PLEASE help me remove the people behind my little Charlie Brown! I've been trying to get rid of them in PS, but due to my limited skill, everything I try just looks clumsy, awkward, and horrible.
The closest I got to anything decent was by using the Magic Eraser to intuitively select the people, and that really did a great job of erasing them, but then what???? What is the best way to fill back in the area that was erased? I would be perfectly happy having just the sky, but I'm not getting anything that looks even close to natural. It would be really nice to have a tool that would simply fill the exact pixels that were just erased....
Any recommendations based on what I've tried, or something completely different, would be MOST welcome!!!!
Have you tried the patch tool or the clone stamp? I'd use a fairly soft brush and zoom in close... Also, work on a copy of the image (if using patch tool) or a separate layer if clone stamping... Good luck - it's a beautif capture!)
@mittens Hi Marilyn. Did you remember to first select a source? It can slip your mind at times. Have the "Source" button highlighted and click where you want "Clone from..." to begin, then place the cursor where you want to begin the "Cone to..." click-hold and drag. You can release and begin cloning to again (from the relative position of where you originally clicked "clone from..."). I think you can also use the ALT (PC) - Click as a shortcut to pick a new "clone from..." source as well, just like Photoshop.
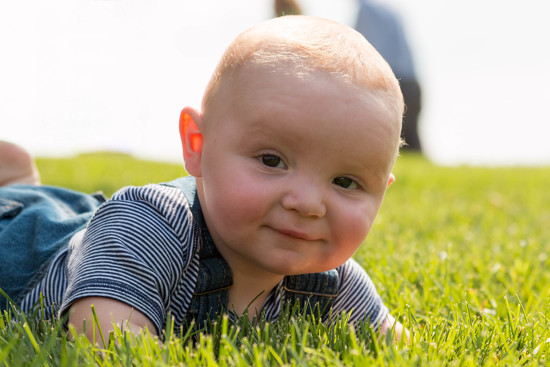
Made a rough selection around the little head with the magic wand tool extended by hand. The stamp tool then results in the @HippieChick13 version above.
Then I added another layer for a small light grey brush, a little blurred at the edge. The layer was a 'lighten' layer. Because of that the light gray brush didn't effect the lighter colors on the hair but brushed away the unwanted dark edges.
I made a copy of a little grass + air piece, put it in an own layer with the same 'lighten' effect. A little rotation placed the piece above the dark 'hill' on the right of the head, removing the unwanted dark edge over there.
finally I made a little gradient effect which gives the sky a blue tint which highlights the complementary red/orange in the boys hair. Also it makes the result a little sunnier effect.
@frankhymus Thank you Frank. I followed what you said and it worked great. The only problem was when I was finished and clicked "apply" it said I had to be a royal member so I couldn't complete it.
@hippiechick13 Thank you HippyChick13. I haven't tried doing it after I've loaded my pic to 365 Project. I'll have to try that sometime. The only problem with that is I would like to have the problem fixed before I post it on my Project. Oh well.
@mittens if you edit the pic with picmonkey after it's posted - the final image you want to show is the one everyone will see. You just have to remember to save it.
you can save the finished one to your computer as well.
@shesnapped I think the trick is to zoom in super close and use the smallest brush available when using the clone tool. You'll really be able to get a good outline with no lumps.
@vignouse thx. I forgot to mention to use the brush careful not to lose the little redish line of hairs around the head in this image. At some places it was darker than the grey backround. Therefor I use a slightly blurred brush, so -zoomed in- you can exaxtly determine how far to go.
The grey background in this image made the work quite easy to do.
@mastermek Good comments Mek! I would have tried to also give the little guy some of his head back, but that might have been too difficult given the bright background. Nice going!
you could select the eye dropper tool, select the colour you want the pixels to be, then press alt onto the paint brush and paint over the bits you want to re-colour. You can then flip between the two using the eye dropper, alt and paintbrush. Hope that makes sense!
@mastermek I have FINALLY come to a point where my image could PRETEND to resemble something similar to yours. My final hurdle is the blue gradient. How did you create the gradient effect?
So you learned one or two things, right Ashley! That is a good thing. The gradient isn't too difficult. I picked a blue (pipet) from the trouwsers and made a gradient in another new layer (I love layers) from the top to the horizon, from blue to transparent, right over his head. Remember my rough selection from the start? I used that to make a selection. By inversing the selection I was able to throw away all the blues over the boys head. Alternative you can take an eraser, circle, little blurred on the edge, and erase all the unwanted blues by hand.
Succes
@mastermek Oh the PANTS!!! I hadn't even thought of grabbing the color from there! Excellent! I've come to something very close to what you've done, and I've learned a LOT about making selections. As I came to a stopping point last night and enlarged my photo once again, I noticed I have some areas right around his head that went "outside of the lines". I need to start over again and retry using everything I've learned from the beginning. My edit has been a learning process all the way thru, so it looks a bit elementary. For some reason, the brush is still giving me a hard time.
Thank you guys SO MUCH for all of your help, detailed instructions, recommendations, tips and tricks! There is no way I could have done this alone! LOVE you guys for being so willing!
Here's the version I'm calling "Fixed" at 11:00 on a Saturday night:
@mastermek Weeeeeeelllllll, that's debatable sometimes. Post processing is my least favorite part of photography, mostly because I really don't know how to do it. And living in BFE, there's not much opportunity for classes. I did, however, FINALLY run across 3 different YouTube series that are actually good, instructional, clear, thorough, educated people, etc, etc, etc. Definitely a major score! Great to have instructions from you, then had to see some videos to figure out exactly how the selection and brushes and gradients actually worked. DEFINITELY learned a LOT about the whole selection process - WHO KNEW!!!!
Well done Ashley. Editing will be more fun if you know how to start. That's what you learned I suppose. It's enough to be able to do little changes to make a shot even more what you expect it to be.

Best of luck!
it will still show the little crown saying you need the Royale membership - but you can use it.
Made a rough selection around the little head with the magic wand tool extended by hand. The stamp tool then results in the @HippieChick13 version above.
Then I added another layer for a small light grey brush, a little blurred at the edge. The layer was a 'lighten' layer. Because of that the light gray brush didn't effect the lighter colors on the hair but brushed away the unwanted dark edges.
I made a copy of a little grass + air piece, put it in an own layer with the same 'lighten' effect. A little rotation placed the piece above the dark 'hill' on the right of the head, removing the unwanted dark edge over there.
finally I made a little gradient effect which gives the sky a blue tint which highlights the complementary red/orange in the boys hair. Also it makes the result a little sunnier effect.
@hippiechick13 Thank you HippyChick13. I haven't tried doing it after I've loaded my pic to 365 Project. I'll have to try that sometime. The only problem with that is I would like to have the problem fixed before I post it on my Project. Oh well.
Thank you both for the great advice.
you can save the finished one to your computer as well.
he's a cutie!
The grey background in this image made the work quite easy to do.
Succes
Succes! I'm curious about the result :-)
Thank you guys SO MUCH for all of your help, detailed instructions, recommendations, tips and tricks! There is no way I could have done this alone! LOVE you guys for being so willing!
Here's the version I'm calling "Fixed" at 11:00 on a Saturday night: