First of all I would like to thank everyone who voted or participated in the last challenge. I am honored and excited to present the new challenge.
Backlighting – I love backlighting photography. For this challenge we are especially looking for a little rim lighting around the subject while making sure your subject is exposed properly (not a silhouette or too much shadows).
A few helpful tips to remember are:
Using a lens hood can be very helpful since you may be shooting directly into the sun. A good idea is to meter your shot on the subject or skin using spot metering.
Using a (diffused) on camera flash set at "-1" or a reflector may be helpful in adding a little light on the subject.
A wider aperture (lower F-stops) can create a beautiful blurred bokeh background effect.
Try to avoid getting sun flares in your photo – this can be achieved by standing in the shade with your camera..
Also for a better results it is good to have a more interesting background that highlights the beautiful rim lighting on the subject rather than just the sky which tends to look blown out.
Different photographers use different methods as you can see from the articles and videos below. I HAVE COPIED THE LINKS IN A COMMENT BELOW SINCE THESE LINKS ARE NOT WORKING
These are all suggestions not hard fast rules. But what we are looking for in this challenge is a properly exposed subject, a rim on all or part of your subject or person, Backlighting works great with portraits but it can be used for many other subjects such as pets, glass bottles, plants and much more.
Here are some links that you may find helpful:
https://iso.500px.com/backlight-natural-light-portrait-photo-tutorial/
Helpful VIDEO - : https://www.youtube.com/watch?v=O6GXRdAR1GM
https://www.youtube.com/watch?v=asr-NjmYO68
https://www.youtube.com/watch?v=8aJ6ebNiSxQ
http://photography.tutsplus.com/articles/mastering-backlighting--photo-9375
For this challenge I would like to encourage you to copy/paste your photo in the discussion of this tread for helpful feedback Be sure to tag your photo technique57 This challenge starts now June 8th ad lasts for two weeks and ends June 24th. Photos must have been taken within this time frame for this challenge
@johnston1364 very interesting shot and when I look at the inside of the pod I'm even more intregued. For this challenge I would like to see a little more of a golden rim light and some type of background verses just a high key white background. That is where the challenge lies in this type of technique.
thanks for the challenge Kathy. here are two attempts, different backgrounds. not sure which I like better and not sure which is more successful for the challenge or if either one is! a translucent flower may not have been the best choice?
Not wildly inspired, just a few bands of color and light for the background, more a quick snap out walking yesterday in Saratoga Springs NY at lunch time to clear the cobwebs.
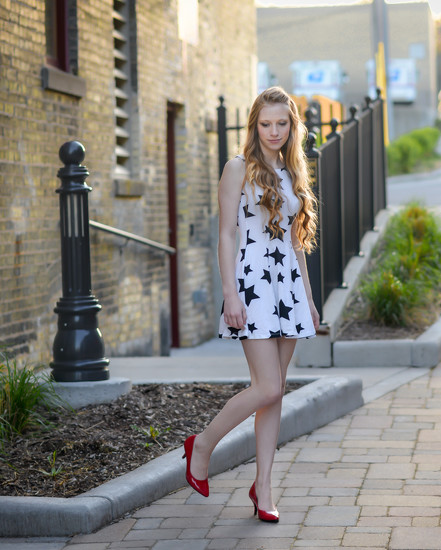
For my taste, the difficulty of this technique is to get a "glow" of light, a true rim on the subject itself, and not ugly edge sharpening artifacts around the (darker) subject in the (bright) background. Live TV appears to be very prone to this effect lately. The first image Kathy posted above is a beautiful example of the technique done nicely. Look at that wonderful glow on the hair itself. Some drama series use this effect over and over again so that it can be like eating too much sugar. CSI Miami I have in mind especially, in every one of their "in the lab" scenes.
@jackies365 I personally like the second shot more than the first because the first image is still a bit dark. Translucent flowers or foliage can be very good subjects for this type of challenge.
@frankhymus Solid objects such as this is more difficult but Frank you did very well. Clearly see the rim light and the detail of the image is lite up and shown very nicely
@myhrhelper I have spent this evening trying to get a decent shot outside with the sun setting and all my shots are rubbish. They are either too blown out at the back or too sillouetted at the front. I sometimes get the rim, but there is usually a big white blob to go with it. I have watched the videos and he makes it look so easy! I haven't got a hood for my camera and am not sure about other what he means by spot metering although I know I have a setting for it. Do I take the photo from the side or directly in front of the sun? I really like the look of these photographs so I want to learn how to do it. I have been using the exposure compensation button, but although it makes the front of the object brighter it doesn't help with the light rim around the object. Any help would be appreciated. I will keep watching the videos.
This photo was blown out and I have reduced the brightness in Photoshop and cropped it. I would like to know how to prevent too much light ruining the picture.
@emma78 Emma never never give you - you are getting close. Couple things - I would not use such a high ISO - 200 is good. Then try setting it so you photo looks close but your subject is just a little too dark but you like the rim lighting then if you have a reflector (you can make one yourself with aluminium foil or even a white card board piece and try to reflect some of the light from behind your subject back on the subject. OR use a low fill flash -1
OR use your exposure setting - this is located on the top of your camera. Under your shutter button to the right +/- then increase the exposure slowly until it is the way you like it. Also you are shooting at such a narrow (very high F number). Depending on the type of your lens you own put your aperture at F5.6 as a starting point and see what you get.
If you don't have a lens hood try stepping in the shade if that is an option - Keeping in mind that your subject's back (if a person) is toward the sun and you yourself are shooting into the sun. You can make your own lens hood but at some point I recommend purchasing them since they are not that expensive. Here are downloadable lens hood patterns you can make out of cardboard: http://www.lenshoods.co.uk/nikon.php
@myhrhelper thank you so much for your advice. I did not realise my ISO setting was set so high! I don't remember setting that high I usually just leave it on 100 or 200 so I didn't think that was the problem. Whoops, now I know it is. I will also try the reflector and hood.
@emma78 I played around a little bit today and I didn't have my reflector with me but the use of my flash was helpful. You don't want too strong of a flash a nice fill flash dialing the strength of it down is helpful. Also I personally would not have my aperture that narrow (higher f stop) either. Using the exposure compensation didn't help me very much during the practice
@myhrhelper Yes, I found the exposure compensation didn't help much, but it did help brighten the subject up so that they were not a sillhouette. It didn't help with the rim of light though. I had my camera setting on P so I will change it so that I can adjust the F stop.
I'm in. I tried this one on the spur of the moment, and later found that the exposure on the camera had been dialed down one f-stop...so it was really dark. It's not what I want, but I figured I'd put it out there just for kicks. I shoot RAW, so I was able to pull it up quite a ways.
@houser934 Love the lighting of the clovers - the exposure is nice on it. @featherstone Really a very nice backlite photo and not the easiest subjects to capture - turned out nice. @kali66 This collage really turned out really well great rim lighting and the detail of the cat is good.
Backlighting is one of my favourite techniques for my macro photos. I used this challenge as an excuse to sit out in the paddock and watch the bees at work :)


Helpful VIDEO - : https://www.youtube.com/watch?v=O6GXRdAR1GM https://www.youtube.com/watch?v=asr-NjmYO68 https://www.youtube.com/watch?v=8aJ6ebNiSxQ http://photography.tutsplus.com/articles/mastering-backlighting--photo-9375
here u go
For my taste, the difficulty of this technique is to get a "glow" of light, a true rim on the subject itself, and not ugly edge sharpening artifacts around the (darker) subject in the (bright) background. Live TV appears to be very prone to this effect lately. The first image Kathy posted above is a beautiful example of the technique done nicely. Look at that wonderful glow on the hair itself. Some drama series use this effect over and over again so that it can be like eating too much sugar. CSI Miami I have in mind especially, in every one of their "in the lab" scenes.
@frankhymus Solid objects such as this is more difficult but Frank you did very well. Clearly see the rim light and the detail of the image is lite up and shown very nicely
This photo was blown out and I have reduced the brightness in Photoshop and cropped it. I would like to know how to prevent too much light ruining the picture.
OR use your exposure setting - this is located on the top of your camera. Under your shutter button to the right +/- then increase the exposure slowly until it is the way you like it. Also you are shooting at such a narrow (very high F number). Depending on the type of your lens you own put your aperture at F5.6 as a starting point and see what you get.
If you don't have a lens hood try stepping in the shade if that is an option - Keeping in mind that your subject's back (if a person) is toward the sun and you yourself are shooting into the sun. You can make your own lens hood but at some point I recommend purchasing them since they are not that expensive. Here are downloadable lens hood patterns you can make out of cardboard: http://www.lenshoods.co.uk/nikon.php
@featherstone Really a very nice backlite photo and not the easiest subjects to capture - turned out nice.
@kali66 This collage really turned out really well great rim lighting and the detail of the cat is good.