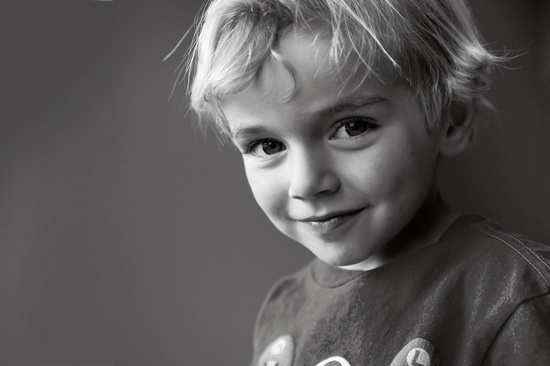
I'm hoping someone can help me. My son has a red tee-shirt on here and the colour has gone all patchy on his tee-shirt (even in the colour version). Is there a way to stop this from happening in RAW. I tried a few things but I couldn't get it to work and it's something that has been bugging me for a while (with reds and pinks). Any advice would be greatful accepted, thanks.
I use LR5, so I may not be able to advise, but in LR, you can use the tonal shades (slides) in bw or diff. bw filters. I would check the saturation for those specific colors first. Sorry, I'm not much help.
It's hard to tell for sure from the black and white image, but the most likely cause is that the red channel has been overexposed, causing it to saturate.
As well as the common overexposure of all colours that most people are familiar with, which causes blue skies or other bright objects to turn completely white, with very strongly-coloured, bright objects, it's possible to overexpose a single channel (red, green or blue) of the photo.
This isn't as noticeable on the rear screen (or elsewhere if you're not looking for it), but causes the overexposed areas to become a solid, bright colour (red, in this case) without capturing any detail or texture. However, slightly darker parts of the shirt are not quite overexposed, so they still retain tonal detail.
When you come to try and recover the highlights, either in the colour photo or by converting to black and white, the areas of the shirt that still have tonal range correct smoothly, retaining the texture and gradations of the cloth, but the overexposed areas have no detail to recover -- you can make them darker, but you can't bring back the texture. This causes the shirt to become blotchy.
The problem is exacerbated because the normal histogram that the camera shows you is an average of all the colour channels, so frequently will not show that one channel is suffering from severe overexposure, because the average is OK. Most cameras today, including your 5D Mark II, have the option of showing an RGB histogram, which has histogram charts for each of the three colours, allowing you to easily see when a colour channel is overexposed. When you shoot a subject with very strong colours in it, especially if there is only one very strong colour in the scene, it is very advisable to keep an eye on the RGB histogram to avoid this.
On your 5D Mark II, you will need to switch to the RGB histogram, as documented on page 146 of the manual:
Unfortunately, like other kinds of overexposure, it's very hard to correct this nicely after the fact -- for best results you really need to get it right in-camera.
@abirkill Thanks so much for your reply Alexis. I actually shot this quite underexposed and I lightened it up a bit in RAW. So I'll go back into the original photo and see if I can manage to lighten his face without lightening the red shirt. I often find that the red or pink is overexposed but the rest of the picture is at the correct exposure, and I'm not quite sure how to best set the camera so this doesn't happen. So if you have any suggestions for that I'd love to hear them :)
I've had a play around with it, and although it's now darker at least I've managed to cut down the patchiness from the first edit. Thanks for all your help @abirkill :)
What software are you using to process your raw files? If you increase the exposure during processing you can cause the same issues as if the shot was overexposed in camera, but this can usually be corrected by other adjustments.
In Photoshop or Lightroom, the 'whites' slider, despite the name, will do a good job of correcting areas of colour that are overexposed by other adjustments without darkening the entire image. Again, the histogram in your raw converter is good to keep an eye on. You can also click on the triangle symbol at the top right of the histogram to show areas of the image which are overexposed (click it again to switch it off).
If the whites slider isn't enough to fix the overexposure, and the image wasn't overexposed in the camera, you can go further and use an adjustment brush with a negative exposure or highlights setting and 'paint' over the overexposed areas, to bring them back into the correct range.
@abirkill Thanks again Alexis. I use CS5 in RAW (which doesn't have the whites slider but similar I think?). I decreased the exposure and brightness overall and then used the gradient tool to bring up the exposure and brightness in the darkest corner of the photo. The second time I edited it I made sure I didn't increase the exposure of the shirt with the gradient tool, which definitely helped.
I used to use the adjustment brush a lot but have stopped using it after finding it a bit patchy around the edges. I did check the histogram on my camera and I can see the red is overexposed although the whole image is under exposed. It is a very red shirt!
I do use the highlights indicator in RAW also, having it on most of the time. I'm wondering if there is a setting on my camera which I can change the contrast amount. I often seem to have parts of my photo under exposed while other parts over exposed. I'm guessing a flash could help me too, which is something I'm hoping to get soon.
@kiwichick The recovery slider in CS5 will do a similar job, although not quite as nicely as the whites slider -- but it's close enough.
Have you tried adjusting the brush settings for the adjustment brush? By using a large size, a high feather amount (50-75), and a low flow setting (5-10), you should get very soft edges unless you are making very strong changes with the brush. It can also help to just reduce highlights with the adjustment brush, which will only affect the brightest parts (although I'm not 100% sure that's an option in CS5)
The raw file from the camera has the maximum amount of detail from the sensor, so although there is a contrast setting in the picture styles menu, it will only affect the JPEG output (although be careful, because it also affects the preview image on the rear screen!). A photo with both overexposed and underexposed areas means that the dynamic range of the scene is too high for the camera to capture in a single shot. Lower ISO settings capture (slightly) more dynamic range, and give you more to work with, but the best option is often to reduce the dynamic range, which for this type of photography could be done nicely by using a flash to act as a 'fill' light.
@abirkill I haven't tried playing with the adjustment brush settings, but will give it another go. I always liked what it did but just got put off when I zoomed in and saw a scattering effect near the edges.
Thanks for all the helpful advice. I sure do appreciate you taking the time to help.
@kiwichick Lesley, I'm so glad you posed this question! It's been a major problem any time I encounter red or magenta (most typically in flowers. @abirkill Alexis, thank you for such an in-depth explanation! I've marked this page to return to to study it all further as there's a lot to take in! (I understood most of what you explained, so I'll do some experimentation. Most appreciated, both of you!
Have you tried changing the mode(in PS) to grayscale before you edit.?Sometimes it is as simple as that and then adjusting the contrast to kill those patches in black and white.
@brianarmoured I haven't tried that Brian. To be honest I always start in colour and then decide after editing if I want to convert it. Not the best way I know, but it's what I'm used to.
Write a Reply
Sign up for a free account or Sign in to post a comment.

As well as the common overexposure of all colours that most people are familiar with, which causes blue skies or other bright objects to turn completely white, with very strongly-coloured, bright objects, it's possible to overexpose a single channel (red, green or blue) of the photo.
This isn't as noticeable on the rear screen (or elsewhere if you're not looking for it), but causes the overexposed areas to become a solid, bright colour (red, in this case) without capturing any detail or texture. However, slightly darker parts of the shirt are not quite overexposed, so they still retain tonal detail.
When you come to try and recover the highlights, either in the colour photo or by converting to black and white, the areas of the shirt that still have tonal range correct smoothly, retaining the texture and gradations of the cloth, but the overexposed areas have no detail to recover -- you can make them darker, but you can't bring back the texture. This causes the shirt to become blotchy.
The problem is exacerbated because the normal histogram that the camera shows you is an average of all the colour channels, so frequently will not show that one channel is suffering from severe overexposure, because the average is OK. Most cameras today, including your 5D Mark II, have the option of showing an RGB histogram, which has histogram charts for each of the three colours, allowing you to easily see when a colour channel is overexposed. When you shoot a subject with very strong colours in it, especially if there is only one very strong colour in the scene, it is very advisable to keep an eye on the RGB histogram to avoid this.
On your 5D Mark II, you will need to switch to the RGB histogram, as documented on page 146 of the manual:
http://gdlp01.c-wss.com/gds/0/0300004270/01/eos5dmkii-im4-en.pdf
Unfortunately, like other kinds of overexposure, it's very hard to correct this nicely after the fact -- for best results you really need to get it right in-camera.
What software are you using to process your raw files? If you increase the exposure during processing you can cause the same issues as if the shot was overexposed in camera, but this can usually be corrected by other adjustments.
In Photoshop or Lightroom, the 'whites' slider, despite the name, will do a good job of correcting areas of colour that are overexposed by other adjustments without darkening the entire image. Again, the histogram in your raw converter is good to keep an eye on. You can also click on the triangle symbol at the top right of the histogram to show areas of the image which are overexposed (click it again to switch it off).
If the whites slider isn't enough to fix the overexposure, and the image wasn't overexposed in the camera, you can go further and use an adjustment brush with a negative exposure or highlights setting and 'paint' over the overexposed areas, to bring them back into the correct range.
I used to use the adjustment brush a lot but have stopped using it after finding it a bit patchy around the edges. I did check the histogram on my camera and I can see the red is overexposed although the whole image is under exposed. It is a very red shirt!
I do use the highlights indicator in RAW also, having it on most of the time. I'm wondering if there is a setting on my camera which I can change the contrast amount. I often seem to have parts of my photo under exposed while other parts over exposed. I'm guessing a flash could help me too, which is something I'm hoping to get soon.
Have you tried adjusting the brush settings for the adjustment brush? By using a large size, a high feather amount (50-75), and a low flow setting (5-10), you should get very soft edges unless you are making very strong changes with the brush. It can also help to just reduce highlights with the adjustment brush, which will only affect the brightest parts (although I'm not 100% sure that's an option in CS5)
The raw file from the camera has the maximum amount of detail from the sensor, so although there is a contrast setting in the picture styles menu, it will only affect the JPEG output (although be careful, because it also affects the preview image on the rear screen!). A photo with both overexposed and underexposed areas means that the dynamic range of the scene is too high for the camera to capture in a single shot. Lower ISO settings capture (slightly) more dynamic range, and give you more to work with, but the best option is often to reduce the dynamic range, which for this type of photography could be done nicely by using a flash to act as a 'fill' light.
Thanks for all the helpful advice. I sure do appreciate you taking the time to help.