Welcome to the Brand New & Revised Camera Settings Challenge 2015
Do some of the camera settings intimidate you? Do you want to learn how to develop your photography skills and learn how to use your camera effectively without always going back to the “auto” function? These challenges are for you!
We are going to walk you through various camera settings starting with the basics and build upon them as we move forward. They will no longer be a competition but rather a type of 365 classroom community. You can join in and follow which ever challenges interest you.
These are designed for those experienced photographers to share their knowledge with others who are anxious to learn and improve their skills.
This week’s challenge is: Using small Apertures in Aperture Priority.
Explanation:
We’ve looked at wide apertures, the part they play in exposure and how they affect DoF in your image and now it’s time to look at the smaller apertures and a bit more about DoF.
Just as large apertures let in a lot of light, as you work your way down through the aperture range you let in less and less light. Each time you move down from one to the next you let in half as much light. While the aperture itself gets smaller the number representing it gets larger. F/16 and f/ 22 are small apertures while f/2.8 is large. As we will be working in Aperture Priority the camera will select the appropriate shutter speed to maintain correct exposure.
Depth of Field, or DoF, refers to how much of your image is, or appears to be in focus. A lens can only focus on one point at a time but the area on either side of that point can still appear acceptably sharp.
The size of this area is influenced by several factors, some you have some control over and some you don’t. The distance to your subject and your choice of lens both affect DoF and you have some control over them. The size of your sensor affects DoF, small sensors give large DoF and larger sensors give less DoF, you have no control over that. The one thing you have complete control over that affects DoF is the aperture. As you close the aperture down DoF field increases, or gets deeper.
In the shots above the camera was focused on the F2.8 and the only change made was to close the aperture down. First from f2.8 down 3 stops to f/8 then a further three stops to f/22. As this was shot in Aperture Priority the camera automatically selected a shutter speed 3 stops slower each time to keep the exposure the same
When and why:
As photographers we are going to be interested in two things when making a decision over which aperture to use. The first is about how much light to let in and the second is about how it will affect the DoF in the image. In the case of using smaller apertures, how much light comes in is often secondary to the effect on DoF. As always you are going to have to juggle shutter speed with aperture to get correct exposure with enough DoF and a reasonable shutter speed while keeping an eye on your ISO.
So how do we make best use of the aperture to get everything we want in focus ?
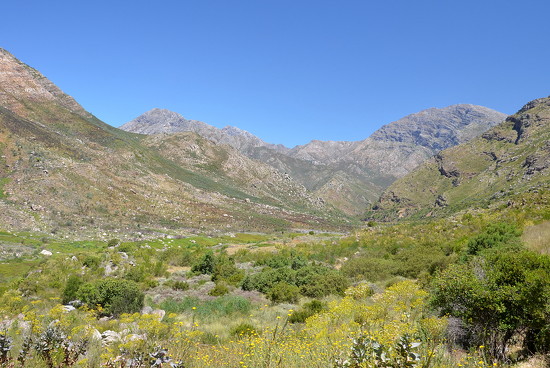
The simplest way is to close down to a really small aperture.
f/16 1/10th sec 18mm ISO 100
There are plenty of occasions when simply stopping down the lens will give you all the DoF you need. This was shot at 18mm on a crop sensor camera so it’s a fairly wide-angle shot. Wide-angle lenses, lenses with a short focal length which give a wide angle of view, will give you more DoF than a longer lens from the same position.
There are other methods you can employ if you want to exercise a bit more control over DoF and they rely on your choice of focal point, the part of a scene you decide to focus on. You might have to select Manual Focus to prevent the camera refocusing when you take the shot.
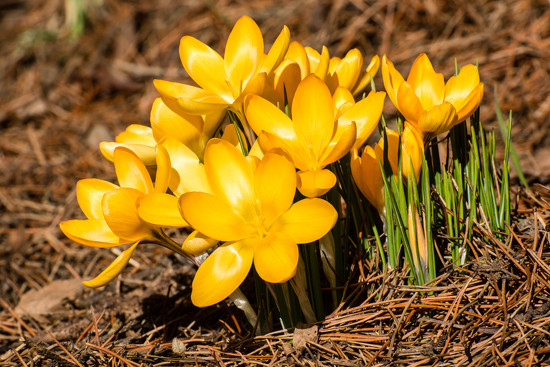
f/16 1/400th sec 140mm ISO 400
The slightly long focal length coupled with close focus meant DoF was very shallow in this shot.
Generally, DoF is divided about one third in front of the focal point and two thirds behind it. By focusing about a third of the way into your subject you can make the most of this.
If I’d chosen to focus on the tip of the closest petal, which I wanted to be in focus, DoF would have been wasted in front and might not have extended far enough back to include all of the blooms in the centre.
As you can see this works quite well when your main subject is quite close and you want it sharp while the rest of the scene is less important as it allows you to control where the DoF will fall.
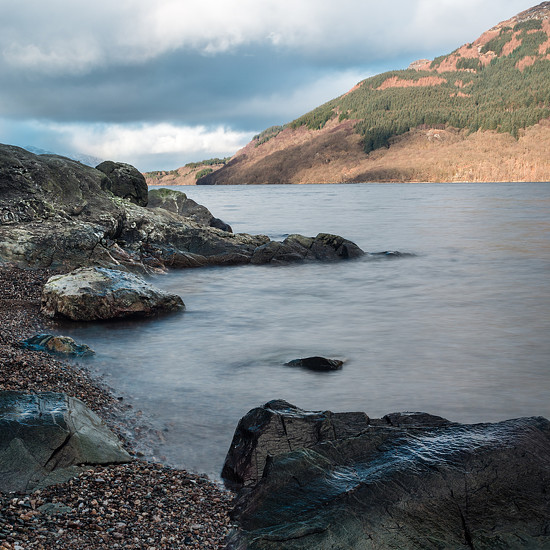
What if it’s a scene that includes foreground interest and you want as much in focus as possible.
f/11 25mm 1/250th sec ISO 400
The temptation here is to focus on the front of bench, choose a small aperture and hope for the best. The focal point here is actually nearer the end of the bench.
The fence on top of the hill is perfectly sharp and you can see that someone has thoughtfully left an empty Irn Bru can under the bench for me to take away. Unlike the first shot which was at f/16 I only had to go as low as f/11 for similar DoF. This has the added advantage of allowing a reasonably fast shutter speed to help keep things sharp and allowed me to use an aperture in the middle of the range which also helps with the quality of the image.
It’s similar to the previous example but on a grander scale and because things are now relatively far away the amount of DoF available is greater.
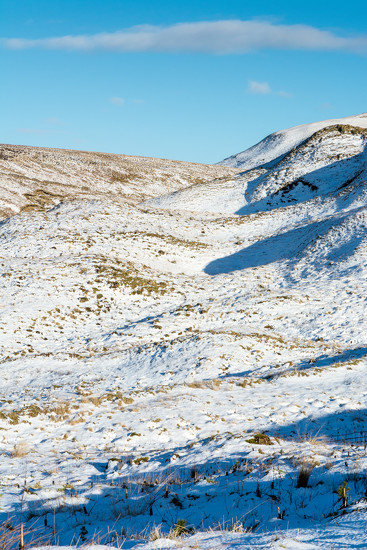
Alternatively, you could have a distant scene with no predominant foreground interest.
f/11 1/640th sec 70 mm ISO 400
In a situation like this your first instinct may be to focus on infinity. Infinity is as far away as your lens can focus and is marked on the focus scale with a symbol that looks like a number 8 on its side: ∞
If you remember from earlier your DoF is split on either side of your focal point you should realise that 2/3rds of your DoF will now be lost beyond infinity. By moving your focal point forward you can reclaim some, or all, of that lost DoF.
Those two examples made some use of something called the Hyperfocal Distance, which allows you to very accurately position and control your Depth Of Field. There’s a link to more detailed information at the end.
Finally:
Remember that only the point you focused on can be in sharp focus, the rest just appears to be, which is why it’s described as acceptably sharp or apparent Depth of Field, and is affected by other factors that are a bit less tangible that what’s covered here. Things like the size of the finished image, the viewing distance, lighting conditions or even the eyesight of the viewer.
Take a look again at the shot of the yellow flowers, view it large, look at it closely, face up to the monitor close. The petals at the back are soft and going out of focus. Now lean right lack.
How – Camera Setting
For this challenge we’ll be using the Aperture Priority setting by setting the camera mode to A or Av and we’ll be using the apertures smaller than your maximum.. Your minimum aperture may be marked on the your lens but is probably f/22, if you have a variable maximum aperture your minimum may also vary from f/22 to f/32 In Aperture Priority mode you choose the aperture and the camera will select the appropriate shutter speed for correct exposure but that doesn't mean you can ignore what's going on with the other settings so keep an eye on the readout in the viewfinder.
Your Challenge:
Make the most of DoF. Whether it is an object or a landscape with important foreground interest, try to make sure everything that should be in focus actually is.
Things to look out for:
• Avoid using your minimum aperture. Because the minimum aperture is a very small hole light passing through it bends and scatters leading to a loss of sharpness. You can still try it, you might not even notice the difference or it might not bother you.
This doesn’t apply if you are using a macro lens as they are designed to perform well at small apertures.
• Check your shutter speed? Small apertures can lead to slow shutter speeds so check the readout in the viewfinder or LCD.
• If you are shooting people or animals it’s usually best to focus on the eyes.
• If you are taking extreme close-ups even stopping the lens right down will only give minimal DoF so whatever is the most important feature is where you should place your focal point.
Critiquing your shot:
• Is your shot properly exposed?
• Is it sharp ? If not , why not?
• Is everything you wanted in focus actually in focus ?
• Do you notice anything about the shutter speeds your camera is selecting?
• If you are using Auto ISO what’s happening with that?
(ISO will be covered in more detail after the aperture challenges but you should still be aware of what’s going on.)
This challenge starts today, Monday, February 16th and lasts until Sunday, February 22nd. Please use the tag: camerasavvy-smallaperture
Experienced photographers who are knowledgeable in this particular setting are encouraged to offer “kind and constructive” suggestions on the posted entries. Those entering this challenge want to learn and improve.
For these challenges we encourage you to post your photo(s) in this thread to receive feedback and/or tips on what could be done to possibly improve the image (based on this specific challenge). We will not have a voting but we will select a few honorable mentions at the end of the challenge.
ASK QUESTIONS, we are all here to help you learn!
Expect to receive constructive suggestions on how to improve your skills.
How to post your photo to this discussion:
1) Go to your page that has the photo you wish to post.
2) Click on the three dots, and copy the code from the pop up box
3) Return to this thread and paste the code under comments
Sounds v interesting and I will have a good read as I tend to like macro and close-up for preference and never quite sure how small an aperture to use for other work. Thank you!
Don't know if this counts, but here goes… I used f/14 for this shot because I wanted the entire water balloon and hands in focus but not the child's face… I used a 100mm macro so the DOF is quite small even with f/14 which is quite interesting… :) Critiques welcome!
These articles are so helpful and easy to understand. I can't always participate, but feel I am learning a LOT anyway. Thank you for making the effort to post these! I'm sure it's very time consuming for you. :)
I struggle with landscapes. This was f11 at 1/60 but I could have sent any of the shots I took today, ranging from f11 to f18, and the sharpness (or lack of it) of the distant hill seemed exactly the same, whatever the aperture. So is it all to do with my focal point? I tried to focus 1/3 of the way in on some, and focussed on the distant hill in others, and again there seems to be no appreciable change to the DoF. I would be very grateful for any light any of you kind folks can shed :)
@camerasavvy thank you for organising this, I haven't been keeping up at all with the photography but I'm finding the articles really interesting. I'm hoping to start working through the techniques soon!
@pistache A tripod is almost essential for shots this complex; you want absolutely no camera movement. Complex because you have the foreground right under your camera, and yet you want the hills sharper too, so you have to be extremely stable for the back to behave sharply. I would try to place the focus point almost all the way along the road before the bend, and with the tripod, try say f/16 a stop narrower; the shutter speed will drop. Keep the ISO as low as you can to keep noise out of the equation (more on that next week), and aperture not any higher or you'll run into the "softness" problem of small aperture diffraction. And you might also want to do a "timed release" (or a remote release) so that there will be absolutely no camera bounce when you press the shutter. Fortunately you don't have "mirror shock" problems to worry about with your Olympus mirror-less camera.
Is this a jpeg or raw? If a jpeg, I would select a different "picture control" which should help the sharpness. Many cameras have one labeled "landscape" even. You might even want to edit in extra sharpness in-camera. You'll have to consult your camera menus and manual for all of this.
The write-up at the top also had suggestions to make sure the focus stays exactly as you want it. Use the Auto Focus to get up to the bend (or a little in front of it) and then carefully change the focus mode to Manual so focus stays locked at that distance even as you might want to reframe the shot. You might also have AF-Lock options on your camera - the so-called back button AF. That would work well too.
But a key point is surely *no camera motion" and so a sturdy tripod is key. Yes, I know, extra bother, but the shot is so very complex as I said. Pro landscape photographers use a tripod consistently, so we should be no different if we want the best results with tough shots.
I hate to mention it, but this is exactly the sort of frame that a camera phone with its tiny, tiny sensor has no trouble at all with, front to back, huge DoF and AUTO as well. Also, try a "landscape" scene mode if your camera has one. Yes, I know this series is all about getting out of such AUTO things, but sometimes nothing will beat the specialized effects modes in tough situations.
@lambda It's a great shot and a great illustration of well controlled Depth of Field. You knew how much you wanted in focus and selected your aperture accordingly.
How many tries did it take to get that ?
@pistache At 17mm on a micro four thirds camera an aperture of f/ll is plenty to include the distant hills and fairly close foreground detail.
I've squinted at that shot as large as I could get and the pylons in the distance appear to be in focus as do the brambles hanging over the wall in the foreground.
Remember that although you may have uploaded a high resolution 5Mb file the one we get to look at is compressed and resized to a fraction of that so not a particularly accurate representation of the quality of the original but I'd tend to agree with Frank @frankhymus
in that it's more technique than a lack of Depth of Field.
Sharpening isn't cheating, it's a necessary part of the process, if you start from a RAW image it's an essential part and there is no substitute for solid support :)
I attempted to focus on the green flags. I was trying to capture some of the sense of diversity at UNE during O Week. Please feel free to comment.
18mm F16 1/40 ISO 250
@frankhymus@iqscotland Thank you both so much for your thoughtful & helpful advice! I do shoot raw so I shall certainly be sharpening images in the future. And using a tripod! Quite reassuring to hear that this was a complex shot - need to be a bit more patient with myself. Thanks for the 10 tips article which was indeed very helpful. Oh, and I'll be bringing the phone out for comparison as well :)
@pistache Hi Clare. Good luck! I always sharpen my images in Photoshop, so good luck with that. Just don't overdo it. I am guilty of overdoing it sometimes, so I speak from experience. :) As the other link says, and I commented on it there as well, images bound for the Internet need *less* extra sharpening than those that will be printed., so just watch when downsizing large images, or having them downsized automatically for you. Like for instance this one of yours would be susceptible to having nasty glowing edges at the sky/hill horizon (a high contrast edge already) if overdone.
@weebindi2@bizziebeeme Both of your shots exhibit plenty of depth of field.
Both of you have opted for f/16 where f/11 would probably have been sufficient. It's not really a problem for shots on an internet forum but in other situations f/11 would have it's advantages
Helen, your shot has nothing at any great distance, the furthest objects are the roofs of the buildings. Focusing where you have, or a little closer, but choosing f/11 should still keep the group in the foreground sharp but extra stop you save would give you a safer shutter speed.
Similary for you @bizziebeeme, you don't have anything particularly close so selecting f/11 and focusing on the centre of the row of boats should be fine. In your case the extra stop you save could lower your ISO to 200. You could probably drop to 100 but then you'd need to drop your shutter speed which might not freeze the bird in flight.
F/11 also falls in what tends to be the better part of the range for best optical performance but don't get too hung up on that :)
My first attempt at a landscape which wasn't my usual point and hope technique:-) There is a lot of room for improvement still but I was pleased with the detail on the buildings in the distance.
Camera set to 'A' 1/80 sec f11 and ISO 200 (Auto)
I like this shot better, perhaps simply just because of the brightness of it, but this one is at F/25, 24mm, 1/640, and also ISO 200. again, I made sure to concentrate my focus on the big light. will appreciate any and all direction i can get. Thank in advance!
@thistle f/11 has been a good choice here . I don't know if your lens has vibration reduction or you broke out the tripod again but it certainly looks to be free from shake even at 1/80th. The distant tree line looks sharp as does the grass in the foreground . It's hard to tell how close in the Depth of Field comes but I'd still be tempted to crop off some of the bottom of the frame for a bit more balance.
You have some nice layers of fields and trees but maybe a bit to much empty space in the foreground.
A little boost in contrast will give it a bit more punch and enhance the overall sharpness.
As you can see nothing good about this collection of images. Trying to get depth of field in low light, handheld was virtually impossible.
I enjoyed the trying though and learnt a lot about what I can and can't do with my camera on AV setting. Any comments welcome.
Today's photos. As recommended I used f11 and focussed on the cathedral. I didn't have my lens at its full zoom as recommended elsewhere and I rested it on the stair railings. Any comments please.
@weebindi2 Beautiful view Helen. I think you executed the camera challenge well, nice DoF, good stability and all-round well chosen exposure. What does play havoc with sharpness and clarity on days like this is atmospheric haze, nothing to do with the challenge of course, nothing you can do in-camera about that. I did put some suggestions in your album on how to begin to tackle it, so as not to clutter this thread. The latest edition of the excellent editor DXO Optics Pro even has an effective "one click" general solution for issues exactly like this.
I do prefer the image without the internal frame, it is strong enough to stand alone I feel, and personally I don't like frames anyway. Personal taste of course, others like the effects. A small composition thing, I might have elected to have the cathedral at the 1/3 or 2/3 vertical line in the frame, Rule of Thirds and all that, although its overall position between the two clumps of foreground trees does set it off OK.
@iqscotland Thanks for taking the time to look and comment. No tripod this time but I used a fencepost instead! My 50mm lens doesn't have VR. I see what you mean and I've had another go. It really does look better. I don't want to post it and block up everyone's home page with repeat attempts. Is there any way of posting without doing this? Thanks for your help it's amazing what a difference it makes. I'm learning do much from this challenge.
F8.0 (minimum aperture on the Lumix FZ200); ISO 100 (Auto); 1/250
Conditions were windy and hazy. Shot was handheld. The shot is not as clear as I would like probably due to the haze and I probably should have used a tripod.
I selected f/22 for this shot for similar but different reasons. I have challenged myself to capture the feel of golden hour in B&W. In this shot, I knew I wanted to accentuate the details of the architecture as well as the shadow.
@thistle You could put your other attempts on Facebook or something and link to them but really I wouldn't worry about posting a few extra shots. You have an ACE account so there's three a day right away. Filling up feeds is only really a problem if you have a big backlog to post but even then you can stagger them over a period of time :)
Way to cold to get out so did the best I could. I tried to focus just above the center of the window. Exp. 0.0025 f/7.1 ISO 200 maybe should have been 100, not sure. 18 mm. Was having trouble with darker inside and so light outside with the white of the snow.
@voiceprintz Really like your tree shot. F22 is probably overkill in the Depth of Field department but you've still managed to keep a fast shutter speed and your ISO down low. Nice one :)
Here's my shot...f/9.5 1/30s. I like the building but the sky is so washed out. I did not have time to stand here and try different apertures (I was on a college tour and they kept us moving!) but this has happened to me before. Granted it was a cloudy and snowy day..we kept getting snow squalls. but while editing in order to get the building right the sky got washed out even more. Thoughts? I wish editing programs had a simple one button "sky" changer! :)
Finally had a chance to take some photos. All of mine are indoor shots. It's way to cold to be outside for me to spend anytime out there trying to figure out my camera.
Camera: Nikon D3200
Setting: A Mode
Focal Length 55mm
1/20...f7.1...ISO-1600
I know I didn't get to a small aperture, when I tried the photo was blurry due to a lot of camera shake. My shutter speed was always slow even going with my max ISO (my ISO isn't auto). This is the best picture of the bunch that I took.
Please let me know what I may be doing wrong. Is there something indoors that may be able to get better shots of using a small aperture?
@kalm A slightly smaller aperture would have helped here but this is a good illustration of the compromises we often have to make. Your ISO is as high as it will go and selecting a small aperture will still result in a shutter speed too slow to hand hold so you have to find the middle ground. Small enough aperture to get as much Depth of Filed as possible but fast enough shutter speed to avoid camera shake.
If you are shooting stationary subjects indoors the key to using small apertures is to steady the camera. If you don't have a tripod work with what you have. Table top, pile of books, folded up sweater stuff like that. Once the camera is steady and out of your hands you can turn the ISO right down a select whatever aperture you want. Use the self timer to fire the shutter so the camera doesn't move when you take the shot.
@dianen If you are faced with tricky lighting, where you think the camera's built in meter may not be accurate, you could try bracketing. I think your D5000 has an auto bracket feature built in. This will explain better than the attempt I was going to make at it :)
@iqscotland@thistle When ever I have challenges or want to post more photos but can't because I don't have an account I just use an unused past date - ie May 2, 1998 You can always go back and delete that photo later if you want.
@adayinmallacoota The smaller sensor in your fz200 actually means you have more Depth of Field to play with. F/8 on your camera will give just as much as f/22 on a DSLR but you'll find it much easier to manage your shutter speed :)
This is my Small Apertures Photo - I used manual focus to try to get the focus 1/3rd in. I think I missed getting the right spot.
The photo on the left is at f6.3 & the one on the right is f18. When I was at f18 the shutter slowed down & the ISO increased to let more light in.
I can see that I have more in focus in the f18 shot. The branches of the tee on the right & the trees next to the road are in focus, as are the border plants on the right hand side. I can also see the power pole & wires in the background on the left are in focus.. Looking at the little posts on the left side of the driveway in the f18 shot I can just make out the individual tops, but in the f6.3 they are blurred together.
However I haven't gotten the focus all the way to the end of the road There is a short fence on the right hand side at the end of the road that isn't in focus. I'm not sure if that is because I wasn't focused properly 1/3rd of the way in or if it was never going to be in focus no matter what because it was too far away.
I have a couple of small aperture photos that I took whilst on holiday last week. Any feedback on how to improve would be very much appreciated (as always).
Both photos were taken with my Lumix DMC-GH4
Lense 12-35mm . Auto Shutter & Auto Iso. Lense Stabiliser.
Shot 1. ISO200 12mm f/5 1/200 - Hand Held
Shot 2. Iso 200 12mm f/7.1 1/640
I really struggled getting everything into focus. I tried various settings for focus from the end of the rocks in the foreground to the hills in the background, but just could not get it right.
I didn't have a tripod with me, so balanced the camera on top of my bag on a rock and set it on a 10 sec timer.
@jennymallett I don't know what focal length your lens was but f/18 was probably enough to have the end of the road in focus however, your ISO of 800 is going to lose you a bit of fine detail so something small and distant may not look particularly sharp if you look closely.
With your shutter speed of a 1/13th of a second I'm hoping the camera was on a tripod or supported in some way but if it was on a tripod you wouldn't have needed the high ISO in either shot.
ISO will be covered next week but that's a nice interpretation of this weeks challenge :)
@deborah63 Your first shot shows good Depth of Field but placing the island and strip of water close to the middle hasn't produced the strongest composition. This shot would be better suited to a crop like your second shot with about two thirds of the frame using the sky or if you prefer, two thirds using the beach.
If you don't use it already Google Rule of Thirds for an easy way to compose. Your second shot follows it quite well so maybe you already knew that.
You can also see how clear the atmosphere is in your first shot, which is early in the morning, and how this has improved the clarity of your shot compared with the the second one which has a bit of haze in the distance.
I struggled a bit with decided which aperture to use. I have read all your comments especially interesting that the smaller aperture not always the best. I found that f11 worked quite well in this against the narrower.
Handheld F11. 1/100. Auto Iso 100. FL31mm
I could have done with a sharper defined distant image for this challenge. The days have been quite grey. I am posting two of the same shots with slightly different apertures and would appreciate any comment on them. I was trying to show the distant tree line. I think this is probably the sharper of the two.
Handheld F14. 1.125. Auto iSO 250. FL 92mm.
My focus here was the Farallon Islands 30 miles off the coast of SF. Not often can we view the islands so it was a treat to see them. Thought it might be a better shot than the one I uploaded yesterday. f5.6 1/1250 200(auto) Handheld
@mzbull For someone who's never been to San Francisco your Farallon Islands shot is interesting, I didn't realise there were Islands there and that's a view of the city I've never seen before.
I do prefer your Orinda Hills shot for this challenge though. If you were to crop that shot a, little of the bottom, and a bigger bit of the top, you'll have a more balanced composition and a more panoramic feel that will suit both the view and the wide angle lens you have used :)
@jennywren First shot is definitely the strongest. You've made good use of both aperture and foreground interest, it's a wee bit central in the shot but it's sharp and leads to a much stronger composition.
Of the second pair of shots, the first will be sharper though use of lower ISO and faster shutter speed. Aperture is ample in both cases.
I would have placed the hedgerow nearer the bottom of the frame rather than through the middle where it tends to cut the shot in half :)
Aperture f/10, shutter speed 1/15, ISO 6400, focal length 31 mm
1. Don't know if my shot is properly exposed. It looked too light to me. Is ap in relationship to focal length? If so, shouldn't it be f/30?
2. Not as much sharpness and clarity as I would like, but not due to dof, I think. Was disappointed.
3. I guess it's in focus. Going to read the ap/focal length/focus article. I really don't know how to focus except to move around the little focal ring on the end of the lens.
4. My thought is that the camera auto-set shutter speed too slow while I shot in aperture mode. I'm beginning to wonder if this is a pattern with my camera, as it also happened in one of the shots on the last challenge?
5. I think ISO automatically went high to compensate for slower shutter speed.
I took a similar shot posted the previous day with a wider aperture, but was concerned there wasn't much difference in DOF when I compared the two shots. That's the best I can do for analysis. Thanks!!! @iqscotland
@gratefulness
1. It looks a wee bit light but easily fixed if you shot a RAW file. Are you not thinking of the rule of thumb for safe hand holding shutter speeds. For a full frame camera it's usually considered to be 1/ focal length. As you are using a crop frame camera you have to be a bit more conservative as your lenses give a narrower angle of view , acting like a longer focal length. For your 31mm you should be looking at at least 1/60th. I realise you probably have image stabilisation but your technique still has to be good to make the most of it.
2. Depth of Field is probably fine but the image isn't sharp because there's a bit of camera shake present.
3. Moving the focusing ring is all you do but it can actually be quite tricky. The focusing screen on your camera is designed be easy to look at and might not be particularly bright, or sharp, depending on the lens you are using. It's main function is to show you a nice picture while the AF takes care of focus. It takes a bit of practice to focus manually, older manual focus cameras had focusing aids incorporated into the screen.
4. The camera set the shutter speed to slow to hand hold because it had no choice. In Auto ISO you are limited to 6400 which you have reached, you have manually selected f/10 so the only other variable to get the right exposure is the shutter speed.
The other options available to you are to switch to manual ISO which allows you to select an even higher ISO which in turn would give you a faster shutter speed. Alternatively you could open your aperture up and sacrifice some of your Depth of Field in exchange for a faster shutter speed and a sharper image. Or you could do both.
5. Your ISO went up because you selected a small aperture in a relatively low light situation.
The best answer in a situation like this is a tripod, manually set low ISO and a slow shutter speed. Probably not practical in this case but just sitting the camera on a table or something would do.
Hand held a shot like this is always going to be a compromise. You have to balance the loss in quality over the risk of camera shake with to slow a shutter but still consider your aperture and Depth of Field
This was a high ISO shot and that's what's being covered this week if you wanted to post it in the current challenge and maybe get some other opinions :)
Thanks so much for your feedback and instruction. Need to learn my software to shoot in RAW (I think). I'm putting it on my list for this month. Must turn IS back on.
I noticed the little red meter in the viewfinder (different from live view on the lcd, if I'm using these terms correctly) and wondered what that was for...So it's for focus? Yes, I think I need practice with focus!
Wish I would have selected a smaller aperture, will probably need to look into tripods and a nd or polarizing filter or two. I think 6400 is the highest shutter speed for my camera...
Now posted to the high ISO challenge thread. Thank you for your assistance, and suggestion!
@gratefulness ISO 6400 is the upper limit for Auto ISO but you can manually set it as high as 25600
If the meter you can see has a +/- scale with a zero in the middle then that's your exposure meter. If it looks more like a set of brackets with a circle in the middle < o > that's your focus confirmation.
Write a Reply
Sign up for a free account or Sign in to post a comment.


@acsstudios @adayinmallacoota @aecasey @aliha @alinz @alisonp @andrina @angelbattlebross @aponi @april16 @aquaina @autumneden2015 @axmartinez @barb_b @barbtatum @barneyone @berta @billy52 @bizziebeeme @blinkny @brigette @brittwd @bsheppard @callymazoo @candysiegmueller @cathieg @catsmeowb @ccb @cdean1956 @christophercox @clake @craazyal @cruiser @cynthiak @darylo @deb60 @deborah63 @deverest @dianen @dmcoile @dsp2 @elliotwb @emblegemble @fivefingerofdeath @francoise @frankhymus @froggie0628 @gabigabs @gai @grammyn @gratefulness @harts @homeschoolmom @houser934 @iqscotland @ithinkithunk @janet365 @jannkc @jantan @jbd1962 @jehill1159 @jennymallett @jennywren @jewelofdenial @jocasta @jocee @joeyl @julieco @juliedduncan @justaspark @kalm @karlow75 @kauaikris @kerrynz @kimmy15 @ksyvarth @kwiksilver @la_photographic @ladygator @lauramalone82 @leestevo @lensenvy @lfreeman1230 @libertylady @lifepause @linah @lizfawn @lsquared @lstasel @ludgate @luka365 @lynnb @lynnilou @maaayke @madamelucy @maishanny @melinareyes @miata2u @milaniet @motherjane @mpratt @mrslaloggie @musecreative @mzbull @mzzhope @nanderson @newbank @nickspicsnz @northy @nosarian @olivetreeann @omglooksquirrel @oreos808 @overalvandaan @pamknowler @panthora @paulam @paulaw @pistache @polarvrtx @psychegrrrl @quietpurplehaze @quintus @randystreat @rangerxenos @ribbet9 @rosie1610 @rosiekerr @salza @sarahsthreads @shazzym @slash @soseema @sparkle71 @squamloon @stepheesue @summerfield @susie1205 @taffy @tahoemb @takcarol @thejazzyj @theresefriis @thistle @transatlantic99 @trinda @tstb @ukandie1 @voiceprintz @weebindi2 @wingwatche r@yaorenliu @yeshanghai @zosimasy
You don't need to be on the list to take part but if you'd like to added just post a request in this discussion thread :)
I struggle with landscapes. This was f11 at 1/60 but I could have sent any of the shots I took today, ranging from f11 to f18, and the sharpness (or lack of it) of the distant hill seemed exactly the same, whatever the aperture. So is it all to do with my focal point? I tried to focus 1/3 of the way in on some, and focussed on the distant hill in others, and again there seems to be no appreciable change to the DoF. I would be very grateful for any light any of you kind folks can shed :)
Is this a jpeg or raw? If a jpeg, I would select a different "picture control" which should help the sharpness. Many cameras have one labeled "landscape" even. You might even want to edit in extra sharpness in-camera. You'll have to consult your camera menus and manual for all of this.
The write-up at the top also had suggestions to make sure the focus stays exactly as you want it. Use the Auto Focus to get up to the bend (or a little in front of it) and then carefully change the focus mode to Manual so focus stays locked at that distance even as you might want to reframe the shot. You might also have AF-Lock options on your camera - the so-called back button AF. That would work well too.
But a key point is surely *no camera motion" and so a sturdy tripod is key. Yes, I know, extra bother, but the shot is so very complex as I said. Pro landscape photographers use a tripod consistently, so we should be no different if we want the best results with tough shots.
I hate to mention it, but this is exactly the sort of frame that a camera phone with its tiny, tiny sensor has no trouble at all with, front to back, huge DoF and AUTO as well. Also, try a "landscape" scene mode if your camera has one. Yes, I know this series is all about getting out of such AUTO things, but sometimes nothing will beat the specialized effects modes in tough situations.
There is also a related thread post http://365project.org/discuss/general/24887/10-tips-for-sharper-photos-even-when-zoomed-in that is surely related to this week's "narrow aperture" theme. It's an easy read, you might want to check it out.
Good luck!
How many tries did it take to get that ?
I've squinted at that shot as large as I could get and the pylons in the distance appear to be in focus as do the brambles hanging over the wall in the foreground.
Remember that although you may have uploaded a high resolution 5Mb file the one we get to look at is compressed and resized to a fraction of that so not a particularly accurate representation of the quality of the original but I'd tend to agree with Frank @frankhymus
in that it's more technique than a lack of Depth of Field.
Sharpening isn't cheating, it's a necessary part of the process, if you start from a RAW image it's an essential part and there is no substitute for solid support :)
I attempted to focus on the green flags. I was trying to capture some of the sense of diversity at UNE during O Week. Please feel free to comment.
18mm F16 1/40 ISO 250
f16 1/320 ISO400
This is the jpeg version and I have not edited/processed it all...sooc
Both of you have opted for f/16 where f/11 would probably have been sufficient. It's not really a problem for shots on an internet forum but in other situations f/11 would have it's advantages
Helen, your shot has nothing at any great distance, the furthest objects are the roofs of the buildings. Focusing where you have, or a little closer, but choosing f/11 should still keep the group in the foreground sharp but extra stop you save would give you a safer shutter speed.
Similary for you @bizziebeeme, you don't have anything particularly close so selecting f/11 and focusing on the centre of the row of boats should be fine. In your case the extra stop you save could lower your ISO to 200. You could probably drop to 100 but then you'd need to drop your shutter speed which might not freeze the bird in flight.
F/11 also falls in what tends to be the better part of the range for best optical performance but don't get too hung up on that :)
Camera set to 'A' 1/80 sec f11 and ISO 200 (Auto)
I like this shot better, perhaps simply just because of the brightness of it, but this one is at F/25, 24mm, 1/640, and also ISO 200. again, I made sure to concentrate my focus on the big light. will appreciate any and all direction i can get. Thank in advance!
You have some nice layers of fields and trees but maybe a bit to much empty space in the foreground.
A little boost in contrast will give it a bit more punch and enhance the overall sharpness.
I enjoyed the trying though and learnt a lot about what I can and can't do with my camera on AV setting. Any comments welcome.
I do prefer the image without the internal frame, it is strong enough to stand alone I feel, and personally I don't like frames anyway. Personal taste of course, others like the effects. A small composition thing, I might have elected to have the cathedral at the 1/3 or 2/3 vertical line in the frame, Rule of Thirds and all that, although its overall position between the two clumps of foreground trees does set it off OK.
Good shooting though!
F8.0 (minimum aperture on the Lumix FZ200); ISO 100 (Auto); 1/250
Conditions were windy and hazy. Shot was handheld. The shot is not as clear as I would like probably due to the haze and I probably should have used a tripod.
Camera: Nikon D3200
Setting: A Mode
Focal Length 55mm
1/20...f7.1...ISO-1600
I know I didn't get to a small aperture, when I tried the photo was blurry due to a lot of camera shake. My shutter speed was always slow even going with my max ISO (my ISO isn't auto). This is the best picture of the bunch that I took.
Please let me know what I may be doing wrong. Is there something indoors that may be able to get better shots of using a small aperture?
If you are shooting stationary subjects indoors the key to using small apertures is to steady the camera. If you don't have a tripod work with what you have. Table top, pile of books, folded up sweater stuff like that. Once the camera is steady and out of your hands you can turn the ISO right down a select whatever aperture you want. Use the self timer to fire the shutter so the camera doesn't move when you take the shot.
http://digital-photography-school.com/automatic-exposure-bracketing-aeb/
The photo on the left is at f6.3 & the one on the right is f18. When I was at f18 the shutter slowed down & the ISO increased to let more light in.
I can see that I have more in focus in the f18 shot. The branches of the tee on the right & the trees next to the road are in focus, as are the border plants on the right hand side. I can also see the power pole & wires in the background on the left are in focus.. Looking at the little posts on the left side of the driveway in the f18 shot I can just make out the individual tops, but in the f6.3 they are blurred together.
However I haven't gotten the focus all the way to the end of the road There is a short fence on the right hand side at the end of the road that isn't in focus. I'm not sure if that is because I wasn't focused properly 1/3rd of the way in or if it was never going to be in focus no matter what because it was too far away.
Both photos were taken with my Lumix DMC-GH4
Lense 12-35mm . Auto Shutter & Auto Iso. Lense Stabiliser.
Shot 1. ISO200 12mm f/5 1/200 - Hand Held
Shot 2. Iso 200 12mm f/7.1 1/640
I really struggled getting everything into focus. I tried various settings for focus from the end of the rocks in the foreground to the hills in the background, but just could not get it right.
I didn't have a tripod with me, so balanced the camera on top of my bag on a rock and set it on a 10 sec timer.
With your shutter speed of a 1/13th of a second I'm hoping the camera was on a tripod or supported in some way but if it was on a tripod you wouldn't have needed the high ISO in either shot.
ISO will be covered next week but that's a nice interpretation of this weeks challenge :)
If you don't use it already Google Rule of Thirds for an easy way to compose. Your second shot follows it quite well so maybe you already knew that.
You can also see how clear the atmosphere is in your first shot, which is early in the morning, and how this has improved the clarity of your shot compared with the the second one which has a bit of haze in the distance.
I struggled a bit with decided which aperture to use. I have read all your comments especially interesting that the smaller aperture not always the best. I found that f11 worked quite well in this against the narrower.
Handheld F11. 1/100. Auto Iso 100. FL31mm
I could have done with a sharper defined distant image for this challenge. The days have been quite grey. I am posting two of the same shots with slightly different apertures and would appreciate any comment on them. I was trying to show the distant tree line. I think this is probably the sharper of the two.
Handheld F14. 1.125. Auto iSO 250. FL 92mm.
This is the second shot of the same scene. Again trying to focus on the tree skyline.
F18. 1/125. Iso 500. FL.92mm.
I do prefer your Orinda Hills shot for this challenge though. If you were to crop that shot a, little of the bottom, and a bigger bit of the top, you'll have a more balanced composition and a more panoramic feel that will suit both the view and the wide angle lens you have used :)
Of the second pair of shots, the first will be sharper though use of lower ISO and faster shutter speed. Aperture is ample in both cases.
I would have placed the hedgerow nearer the bottom of the frame rather than through the middle where it tends to cut the shot in half :)
Aperture f/10, shutter speed 1/15, ISO 6400, focal length 31 mm
1. Don't know if my shot is properly exposed. It looked too light to me. Is ap in relationship to focal length? If so, shouldn't it be f/30?
2. Not as much sharpness and clarity as I would like, but not due to dof, I think. Was disappointed.
3. I guess it's in focus. Going to read the ap/focal length/focus article. I really don't know how to focus except to move around the little focal ring on the end of the lens.
4. My thought is that the camera auto-set shutter speed too slow while I shot in aperture mode. I'm beginning to wonder if this is a pattern with my camera, as it also happened in one of the shots on the last challenge?
5. I think ISO automatically went high to compensate for slower shutter speed.
I took a similar shot posted the previous day with a wider aperture, but was concerned there wasn't much difference in DOF when I compared the two shots. That's the best I can do for analysis. Thanks!!! @iqscotland
1. It looks a wee bit light but easily fixed if you shot a RAW file. Are you not thinking of the rule of thumb for safe hand holding shutter speeds. For a full frame camera it's usually considered to be 1/ focal length. As you are using a crop frame camera you have to be a bit more conservative as your lenses give a narrower angle of view , acting like a longer focal length. For your 31mm you should be looking at at least 1/60th. I realise you probably have image stabilisation but your technique still has to be good to make the most of it.
2. Depth of Field is probably fine but the image isn't sharp because there's a bit of camera shake present.
3. Moving the focusing ring is all you do but it can actually be quite tricky. The focusing screen on your camera is designed be easy to look at and might not be particularly bright, or sharp, depending on the lens you are using. It's main function is to show you a nice picture while the AF takes care of focus. It takes a bit of practice to focus manually, older manual focus cameras had focusing aids incorporated into the screen.
4. The camera set the shutter speed to slow to hand hold because it had no choice. In Auto ISO you are limited to 6400 which you have reached, you have manually selected f/10 so the only other variable to get the right exposure is the shutter speed.
The other options available to you are to switch to manual ISO which allows you to select an even higher ISO which in turn would give you a faster shutter speed. Alternatively you could open your aperture up and sacrifice some of your Depth of Field in exchange for a faster shutter speed and a sharper image. Or you could do both.
5. Your ISO went up because you selected a small aperture in a relatively low light situation.
The best answer in a situation like this is a tripod, manually set low ISO and a slow shutter speed. Probably not practical in this case but just sitting the camera on a table or something would do.
Hand held a shot like this is always going to be a compromise. You have to balance the loss in quality over the risk of camera shake with to slow a shutter but still consider your aperture and Depth of Field
This was a high ISO shot and that's what's being covered this week if you wanted to post it in the current challenge and maybe get some other opinions :)
.
I noticed the little red meter in the viewfinder (different from live view on the lcd, if I'm using these terms correctly) and wondered what that was for...So it's for focus? Yes, I think I need practice with focus!
Wish I would have selected a smaller aperture, will probably need to look into tripods and a nd or polarizing filter or two. I think 6400 is the highest shutter speed for my camera...
Now posted to the high ISO challenge thread. Thank you for your assistance, and suggestion!
If the meter you can see has a +/- scale with a zero in the middle then that's your exposure meter. If it looks more like a set of brackets with a circle in the middle < o > that's your focus confirmation.