Welcome to the Brand New & Revised Camera Settings Challenge 2015!
Do some of the camera settings intimidate you? Do you want to learn how to develop your photography skills and learn how to use your camera effectively without always going back to the “auto” function? These challenges are for you!
We are going to walk you through various camera settings starting with the basics and build upon them as we move forward. They will no longer be a competition but rather a type of 365 classroom community. You can join in and follow which ever challenges interest you.
These are designed to allow experienced photographers to share their knowledge with others who are anxious to learn and improve their skills.
**********************
**Week 6**
This week's topic is ISO, when to consider using High ISO settings and how certain camera settings can get you best results. We will look at some Low Light situations and techniques. We’ll also talk about noise, not a nice subject I know, but one we must confront as we raise the ISO in the camera.
Basic Facts.
For image processing, ISO refers to a specific standard dealing with the *sensitivity* to light of the recording medium. It is measured starting from a base of 100 defined precisely in the standard, and then doubling (100, 200, 400, 800…), or halving, becoming more (less) sensitive to light in proportion. A doubling of ISO requires only ½ of the amount of light to provide the same image response. The concept originated long before the advent of digital cameras.
In the digital world, we still talk about ISO altering the “sensitivity” of the main sensor, but that is not quite accurate. Instead the camera alters the amount of *amplification* of the fundamental signal level, before it is digitized, that the light has generated on the sensor. As ISO is turned up, unfortunately not only is the good information in the image amplified, but so is the static and random noise of the image signal. This is completely analogous to turning up the volume of analog audio, AM radio for example, when static and interference can become unpleasant at high levels.
Why then if high ISO means more noise in our digital photo would we consider increasing ISO at all? It’s when we cannot get a good exposure (enough light in the final image) by slowing the shutter or widening the aperture any further. As @taffy says "ISO is now your only friend.”
An Example.
Let's make this a little more real with a walk through of a practical situation. Here is an image inside the Basilica of the Sacred Heart in Newark NJ. You might want to click on the image and view it larger to see more detail.
f/1.8, 1/200, ISO 3200. How did I decide on these final exposure settings?
1/200 for Shutter Speed? Hand held shooting with lots of detail I didn’t want to blur and the lens did not have image stabilization. 1/200 was the slowest I thought I could afford. f/1.8 for Aperture? I want the widest aperture to let in the most light the lens will allow, and DoF is not a problem, shooting from so far back. Check out CSC#4 and #5 for the DoF discussion.
So how did I set all that up in my camera? At my normal ISO 100, shooting in A with f/1.8 set, my camera chose a shutter of 1/6 of a second, about 5 stops too slow. How to get more? ISO is all that is left, and so five doublings got me to 3200 and the camera selected a shutter of 1/200. I could have used trial and error of course, but a little arithmetic made the process go a little faster.
A good photo? Unfortunately there are significant problems, although the exposure is “correct.” Even at low resolution, and especially sized suitable for printing, noise has especially raised its ugly head. Look at these two detail magnifications. You might care to click on the image and view it larger to get a better view.
This is the reality of digital noise. On the left we see both “color noise,” random spotted red and blue pixels, and “luminance noise,” random monochrome spots of light grey. On the right is the same detail with the color noise removed so you can see just the Luminance noise. Noise typically hides in dark, relatively uniform areas, and is the curse of “high ISO” digital photography. Most people find this noise unpleasant, color noise especially looks so “digital,” and work to remove it from their shots. How?
First, there is a camera setting that can help some, High ISO Noise Reduction. Find it in your menus, usually in a Shooting Menu. You will be able to pick a level, usually from “OFF” to “HIGH.” High ISO Noise Reduction is not without its own issues. It operates through a blurring or smudging process, so it can result in significant loss of detail and sharpness.
Second, working in a good editor is a more comprehensive option. I won’t talk more about that here, this being a camera challenge, but shooting raw and using a good raw processor, Lightroom, Adobe Camera Raw, DXO OpticsPro, Nik Dfine or similar, is a way to go if you want to get really serious about handling heavy noise.
I did take the original shot of the Basilica into Lightroom and Photoshop, applied their magic for noise mitigation, giving this.
Better? Noise is acceptably low I think, but on the downside I have lost something of the original crispness, even with a little added bump in Sharpening. A typical compromise you will always face with noise handling.
Strategies for Shooting in Low Light.
There are two extreme strategies you can adopt, or you might adopt something in between.
(1) Fast Shutter Speed and High ISO. Suitable/necessary for hand holding and/or subject motion. This is the one I adopted for my basilica picture, and it is the one we concentrate on this week.
(2) Slow Shutter Speed and Low (normal) ISO. Suitable for stationary subjects and essential to use a tripod. Here is one example of this second strategy.
f/16, 15 seconds, ISO 100.
If you follow this to my album by clicking on the image, you can read more about the strategy, but since it doesn’t involve High ISO operation, we’ll defer detailed discussion in CSC for later. There will be a separate CSC week talking about Night Shooting, and that will be a good place to take up "long shutter" again.
Other High ISO shooting scenarios besides the “Stationary” subject.
Here are three wonderful examples from other 365ers to illustrate some other places you can effectively employ the “High ISO” strategy for handling low light. They are “production” in that the noise has been handled nicely in the camera and/or in post editing, along with other finishing touches in the editor.
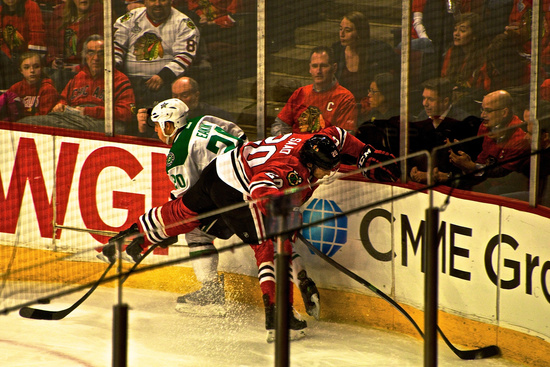
**Sports, Indoors and/or at Night**
f/5.6, ISO1000, 1/320
This is from @taffy, handling the hockey action very nicely with a fast shutter. Note the spray of the ice too.
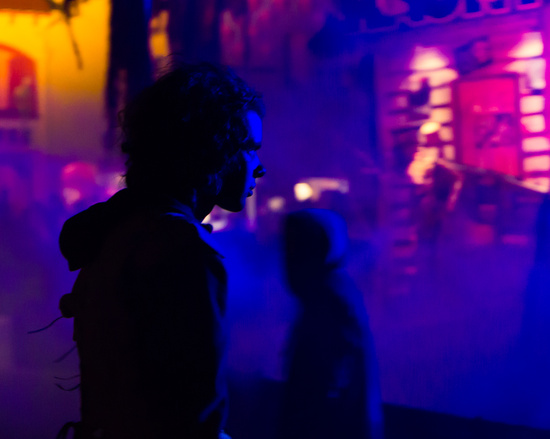
**Events and Concerts**
The low light encountered in such venues is difficult enough, but often there is a significant issue with the color of the light.
f/2.8, ISO 3200, 1/40
This is from @northy and see how she has used the color of the light to great effect.
**Birth and Midwifery**
A specialized genre, almost always in subdued lighting, with flash almost always impossible. Infants and young children sleeping will use many of the same techniques. Shutter Speed can be significantly slower than “sports” but still will usually need to be higher than for a stationary subject.
Practiced by several 365ers, and beautifully represented here by @aliha.
Shooting Challenges.
Now it's over to you! Since many of you might not have had a lot of experience with low light and ISO, I will lead you through the exercises in some detail. I hope that is useful to you. They are not difficult, even though there might be a lot of words. For more experienced shooters, of course use use your own experience and judgment.
**Basic High ISO Low Light Shooting, In-Camera Noise Reduction *off***
1. Find a stationary object in low light. Something around your house at night time is a good place to start. Something that has both light and dark areas in it is best for this demonstration.
2. Mount a standard lens (something between 40 and 70mm) or set your zoom to a comfortable zoom factor so you have a good repeatable shot of the subject. Try shooting from a distance of 10 to 15 feet for this challenge.
3. Put your camera into A/Av mode, and set your ISO at ISO 800. Turn High ISO Noise Reduction off. Even if you haven't touched the setting before, check it out as some form of ON is usually the camera default. I want you to see the different degrees of noise in this first exercise.
4. You may certainly attempt to hand-hold the camera, that will often be why you use High ISO in the field, but for ease of repeated shooting, you might get your tripod out and set the camera on it.
5. Check what shutter speed the camera has selected before you shoot. You half-press the shutter remember, and then check in the viewfinder or the LCD. Shoot at these settings.
6. Now repeat twice more after turning up your ISO to higher levels. If your camera goes as far as 6400, I suggest 1600 and then to 6400. If not, try 3200 or whatever your top level is.
7. As you take shots, note down all the exposure settings the camera decided on and the ISO you set. This will allow you to track what you have done since you are going to repeat all these same steps in the next exercise.
8. Look at your results. Does the light look about the same in each? It should since you are using the camera to choose a "correct" exposure. The shutter speed of course will be different, matching the ISO you have chosen. Do you see noise? At what ISO does the noise become objectionable?
9. You may have to magnify the image to see that clearly, so try to do that first in the “View” menu of your camera. There should be a “+” control on your camera to zoom in on the LCD screen when you are reviewing your image. You will not notice much on the basic non magnified display.
10. Import your images into your PC and zoom in on them there to examine the noise. Is it easier to see the noise this way? If you bring them into an editor on your PC, not all of you do and that’s perfectly fine, make sure that any automatic noise reduction is turned off so that you see only the effect due to the camera.
11. What other conclusions do you come to as you progressively increase ISO and examine the corresponding image? Anything surprising, or was it totally expected?
**Basic High ISO Low Light Shooting, In-Camera Noise Reduction *on***
1. For the same subject as the first challenge, turn on in-camera High ISO Noise Reduction, starting with a “medium-high” setting. I want you to clearly see the effect of softening and “smudging” that noise reduction can cause in your images.
2. Repeat Steps 1-11 in the exercise above. Use the same ISO settings as you used there, using your written record of what you did to keep track of them.
3. Not only examine the images you have just taken,” but also compare with the previous images with “noise reduction off.” What do you observe? Anything at all as you increase the magnification? Look for reduction of the stippling due to the noise, and also see if you can make any observations about the relative sharpness.
These two exercises may take a little time, and yes, they are not terribly creative, but I trust it will start to give you a good feel for the mechanics of High ISO shooting, the digital noise generated, and the effect of the in-camera noise reduction setting chosen. If you have not completed all the steps that's quite OK, but do take a little time to complete some of them.
**Creative Use of High ISO Low Light Shooting.**
Now get your creative juices flowing! Select an interesting subject from Sports, Events, Babies, even Stills, in low light, and get yourself an interesting and original shot shooting with the High ISO strategy and all your skills learned so far.
This time, definitely attempt it hand-held. You will want to target a shutter speed at least as fast as 1/(focal-length of the lens) to stop camera shake, and even more if you have subject motion.
You will do this as I did with my Basilica shot. Shoot in A/ Av, set your aperture and select an ISO based on what you believe the camera will choose for a Shutter Speed. Your experience from the first exercise should help you work out where to start. If this is not fast enough, you can increase ISO and measure again.
No restriction on the lens, but I suggest a “standard” focal length still (somewhere between 40 and 70mm) to keep things relatively simple based on your previous work. Return your in-camera High ISO Noise Reduction to a “low” setting, or one you are comfortable will not smudge the detail too much.
If you post-process your images that’s perfectly fine too. Tell us what you did in the editor. Did knowledge of how High ISO and noise behave help you in your processing of the image?
Let’s see what you have come up with. I hope you will have learned something valuable about your camera.
You may wish to tag your shots as camerasavvy-iso, as well as posting them on this thread.
**************************************
Wrapup.
Experienced photographers who are knowledgeable in this particular area are encouraged to offer “kind and constructive” suggestions on the posted entries. Those entering this challenge want to learn and improve.
For these challenges we encourage you to post your photo(s) in this thread to receive feedback and/or tips on what could be done to possibly improve the image (based on this specific challenge). We will not have a voting but we will select a few honorable mentions at the end of the challenge.
ASK QUESTIONS, we are all here to help you learn!
Expect to receive constructive suggestions on how to improve your skills.
How to post your photo to this discussion:
1) Go to your page that has the photo you wish to post.
2) Click on the three dots, and copy the code from the pop up box
3) Return to this thread and paste the code under comments
And here is one with a fast moving subject in low light explaining what I did. Click on the photo for the details. The image is unedited on left. The right image is with minimal pricess just to remove noise. Hope this helps.
@camerasavvy Thank you for putting all these tips together. I am really enjoying reading through them and picking up knowledge along the way. Kudos to you!
@la_photographic Hi Laura. Of course it counts! You won't have
"noise" problems of course, but you will typically see much more
"grain" with high ISO film. Here is a link to some 35mm B&W Ilford film faster than ISO 400 you might like to try. It is not C-41 process film so might be more expensive to get commercially developed if you don't do your own. http://www.adorama.com/ILD320036.html?adver=new&
I shot this last night. F/8, 1/400, ISO 800.
Normally I would use a tripod and use ISO 100 but I wanted to see the effect of ISO 800. The results are not bad. You can see a little noise in the sky. I did use noiseware, for noise reduction, but there is very little difference between the two versions.
This is what happens when you set your camera to ISO 1600 and forget to change it back. Two days of shots pretty much ruined. These were taken with an older model camera (D300), the newer models do a much better job with "noise".
The top row of shots were all with in-camera ISO noise reduction set to off and the bottom row was with the in-camera noise reduction set to medium. All shots were made with a Canon T5i set in Av mode and a 50mm prime lens, all mounted on a tripod and using room lighting. Much greater noise is noted at ISO 1600 and is objectionable at 3200 with NR set to off. Noise is still bad in the bottom row, but tolerable if the shot was important. I did notice a slight color shift in the images on the bottom row due to the in-camera smoothing effect.
@lstasel HI Laura. Thanks for doing the High ISO/Shorter Shutter version of the tree silhouettes, and not your more customary Low ISO/Long Shutter. Two ways to deal with low light as the main text mentions, at least for no subject motion..
As for "forgetting" to turn ISO back after doing "low light" the night before, we've all been there! You might like to check out the Nikon ISO Sensitivity Settings (in the shooting menu) where you can implement a "smart" version of Auto ISO that you can leave set for almost all shooting (not flash though). Specify an ISO range and a minimum shutter, and the camera will only ever raise ISO (up to the limit) if it can't achieve that shutter speed. Basically it automates the logic described in the "basilica" shot in the main text, but leaves your camera still ready for a shot in "normal" light. I leave it set all the time on my Nikons, and it has "saved" me more than once.
@cdean1956 Great that you did the exercises Charles. You did point out the interesting fact that some cameras' noise reduction "blurring" can sometimes give a cast to the overall color. Get to know how your camera behaves and take that into account as you shoot. A different camera might have different tendencies.
This ended up being a high ISO shot taken for the last challenge. It was recommended that I post it to this thread as well, for feedback and critique. Any assistance is greatly appreciated. Getting ready to start this week's exercise...
@gratefulness This shot really shows how the high ISO really comes into play since the image is nice and bright. I assume you were shooting in aperture priority mode. With an aperture at F10 the camera selected a slow shutter speed to also let in more light. So at 1/15th of a second it is difficult to hand hold a camera steady enough to have a sharp focus image. When that happens you can try widening the aperture (lower F number such as F5.6) and see if the camera selects a little faster shutter speed or use a tripod. Next weeks challenge will be to use the full manual mode where you will have control over it all.
At an ISO at 6400 I do see some noise but for this type of image it works. You really did well with this challenge and I like the angle you selected as well.
@myhrhelper Thanks so much for your feedback! I wondered why it wasn't as sharp as I had hoped. Thanks for the tip of widening the aperture to get a faster shutter speed and maybe lower ISO. Yep, I need to get a tripod! :o interesting how handholding the camera, and camera shake, can effect so much!
@gratefulness Sandi when I looked at where you posted this was actually for the small aperture challenge/lesson. So the idea was to use a narrower aperture which is what you did. if you would have widened the aperture (which is what I suggested above comment) you would have no longer doing the correct settings for the challenge. So again several things has to happen when you use a narrow aperture 1) you either need a higher ISO which could help but in this case not quit enough 2) use a tripod or rest on a stable surface, 3) increase the exposure which we really haven't touched on very much up to this point 4) add additional light to the subject - when you are in a public place such as a restaurant that would be more difficult but a flash may help
Ok not much of a photo subj. but am I doing this right at all for this challenge. #1 on left side is f/6.3 Iso 800 1.3 sec.,,,,,,#2 middle is f/6.3 iso 1600 0.5 sec. and #3 is f/6.3 iso 6400 0.1667 sec. My camera was on AV mode. Using 18-55 lens. 10 ft. away using a tripod. My newbie question is, I am not sure how to shut off my noise reduction. I did turn off auto lighting optimizer, since we are working with learning the lighting of iso. Was that ok or a bad thing? And should that be on most of the time? I must have done something wrong because the one shot has a little deeper color than the other two and it was pretty low light where I had the flower set.
When I find the noise reduction I will do the opposite of it on the next challenge so I can see what you are trying to teach us. Sorry I didn't know how to turn it off.
I have really struggled with this weeks challenge, I only have a small laptop, so have really struggled to compare photos side by side.
My Lumix DMCGH4 does not appear to have a setting to turn off the noise reduction, so I'm not really sure if in camera noise reduction is permanently on or off..... I'm assuming its on.
The below shot was taken inside the local church in Mandurah.
Settings for Camera:
45-200mm lense - set at 45mm with image stabilise on
Aperture f4/0
ISO 3200
Shutter Speed 100
No editing, other than minor cropping.
To tell you the truth, I had no idea what I needed to do to fix this..
So any advise will be much appreciated.
1. ISO 100, f/8, .8sec
2. ISO 1600, f/8, 1/20 sec
3. ISO 3200, f/8, 1/40 sec
4. ISO 6400, f/8, 1.80 sec
To see the full impact of the noise you need to look at this photo at full size. To see the photo at full size go to the page the photo is on, scroll down to bottom of page and look for "sizes", click on view all and down to "original". Copy and paste the code into your browser and a full size shot will open.
Photo 2 (1600 ISO ) is starting to show visible noise. Photos 3 and 4 have pretty severe noise. I processed photo 4.
I made minor adjustments and then ran noise reduction. Looks good.
Here is what the photo looks like zoomed in to 100%.
Noise is still clearly visible. The only thing working for this photo is that the noise is "luminance" rather than "chroma". From looking at my practice shots I would probably not shot above ISO 800 - 1600.
@cdean1956 Nice shot Charles. Great example of the limits of your camera's capability - max aperture (I'm assuming?), VERY lower limits of a hand-held shutter speed (did you have IS on? I can't detect much movement) and maxed out ISO. Clearly it's a struggle image-quality-wise at this ISO, (which is probably what we were expecting) - not only with the high level of noise but also the lack of sharpness. So, if this was not a high-ISO challenge exercise, the best thing to do (for a better image quality) would be to go the slow-shutter-speed and tripod route.
@miata2u
Hi Peggy. Great series of shots. Your series is right for this challenge. Turning off the noise reduction would have made it easier to see the noise but it is still there. Noise is harder to see on down-sized photos so look at the wall on your original shots. As the ISO goes up the surface of the wall starts to look "grainy". Look at the last photo I posted above, you can still see the noise even after noise reduction. The difference in color in the one photo is probably due to "metering" and we will be discussing that later on in the challenges.
Great going! I think you found out a lot about your camera and what its tolerance for high ISO is. About editor-based noise reduction. I have found that color noise (chroma) reduction doesn't result in as much significant blurring of detail, as does luminance noise reduction. Different algorithms I am sure, but no idea what the differences might be. @lstasel
@deborah63 I see a review of the GH3 , and read that Noise Reduction can be applied in steps from -5 to +5, but I didn't see where. Somewhere in a "record" or "shooting" menu. I'll look next time I'm at the camera store and let you know. it is said that the GH4 is much more successful at low light handling than the GH3. http://www.dpreview.com/reviews/panasonic-lumix-dmc-gh3/14
BTW, I do like the stained glass window shot. It did turn out very nicely, so your camera defaults, if you did nothing special to adjust the noise, chose well and handled the situation nicely too.
@miata2u Hi Peggy. You shoot with an EOS T3i, I think? Look in the Third Setup Menu, Custom Features, Custom Feature 5. Since it is a "custom" feature, settings there will only apply in Tv, Av, M or P.
I used some ornaments set on the dining room table with the light dimmed. All shots were at f9. As the ISO increased the shutter speed got faster. The shutter speed stayed the same regardless of whether the ISO Noise Reduction was On or Off.
My camera has 4 settings for ISO Noise Reduction: Disabled, Low, Medium or Strong. So I chose Disabled & Strong.
I can see an increase in the Noise between the three shots. At 800 the shot is pretty consistent across the frame, at 1600 the background gets more noise in it. While at 6400 the background & the subject has noise.
There is not as much noise with the Noise Reduction On but it is still there.
I can see an obvious difference between the eyes of the Owl. The eye in the light doesn't have Noise, while the eye in the shadow does have increasing levels of Noise.
I prefer the 800 ISO Shots. I don't think I was far enough back when I took the shots as I don't see any compromise with the sharpness of the ornaments when I turned the Noise Reduction Setting On. I will have another go next weekend.
Also the colours in the pictures between Noise Reduction On & Off are actually the same. For some reason when I converted the files to jpeg & then stitched them together the colours in the bottom row went a bit orangey - I'm not sure why.
Nice demonstration Jenny. Glad you took the time to take all six and look at the result. @jennymallett To see blurring when Noise Reduction is on, you may have to magnify beyond a normal view. It's good for you that at normal view you didn't notice it as you got rid of some noise.
@frankhymus Hi Frank. I have learned so much and really appreciate all the work that goes into this. I didn't have a chance to get anything worthy of posting this time around but looking forward to the next lesson. Meanwhile, waiting to get a tripod to try out some new stuff. (I know... bean bags, rice bags and all those kinds of things work too... maybe I'm just being lazy)
@mzbull You aren't. Tripods are best to use for long exposures of course, if somewhat cumbersome to carry them and set them up. Personally, I am notoriously lazy about carrying one.
Whoops! this is what happens when you have been practising low light shots and forget to reset your camera. I'm working on the low light and hoping to post later
ISO 6400, shutter speed 1/6 sec, f/18, focal length 40mm
I realize I'm late.
I used a tripod because I don't have a steady hand. The lighting was low (from a southern facing window in the morning). I took it through ISO 400 - 6400 just to see what was the shutter speed that made a decent photo. This is not processed at all
@randystreat Turned out nicely Kathy. A tripod is always a good idea for a close focus like this when the shutter speed might be slower than 1/50 second. There is no objectionable noise visible at internet resolution either. Did you have in-camera high ISO noise reduction on by any chance?
@frankhymus thank you. someone noticed some noise in the dark area when they viewed it on my project (it's larger than here). No I didn't use trhe in-camera ISO noise reduction. I read about that and found it on my camera. Not really sure when it should be used. But that might be the way I could reduce the noise on low light, especially night time with lamp light images.
@randystreat I always have "normal" (my camera's default) high ISO noise reduction turned on. Actually, even if you don't have ANY turned on in the menu, if the ISO exceeds something like 1600, it depends on the manufacturer of your camera, some small level is applied anyway.
Again depending on the camera manufacturer, for any ISO below a certain number (800 is typical), no noise reduction is applied irrespective of what you have set in the camera menu. So it's a "no cost" thing to leave it turned on all the time.
ISO 6400, shutter speed 0.4 sec, f/18, focal length 39 mm. I set the High ISO Noise Reduction setting on my camera to Strong. Personally I cannot see much difference.
@frankhymus You said you leave the High ISO noise reduction setting on. Mine has 4 settings: Standard, Low, Strong, and Disable. (I'm using a Canon Reel T2i). Prior to this photo, it was set to Standard, which is probably the default since I'd never adjusted this before. What would be your recommendation to keep it at.


@acsstudios @adayinmallacoota @aecasey @aliha @alinz @alisonp @andrina @angelbattlebross @aponi @april16 @aquaina @autumneden2015 @axmartinez @barb_b @barbtatum @barneyone @berta @billy52 @bizziebeeme @blinkny @brigette @brittwd @bsheppard @callymazoo @candysiegmueller @cathieg @catsmeowb @ccb @cdean1956 @christophercox @clake @craazyal @cruiser @cynthiak @darylo @deb60 @deborah63 @deverest @dianen @dmcoile @dsp2 @elliotwb @emblegemble @fivefingerofdeath @francoise @frankhymus @froggie0628 @gabigabs @gai @grammyn @gratefulness @harts @homeschoolmom @houser934 @iqscotland @ithinkithunk @janet365 @jannkc @jantan @jbd1962 @jehill1159 @jennymallett @jennywren @jewelofdenial @jocasta @jocee @joeyl @julieco @juliedduncan @justaspark @kalm @karlow75 @kauaikris @kerrynz @kimmy15 @ksyvarth @kwiksilver @la_photographic @ladygator @lauramalone82 @leestevo @lensenvy @lfreeman1230 @libertylady @lifepause @linah @lizfawn @lsquared @lstasel @ludgate @luka365 @lynnb @lynnilou @maaayke @madamelucy @maishanny @melinareyes @miata2u @milaniet @mingr @motherjane @moya @mpratt @mrslaloggie @musecreative @mzbull @mzzhope @nanderson @newbank @nickspicsnz @northy @nosarian @olivetreeann @omglooksquirrel @oreos808 @overalvandaan @pamknowler @panthora @paulam @paulaw @pistache @polarvrtx @psychegrrrl @quietpurplehaze @quintus @randystreat @rangerxenos @ribbet9 @rosie1610 @rosiekerr @salza @sarahsthreads @shazzym @slash @soseema @sparkle71 @squamloon @stepheesue @summerfield @susie1205 @taffy @tahoemb @takcarol @thejazzyj @theresefriis @thistle @transatlantic99 @trinda @tstb @ukandie1 @voiceprintz @weebindi2 @wingwatcher@yaorenliu @yeshanghai @zosimasy
Of course, anyone can participate at any time. Good shooting!
@darylo Thank you so much for your examples - I'm sure some will find it very helpful
"noise" problems of course, but you will typically see much more
"grain" with high ISO film. Here is a link to some 35mm B&W Ilford film faster than ISO 400 you might like to try. It is not C-41 process film so might be more expensive to get commercially developed if you don't do your own. http://www.adorama.com/ILD320036.html?adver=new&
Normally I would use a tripod and use ISO 100 but I wanted to see the effect of ISO 800. The results are not bad. You can see a little noise in the sky. I did use noiseware, for noise reduction, but there is very little difference between the two versions.
This is the best I could do to fix.
The top row of shots were all with in-camera ISO noise reduction set to off and the bottom row was with the in-camera noise reduction set to medium. All shots were made with a Canon T5i set in Av mode and a 50mm prime lens, all mounted on a tripod and using room lighting. Much greater noise is noted at ISO 1600 and is objectionable at 3200 with NR set to off. Noise is still bad in the bottom row, but tolerable if the shot was important. I did notice a slight color shift in the images on the bottom row due to the in-camera smoothing effect.
As for "forgetting" to turn ISO back after doing "low light" the night before, we've all been there! You might like to check out the Nikon ISO Sensitivity Settings (in the shooting menu) where you can implement a "smart" version of Auto ISO that you can leave set for almost all shooting (not flash though). Specify an ISO range and a minimum shutter, and the camera will only ever raise ISO (up to the limit) if it can't achieve that shutter speed. Basically it automates the logic described in the "basilica" shot in the main text, but leaves your camera still ready for a shot in "normal" light. I leave it set all the time on my Nikons, and it has "saved" me more than once.
ISO: 6400; Aperture: f/10; Shutter Speed: 1/15 sec; Focal Legth: 31 mm
This ended up being a high ISO shot taken for the last challenge. It was recommended that I post it to this thread as well, for feedback and critique. Any assistance is greatly appreciated. Getting ready to start this week's exercise...
At an ISO at 6400 I do see some noise but for this type of image it works. You really did well with this challenge and I like the angle you selected as well.
ISO 12600, f/4, 1/14s, handheld using car frame as support, internal noise reduction on medium setting, added some noise reduction in LR as well.
My Lumix DMCGH4 does not appear to have a setting to turn off the noise reduction, so I'm not really sure if in camera noise reduction is permanently on or off..... I'm assuming its on.
The below shot was taken inside the local church in Mandurah.
Settings for Camera:
45-200mm lense - set at 45mm with image stabilise on
Aperture f4/0
ISO 3200
Shutter Speed 100
No editing, other than minor cropping.
To tell you the truth, I had no idea what I needed to do to fix this..
So any advise will be much appreciated.
2. ISO 1600, f/8, 1/20 sec
3. ISO 3200, f/8, 1/40 sec
4. ISO 6400, f/8, 1.80 sec
To see the full impact of the noise you need to look at this photo at full size. To see the photo at full size go to the page the photo is on, scroll down to bottom of page and look for "sizes", click on view all and down to "original". Copy and paste the code into your browser and a full size shot will open.
Photo 2 (1600 ISO ) is starting to show visible noise. Photos 3 and 4 have pretty severe noise. I processed photo 4.
I made minor adjustments and then ran noise reduction. Looks good.
Here is what the photo looks like zoomed in to 100%.
Noise is still clearly visible. The only thing working for this photo is that the noise is "luminance" rather than "chroma". From looking at my practice shots I would probably not shot above ISO 800 - 1600.
Hi Peggy. Great series of shots. Your series is right for this challenge. Turning off the noise reduction would have made it easier to see the noise but it is still there. Noise is harder to see on down-sized photos so look at the wall on your original shots. As the ISO goes up the surface of the wall starts to look "grainy". Look at the last photo I posted above, you can still see the noise even after noise reduction. The difference in color in the one photo is probably due to "metering" and we will be discussing that later on in the challenges.
BTW, I do like the stained glass window shot. It did turn out very nicely, so your camera defaults, if you did nothing special to adjust the noise, chose well and handled the situation nicely too.
My camera has 4 settings for ISO Noise Reduction: Disabled, Low, Medium or Strong. So I chose Disabled & Strong.
I can see an increase in the Noise between the three shots. At 800 the shot is pretty consistent across the frame, at 1600 the background gets more noise in it. While at 6400 the background & the subject has noise.
There is not as much noise with the Noise Reduction On but it is still there.
I can see an obvious difference between the eyes of the Owl. The eye in the light doesn't have Noise, while the eye in the shadow does have increasing levels of Noise.
I prefer the 800 ISO Shots. I don't think I was far enough back when I took the shots as I don't see any compromise with the sharpness of the ornaments when I turned the Noise Reduction Setting On. I will have another go next weekend.
Also the colours in the pictures between Noise Reduction On & Off are actually the same. For some reason when I converted the files to jpeg & then stitched them together the colours in the bottom row went a bit orangey - I'm not sure why.
ISO 6400, shutter speed 1/6 sec, f/18, focal length 40mm
I realize I'm late.
I used a tripod because I don't have a steady hand. The lighting was low (from a southern facing window in the morning). I took it through ISO 400 - 6400 just to see what was the shutter speed that made a decent photo. This is not processed at all
Again depending on the camera manufacturer, for any ISO below a certain number (800 is typical), no noise reduction is applied irrespective of what you have set in the camera menu. So it's a "no cost" thing to leave it turned on all the time.
ISO 6400, shutter speed 0.4 sec, f/18, focal length 39 mm. I set the High ISO Noise Reduction setting on my camera to Strong. Personally I cannot see much difference.