This week you have some creative advantages to take. You can take the “traditional” approach of the past 12 years and continue to shoot in black and white until February 14th when that “flash of red” gets introduced through selective coloring or you can elect to introduce some color to your black and white photos through the use of toning throughout the week.
Andrew Gibson of the Digital Photography School explains toning as the process of adding color to your images, but only after they’ve been converted to black and white. According to Gibson this process “results in some very cool effects – for instance, it can turn your shots yellow or purple or red.”
Your camera may allow you to tone your photos when you take them. But the effect is usually very heavy-handed, which is why Gibson recommends you avoid in-camera toning. Instead, test out toning in post-processing. You can have lots of fun applying a single tone to your images (such as a nice sepia or for this month I’d suggest red!). And if you want to get really creative, you can add multiple tones, an effect called split toning.
The simplified version on this process begins with your black and white photo. Once you’ve selected your image upload it to your photo processing program. Then, within your program’s different settings and effects, apply and remove a layer of color (or several layers) until you have the contrast of black and white and color within your image.
For a further and more technical step-by-step explanation of this process using Light Room read this article:
The following examples are by no means stellar photographs! But they show you some of the options you have as far as the approach you can take to accomplish toning or split toning.
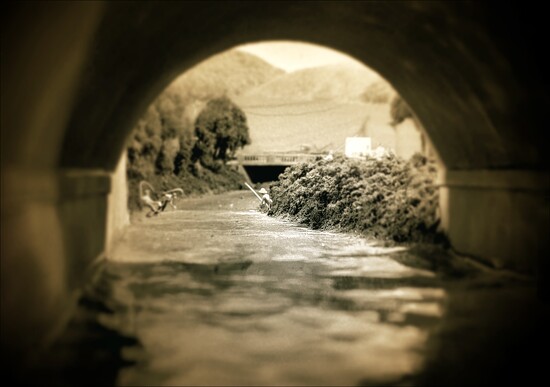
For the result in the picture above, I went into my processing program (I use Smart Photo Editor), uploaded the picture and converted it to black and white. (Note/tip- I will often bring up the vibrance and contrast of my shot before converting it to black and white. I think it makes those elements even stronger once converted but you can also do this after you’ve converted the photo. There is no set rule on how or when to work on this. You can sharpen your photo at this stage as well.)
My program, like many others, allows you to “erase” or remove the effect from parts of the photo where you do not want it applied. If you were interested in selective coloring this would be the point where you’d do that- erase the color you want to show through in black and white. But in this case, I wanted a second “color” applied to the whole photo. So, I added a second layer of sepia and used my sliders to lighten it enough so that the black and white tones came through.
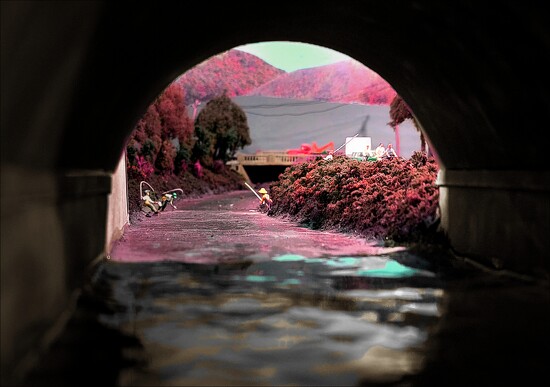
In this example I uploaded the picture into my program, converted it to black and white and then applied a “toning effect” featuring red that was already in my processing software. I erased the effect from areas I did not want to be overly red- the people, truck and bridge- and left it on areas I wanted color (the creek and foliage). I then applied a second layer of color in sepia and erased it on everything but the tunnel. As you can see toning adds a somewhat “other-worldly” mood to an image similar to infrared photography. At any of these steps you can use sliders to adjust the intensity of the effect to achieve the colors you want.
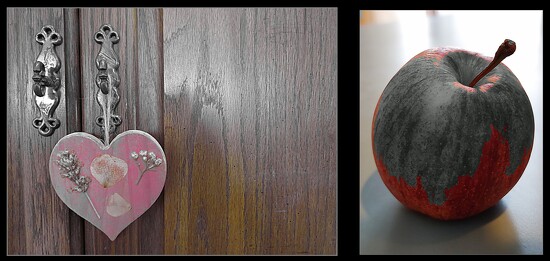
The second option you have to apply toning to your picture is to use your camera’s toning effect. The two shots above were accomplished that way. The photo on the left was taken with a Canon Power Shot SX50 HS and the one on right with my cell phone. They are both sooc to give you an idea of how the camera handles the color selection as opposed to the “manual” steps I took in the two previous pictures. When you use your camera’s toning effect you do not have control over what color will be applied and which ones will not- but that’s half the adventure of using it! (And in response to Gibson’s complaint, I do not find the camera to be heavy-handed. However, you do lose “control” of the color. So it’s really up to whether or not you want those colors selected randomly or by yourself.)
This week you may choose to explore the creative use of toning throughout the week or just on the 14th. You also have the freedom of selecting your own subject. You may want to set up a still life or shoot a street scene. You may want to shoot landscapes or you may select a single object and shoot it differently every day. Have fun and experiment!
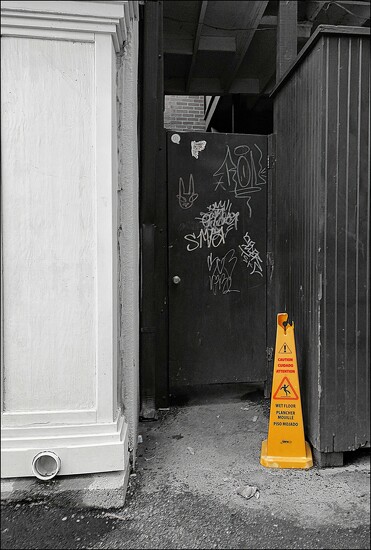
Should you decide not to try out toning, you will be introducing one splash of red on February 14th by using selective coloring. Selective coloring highlights one spot in an image by bringing color back to it. In the photo below the original scene was shot in color, then converted to black and white. The black and white effect was “erased” from the cone allow its bright yellow to return.
Here’s a simple step by step process using a free, on-line program called Ribbet (www.ribbet.com). But these steps will pretty much apply to any photo-processing program you have.
1. Go to Ribbet and upload your picture. Select the “Basic” editing tab to sharpen, adjust contrast or any other fine-tuning you’d like to do to your photo. Remember to select “apply” after each adjustment. Once you’re finished with your fine-tuning…
2. Select “Effects” from the tabs to the left of your picture. Select “Black and White” and convert the picture to black and white. With your cursor “erase” the black and white effect from the item or area you wish to remain in color. The original button will be highlighted while you do this. If you erase too much, just toggle click on “effect” and you can reapply the black and white effect on your photo. Click “apply” when you’re done.
3. You can add a frame at this point by returning to the home page and selecting the frame tab from the left OR you can now save your photo to your computer and then post it to 365.
There are other ways to achieve a selective coloring look but this is probably the easiest and simplest. Other processing programs may label their tabs in a different way or the way you erase an effect might be slightly different but the steps are fairly similar in all programs. So, get ready to have some fun this week!
As for the date- it’s up to you. I am a traditionalist- I like the 14th no matter where it falls on the calendar and I always do red in February. But for those who want as close to the actual center of the calendar as possible, that will be up to you to figure out. And there are others who like to change up the color and not use red at all. The creative control is always in your hands. So, all in all, the choice of where you put your flash and what color it is, is up to you! The idea here is to have fun with it- so have it at and enjoy!
I don't have split toning in my current version of Lightroom which is the latest but you can do the same with Color Grading. I hadn't tried Color Grading on BLack and White before and am delighted it works. Another toy to play with.
@olivetreeann I am having a play with Ribbet, it seems that the "Erase" feature is not available in the free version - unless I am not seeing the right thing? Anne
@olivetreeann Thank you so much for the excellent info once again Anne. I have never tried split toning, and I don’t have Lightroom or Photoshop; I just use Snapseed. I think I get the gist of it though, and can maybe come up with something along the right line.
Upload your photo when prompted. Select the black and white effect and then to bring color back in, click on the little paint brush and "erase" the black and white effect by dragging the cursor over the spots where you want color. Then save the picture to your computer when you are done.
I was able to do this without signing up for anything. Many of the other programs that boasted they were free required you to sign up for a trial period but took all the payment info to charge you when that free trial was up. I did like Fotor but don't need another program.
I hope that helps!
Here's the before and after of the picture I played around with.
Glad the info was of help to you. And yes, as I've been saying all along, there are many ways to accomplish this effect and many programs that can do it, so have fun exploring with what you have or even checking out what might be available for free on line. Be careful though- some of those supposedly "free" programs make you sign up for a "free trial" which will then take your credit card info and charge you when the trial is up. That is not "free" in my books! I was able to use iPiccy without exchanging any info, so hopefully that will be true for anyone else who wants to give it a go. Thanks for bringing that to my attention Anne!
Yes, free versions are always limited. They are a marketing tool to tease you with the possibilities of what the premium program can do. As far as Ribbet goes, it's a great beginner's program for folks who want to edit but don't want the extensive learning it takes to do something like PhotoShop. I don't recall what the premium version costs right now, but it's a one-time-a-year fee (as opposed to the monthly fee PS charges) and it has enough effects to play with to keep your creative juices flowing for a long time. It's one of my go-to programs especially for images that need straightening and adding text. This program definitely gives you a healthy bang for your buck.
Feel free to tag me Anne if you need any further help this week or have more questions. I'm glad to help.
I just popped in on the page with the tag just to see all the red. As always, it’s a delight to see the many different choices people made. This year I didn’t take out the other colors on mine because they are subtle and the red dominates, and after so many years I do have the selective coloring in my skill set if I choose. But I’m always humbled by the variety of artistic shots this month produces.

@grammyn
@spanishliz
@northy
@merrelyn
@farmreporter
@amyk
@brigette
@kametty
@chikadnz
@summerfield
@cocokinetic
@wakelys
@heftler
@30pics4jackiesdiamond
@mittens
@christinaledesma33
@salza
@koalagardens
@rensala
@christinav
@anniesue
@njmom3
@4rky
@annied
@kuva
@novab
@daisymiller
@gerry13
@radiogirl
@joansmor
@cdcook48
@tinley23
@ljmanning
@eudora
@ankers70
@phil_sandford
@carole_sandford
@mona65
@jacqbb
@365anne
@gardencat
@transatlantic99
@pamknowler
@la_photographic
@susie1205
@beryl
@theredcamera
@shutterbug49
@granagringa
@pandorasecho
@yogiw
@busylady
@haskar
@helenhall
@nannasgotitgoingon
@jgpittenger
@johnfalconer
@francoise
@pamalama
@lizgooster
@skipt07
@linnypinny
@casablanca
@emrob
@skuland
@rontu
@tiaj1402
Video instructions on split toning.
https://digital-photography-school.com/split-toning-black-and-white-images-in-lightroom/
@365anne Ribbet is a fab system anne
@365anne
https://ipiccy.com/
Upload your photo when prompted. Select the black and white effect and then to bring color back in, click on the little paint brush and "erase" the black and white effect by dragging the cursor over the spots where you want color. Then save the picture to your computer when you are done.
I was able to do this without signing up for anything. Many of the other programs that boasted they were free required you to sign up for a trial period but took all the payment info to charge you when that free trial was up. I did like Fotor but don't need another program.
I hope that helps!
Here's the before and after of the picture I played around with.
Glad the info was of help to you. And yes, as I've been saying all along, there are many ways to accomplish this effect and many programs that can do it, so have fun exploring with what you have or even checking out what might be available for free on line. Be careful though- some of those supposedly "free" programs make you sign up for a "free trial" which will then take your credit card info and charge you when the trial is up. That is not "free" in my books! I was able to use iPiccy without exchanging any info, so hopefully that will be true for anyone else who wants to give it a go. Thanks for bringing that to my attention Anne!
Yes, free versions are always limited. They are a marketing tool to tease you with the possibilities of what the premium program can do. As far as Ribbet goes, it's a great beginner's program for folks who want to edit but don't want the extensive learning it takes to do something like PhotoShop. I don't recall what the premium version costs right now, but it's a one-time-a-year fee (as opposed to the monthly fee PS charges) and it has enough effects to play with to keep your creative juices flowing for a long time. It's one of my go-to programs especially for images that need straightening and adding text. This program definitely gives you a healthy bang for your buck.
Feel free to tag me Anne if you need any further help this week or have more questions. I'm glad to help.