Welcome to the Brand New & Revised Camera Settings Challenge 2015. This is Camera Settings Challenge #8. @taffy will be coordinating so if you would like a quicker response, feel free to tag in your first comment box. @camerasavvy will be automatically notified as well.
Do some of the camera settings intimidate you? Do you want to learn how to develop your photography skills and learn how to use your camera effectively without always going back to the “auto” function? These challenges are for you!
We are going to walk you through various camera settings starting with the basics and build upon them as we move forward. This will no longer be a competition, but rather a type of Project 365 classroom community. You can join in and follow whenever a challenge interests you.
These are designed for experienced photographers to share knowledge with those who want to learn and improve their skills.
The current challenge is: Night Photography Phase I, March 16 - 23
Please use the tag: camerasavvy-nightphotography1
Explanation: We’ve now explored the “big three” – shutter speed, aperture, and ISO – that together give photographers control over their images. This information helps particularly in night photography. There are many opportunities (skylines, night sky, events, fireworks) and many situations (tripod or steady surface available versus hand held, lots of time to set up and take your shot versus responding instantly). The night photography challenge will last three weeks, in three phases, to give you plenty of time to experiment.
What will you need? For high ISO, fast shutter speed shots, just your camera as usual. For most other shots where you want sharp images using long exposure, you need a steady surface and a way to prevent camera shake. I will talk about this in the section on “How” below.
When and why:
The ‘when’ of night photography is obvious – at night, between dusk and dawn. The ‘why’ might be to record a landscape as the sun is setting, capture the night sky or fireworks, record a special event like an outdoor concert or performance, show off a city’s skyline or iconic image, capture a street scene, and so forth. There are as many situations as you can imagine a night event, as you’ll see in the samples below.
How – Camera Setting and Useful Equipment
The camera setting for night photography really is about making choices among the “big three”:
1. Choosing ISO (Decisions: Do I have sufficient time for the shot like a cityscape or must I snap quickly like for fireworks or a concert? Do I have a way to steady my camera and avoid camera shake or will I be hand-holding? How much ‘noise’ can I tolerate if using a high ISO?),
2. Choosing your shutter speed (Decisions: Do I want it ‘tack sharp’ or do I want light trails or do I want something in between?)
3. Choosing your aperture (Decisions: Do I want ‘light bursts’ or are specific light points not that big a deal?)
Equipment and Information:
For night shots, you need to consider how you will keep your camera steady (a tripod or related surface) and how you will prevent ‘camera shake’ when clicking the shutter speed.
STEADYING YOUR CAMERA: Consider situations when you need a longer exposure than one that would allow you to hold your camera steady. You need something to help you keep your camera steady. A tripod can be your best friend here – they are available in a range of prices (you can check out used ones on eBay or in local camera shops). The lighter the better for carrying it around, but you also have to make sure it can support your camera. Alternatives to tripods that are inexpensive and easy to use: a bean bag or a sock filled with rice (under your control) or a ledge or curb or bench, etc (you will need to scout in advance to be sure something is available at the site you want to shoot).
AVOIDING CAMERA SHAKE: Once your camera is on a steady surface, the other important part of night photography is to make sure it doesn’t shake – even a little is a problem – when you press the shutter release. To avoid this using no extra equipment, use the 2-second delay in your camera’s menu. Knowing how to use this means not having to carry anything extra with you. Or (my personal preference), you can use an external shutter release – it costs about $25.00 and my per-use cost has reduced it to pennies. To me, it’s been as important as the tripod! But you will find it’s all personal preference.
Surprisingly, that’s all you need to do night photography! The rest is all about choosing your subject and then thinking about how to balance the settings. Ask yourself these questions:
1. Can I do this with quick exposure and handheld (i.e., Using a high ISO and fast shutter speed, I will be able to get my shot)?
2. Do I need a long exposure and a stable surface, shake-free shutter release (i.e., I want a lower ISO and a longer shutter speed)?
3. Will DOF matter – does it need to be shallow (wider opening f1.4 to 4.5) or do I want it deeper (smaller opening, like f6.3 or higher)?
Your Challenge:
From the list that follows this section, describing a range of night photography opportinities, CHOOSE ONE that seems most ‘doable’ to you.
1. Once you’ve selected your situation (intentional camera movement, night sky, skyline, water, concert), use the recommended settings as a starting point and take your first image. Is it bright enough to show what you wanted? Were you steady in your camera work? Are all the things you want in focus (DOF)?
2. Now, retake the shot but with a much higher or much lower ISO. What do you notice when you enlarge the photo on your screen? Do you see more or less ‘noise’ (the little dots that seem to make up your photo)?
3. Retake a third time, changing your shutter speed. Again, what do you notice? Do you see more or less signs of movement/blur?
4. Retake a fourth time, changing your aperture. What do you notice? Do you see more or less in focus beyond your main focal image?
5. On your fifth take, think about what you want to accomplish and what you have seen when you’ve varied the three key camera settings (aperture, shutter speed, ISO). Make your decision consciously: How low can you set your ISO so you will make your shot as clear of noise as possible, as steady and stable a shot as possible, with the most in focus that you want to have. What shutter speed and aperture allow you to keep it at the ISO you’ve chosen? Alternatively, for the shutter speed you need to use, how wide will you need your aperture to be and how high your ISO?
We are going to continue the night photography focus for three weeks. This week is all about figuring out what works for you in your most comfortable situation. Then, in Phases II and III, we’ll ask you to branch out into less familiar areas and share what you’ve learned when you post your photos. Welcome to Night Photography!
Summary:
There are many opportunities for night photography, with or without tripod, in or out of cities, with our without people/buildings/water. Use your imagination, look at images on the site, use recommended ISO, aperture, and shutter speeds as starting points and have fun experimenting. Choose a type of night photography from the samples that follow, and consider local settings such as:
• Amusement parks
• Harbors
• City skylines
• Country roads with a few cars going by
• Bridges
• Concerts (but careful not to disturb other patrons)
• Sunsets and sunrises
Things to look out for:
• When you can, take a test shot and see if you like your settings. You can usually take a second shot (if it’s not a candid) with adjusted settings. We suggest starting with an object that isn’t moving.
• Remember your equipment when you go out for a night shoot! A stable surface you can use, how to work your 2-second delay or bring your external shutter release, extra battery if you have one or at least a FULLY CHARGED one as long exposures use up battery power more quickly than faster shutter speeds, a flashlight so you can see your settings at night, gloves unless it’s summer as your hands can get cold, lens cleaning cloth as it’s easy at night to accidentally touch the lens.
• Remember to REMOVE any polarizing filters from your lens as it will cause weird light spots.
Critiquing your shot:
• Is your focal image clear (i.e., no camera shake?)
• Do you have the movement you want as in light trails?
• Is the noise level (the little dots) low enough to be tolerable for your goals?
This phase of the night photography challenge starts, Monday, March 16th and lasts until Sunday, March 23rd. Please use the tag: camerasavvy-nightphotography1
Experienced photographers who are knowledgeable in this particular type of photography are encouraged to offer “kind and constructive” suggestions on the posted entries. Those entering this challenge want to learn and improve.
For these challenges we encourage you to post your photo(s) in this thread to receive feedback and/or tips on what could be done to possibly improve the image (based on this specific challenge). We will not have a voting but we will select a few honorable mentions at the end of the challenge.
ASK QUESTIONS, we are all here to help you learn!
Expect to receive constructive suggestions on how to improve your skills.
How to post your photo to this discussion:
1) Go to your page that has the photo you wish to post.
2) Click on the three dots, and copy the code from the pop up box
3) Return to this thread and paste the code under comments
Stretch your skills and have fun!
Night Photography Situations and Settings for Practice.
Group 1. Handheld Night Photography.
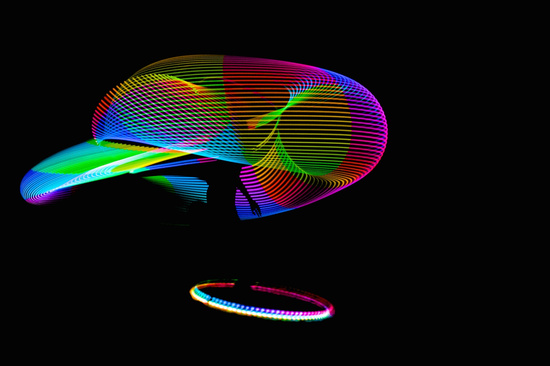
Sample 1. HAND-HELD, PURPOSEFUL CAMERA MOVEMENT
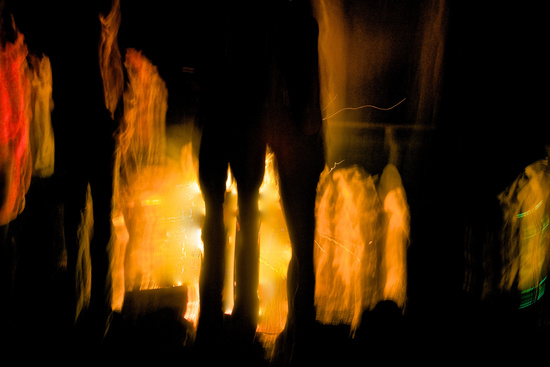
Intentional Camera Movement or ICM is fun at night for the abstract look you can create. This example’s settings are: high ISO (800), a mid-range aperture (6.3), and set the shutter speed to 2 second so I could move my camera, by hand, slowly up and down. This creates the look you see. Best to experiment – too fast of a movement up and down and you lose definition, too slow makes it look like accidental camera shake!
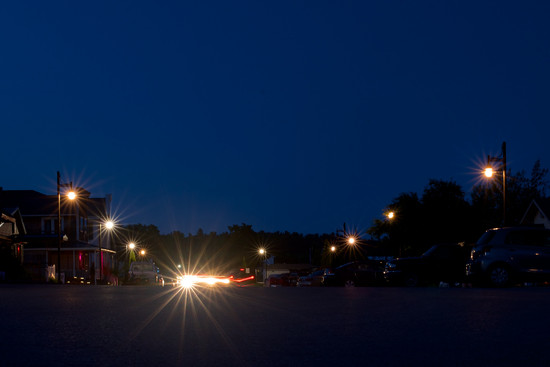
Sample 2. HAND-HELD, ARCHITECTURE
Architecture – whether a skyline or an individual building, is a good place to start with as it doesn’t move. Settings here are ISO is high –not extreme as it wasn’t totally dark yet – at 800. Aperture of 6.3 for depth (DOF). But anything between 2.8 and that would likely have been fine. The shutter speed of 1/6 (.1667) as I thought that was the slowest I could hand-hold for this lens without shaking.
Sample 3. LIGHT TRAILS AT AN OUTDOOR FESTIVAL
This was a combination of tripod support and hand-held. I made the tripod as small as possible, used an external shutter release and braced the tripod legs against my waist. S shutter speed is 1 second (capture lights but not surroundings), ISO at 400 (typical of indoor shoots), and (accidently) had the aperture quite small at f/16 giving a deep DOF. The point was to avoid over-exposing for the overall image when all you want to show up in the light itself.
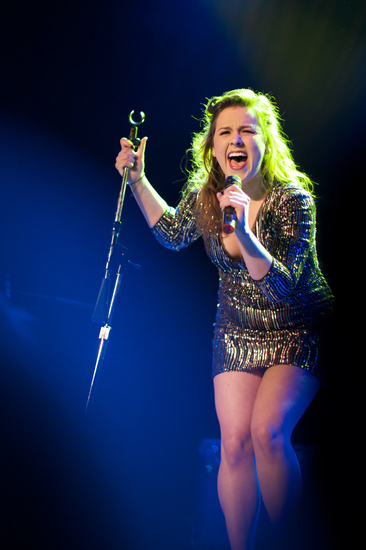
Sample 4: Event Photography
Recommended settings to get the clarity and movement: high ISO (in this photo, by @jyokota) 1600 in this case but can to go up to 3200 or even 4000 depending on lighting. Since handheld, shutter speed can’t be too slow or you’ll have blur. Junko set it to 1/160 (.0063). A wide open aperture (f1.2 in this example)
GROUP TWO: Tripod (or stable surface) Night Photography
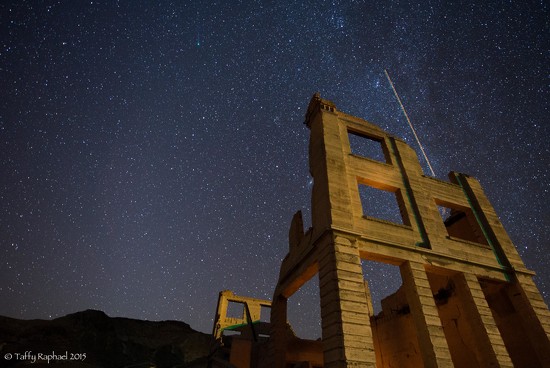
Sample 5. Night Sky and Milky Way.
The goal was to make have an image sharp as possible with minimal movement in the sky (little trails instead of spots of light). This requires a LOT of light so the following settings are recommended for your starting point. First, use an extremely high ISO (this one used 3200). Second, use as wide an aperture as possible (this one – f2.8), and third, use as little time as you can to avoid star movement. I’ve found that 25 seconds is the least I can leave the lens open to allow enough light to capture the stars and, when possible, the Milky Way. Noise from the high ISO is not an issue as it is masked by stars.
Sample 6. Street Scene using Light Bursts
The steady surface here was the curb on the side of the street, using a 2-second delay, long exposure. Settings to start with include a relatively low ISO – 100 to give a richer look to the photo without noise. Aperture of f/16, the tightest/smallest aperture this 50mm allowed to create light bursts. Shutter speed was set for 20 seconds to gather enough light to convey the street.
Sample 7: Bokeh is the nature of the background in back of your focal image. At night, you can create interesting bokeh by having a strong focal image with the lights blurred in the background.
In Aaron’s -- @grizzleysghost – example: 2 seconds, f2 (shallow DOF is important), ISO50, with tripod
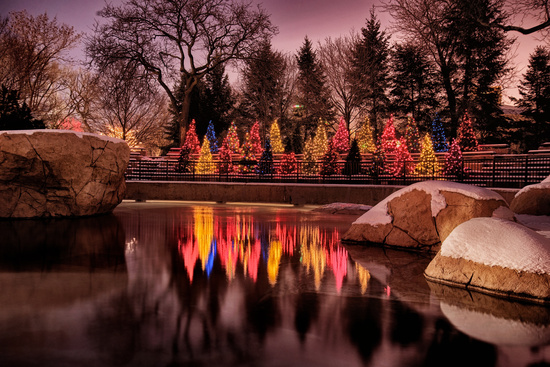
Sample 8. Smoothing Water with Surrounding Lights
You want a long exposure to smooth the water, while capturing light from the surrounding environment – trees here, buildings, bridges, etc.
Typical settings as used here, with a tripod, include long shutter speed of 30 seconds, mid-range aperture of f7.1, and low ISO at 100.
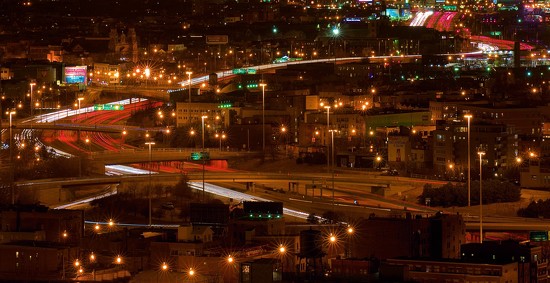
Sample 9. Light Trails from Moving Vehicles
You want to capture movement, but not so much that the trails blend together. Given the amount of ambient light from the city, the shutter speed was 5 seconds. For light bursts, narrow apertureof f22 which is the smallest my lens allowed. Mid-range of 400.
@camerasavvy Wow, a lot of great useful information here. Just want to thank everyone involved in this project! I see a few things I have wanted to try - if I can brave the cold I may start with the night sky. I live in the country so the stars are spectacular - would love to capture that.
thank you so much for all the wonderful examples, will see what i can do, have not been feeling the best so have missed some but am following along - thank you for including me in the tags
This is a fantastic challenge with many options. Looks extra long but that is because there are different option choices. It is good that it will last for 2 weeks.
@linah That's a fun opportunity to start with. Not knowing what camera you use, you'll need to experiment, but for the night sky, I've found that starting with ISO at 2500 is a good place to begin, as wide an angle lens as you have available, with aperture set as wide as possible. I recommend six exposures to start with -- 15 seconds, 25 seconds, and 30 seconds at 2500ISO and then repeat at 3200IS. When you download your photo, if you raise the exposure a bit, it will bring out more stars. You can then look across the six to see which combination gives you the sharpest stars and the most visible in the sky. Your camera will pick up more than you will with the naked eye.
Oh, for focusing, it's hard for the auto focus to work, so find something really far in the distance to focus on and once there, put it onto manual focus. Or just put it on infinity on manual. Have fun!!
@catsmeowb I hope you give it a try. Pick the easiest thing for you to do -- and just have fun trying to do it. You can even do this from inside looking out your window or door.
@myhrhelper I think it may actually last three! We'll see how it goes after the first two. It may be that after 2 weeks, it will make sense to move on to something new.
@linah Hi Lina. Taffy gave you some ideas about where to start with stars, another way to do it is to use "bulb" mode if you find there's too much noise at ISO 2000 or more. You can leave the shutter open as long as you like beyond 30 seconds.
Another one to try is star trails, but you might want to wait until it's warmer out, since you might be outside for an hour or more. Here's just one referene on "how to." Out in the country on a moonless night would be a perfect place to try this. http://digital-photography-school.com/how-to-photograph-star-trails/
@taffy
I have image stabilisation in my lenses and it has been mentioned to me that I should turn it off for night photography. Is that correct, and if it is... Why?
Thank you
@deborah63 Yes, that is correct. Image stabilization is designed to prevent micro-shaking messing up handheld shots. When you have your camera on long exposures and on a stable surface or a tripod, for some reason, your camera thinks it needs to compensate and can create a shake. I don't know 'why' but only that this is something I've been warned about on multiple sites. So, I basically turn it off for any non-handheld, long exposure shot. But at night, for hand-held, I do leave it on. It's not about night photography, it's about whether it is hand-held or not, so it applies even in the day time when using a tripod.
The trick is, when you turn it off, you have to remember to turn it on again!
@taffy Thanks for that explanation of image stabilization. That may have been my problem tonight, as my autofocus said it was focused, but everything was shaky. Very disappointing. Still provided a decent landscape as long as no one zooms in close. Used photoshop gradient filter to add two images with two exposures to get the end result, but plan on shooting again tomorrow, weather permitting to get the focus right. Settings were ISO 100, f/8.0, 1/4 sec for the foreground and 1/50 sec for the sky, 18-200mm zoom at 50mm on tripod with remote shutter.
@taffy Thanks Taffy. I went out and tried a few shots last night before seeing your responses. I will post one of my pictures later. I didn't know about turning off the image stabilizing - so it may have some shake. My ISO has preset numbers so I used 3200 and tried a few at 1600. By wide aperature, so you mean lower number (I always get confused with that) - I used my 50 mm lens so I could use a few settings like 2.8, and did a few around 4 or 5 too I think. It was cold and dark so I didn't fiddle around too much. But with your suggestions and Frank's link, I have some good pointers to try again tonight perhaps.
@cdean1956 Charles, this can't be your very first attempt!! I think you did a great job -- and combining the 2 shots to get the lighting right when they were so different was a smart way to go.
@linah It sounds like you were off to a good start. Yes, you want to have the smallest number possible for the aperture to let in as much light as you can. And the lens choice would be the widest you have so you can gather in as many stars as possible -- you can always crop. And if you don't want star trails, you'll keep your shutter speed under 25 to 30 seconds. More than that (the 'bulb' setting Frank referred to) leaves the lens open longer so that it picks up on the movement in the sky -- even though we won't see it. To get the really long trails, you either leave it open for several minutes or you take timed shots and then stack them -- that's beyond my skill level at the moment.
@taffy Here is my attempt from last night. There is much to learn, but I am pretty happy with this as a start. My middle shot was my better one I think. I only played with changing aperture and in this case the widest did not work best, but perhaps with a little shorter shutter speed I would have got a similar effect. The bottom shot, I tried getting part of the lake in for visual interest, but the lights from the house across the lake caused problems. I also did not turn off image stabilizing for any shot, which I will try. I did realize you had to manually focus - which is rather difficult in the dark. Using suggestions from a link @frankhymus suggested, I think it would be wise to plan your shot in the day time and focus the camera then.
@linah Frank's idea of focusing while it is still light out AND using live view if you can, will help a lot with the focus. It's so cool to see your progression getting infinitely better across the three attempts!
Couldn't let this one go, since the weather is forecasted to start raining again tomorrow. Settings were ISO 100, f/11, 0.8 sec exposure, 50mm prime lens set for hyperfocal distance, mounted on tripod with remote shutter release. Contrast, clarity and sharpness minimally adjusted in LR.
@cdean1956
Well done Charles! You've given us a terrific example of an evening shot during the blue hour, with the tripod insuring that your image components were tack sharp. Lovely DoF too. Thanks for posting!
@taffy This is my Camera Savvy Night Photography 1 Shot. I have always wanted to photograph stars so here they are.
The higher the ISO the brighter the shots got. There is definitely more grain in the higher ISO shots, but it is more noticeable in the foreground than in the stars. There are more stars the longer the shutter stayed open.
I live on acreage & went into the paddock to take these shots after I closed the curtains in the house. I was surprised by how much light was in the photos from the surrounding houses - these houses were quite far away & I couldn't see them. They gave off enough light that I can see my house in the middle & right bottom shots. Even in the top row you can see the glow of the lights around the trees.
I took some photos looking almost straight up so you can only see the tops of the trees & I took some aiming lower down to get some foreground in. I think I ended up with too much foreground. The interesting thing is that even though I know that the top row of photos actually have more sky in them, I keep feeling like the bottom row has more. I think this is because the bottom row has the ground & trees to provide a definition to the photos & to give a perspective and sense of scale.
I've drawn some circles on the bottom row of photos. I don't know if you'll be able to see but they are dots. They are on all the photos, but most noticeable on the photos that have foreground. They are not noise as they are quite sharp. They are not lights as there were no lights on this side of the tree line. I think they might be dust spots in my camera - would anyone have any other suggestions?
In general I like the 3200 ISO shots as a compromise between being too dark and too light/grainy. I think the 25sec shots are also the best compromise. In the 15 sec shots the light illuminating the house is not enough to understand what the house is, it is only enough to be distracting.
@aponi Wow -- this is stunning!! I love the elegance of the image -- with the focal light on the path. I'm tagging Pam who lives in a small village. This is the kind of shot that could be set up with a model too, to capture someone in silhouette walking by -- great practice for night images and the challenges its lighting presents. And, Kathryn, yours is really wonderful!! @pamknowler
@jennymallett Jenny, you've posted such useful information for everyone and I agree with you on the settings you found most useful. Very cool to see the Milky Way in the image!
Re the spots...unfortunately, I can't see them since they are small. You might want to post a full size image on a date from before you started your project just to get it onto the site. Then copy and paste the link to it in here or just send it to me in one of my shots and I'll look more closely. I suspect it is sensor dust if it is always showing up in the same place. Cameras almost always end up with this at some point. I have a few on mine at the moment and am just using Lightroom (or Aperture or picmonkey) to clone them out. There has to be enough, to me, to warrant paying the money for a professional cleaning.
Our area has had record rainfall this year and after a couple of beautiful Spring days, the rain returned today. But today, as I got off work, the rain had stopped and the sun was peeking out. As sunset approached portions of the sky opened up and were really quite outstanding. This perfect pear tree is in my neighbor's yard and the color in the sky was, I thought, very nice. ISO 100, 1/5 sec, f/11.
@cdean1956 THis is beautifully done! Did you use a tripod? Your focus is so tack sharp, it's impressive. And you've caught those lovely toned clouds well. I'm glad you're enjoying this theme!
First post to this Challenge. Not sure if I got the posting right. Night time in a local Village in my town. On the outside deck of a Mexican restaurant, the propane heater appears to be extremely close to the dry thatch of the palapas.
@mtnrunner
Wonderful contribution! It is a bit scary to see the thatch and the heater so close to one another -- I hope that was just from your POV. On thought for your next attempt (maybe two)...First one is that at 30 seconds, you've let in sufficient light so that everything can easily be viewed. At night, though, one of the advantages is to create a little mystery about what we are seeing If you do this again, you might want to try stopping your aperture down as far as possible (I saw you were at f10, maybe to f16 or more if you can) so that the lights -- the white part of the lights -- turn into little starbursts, or at least are a little darker. The sparkles in the background would be fun to see against a somewhat darker background. The second thought is to step back a bit so that there is something that is a clear focal point -- what do you want our eye to land upon? Having the exposure and focus mostly on that and going ahead and letting the rest be darker would create a moodier image.
@lambda Wonderful golden-toned image, with a clear focal point on the motorbike. Without the exif information available, I'm not sure how to advise, but I noticed the street lamp is rather blown out. So it makes me think a tighter aperture might be worth trying or a faster shutter speed, or perhaps lower ISO. Just a thought.
Your b&w of the pier is lovely with the symmetry you've highlighted. With all those lights, this would be a perfect candidate scene for a long exposure, tight aperture, low ISO capture to bring out the starbursts in the lights and have them a little less roundy-bright. The composition is very effective as is your choice of b&w.
Had a go at capturing the stars. Settings used - ISO 1600, Aperture f/3.5, Shutter speed 8 seconds. Unfortunately there was wind around so the trees are more blurry than I would have liked.
@taffy Thanks so much for your suggestions. I got it and understand what you are saying. I did actually have one other similar photo that i did use f16 and got star bursts on the lights, however people were in the wrong spot.
Will post todays picture also. I think it qualifies as night photography, as it is sunrise, yet before the sun is up.
The suggestions from the community are what I need here in the project to help me progress. They are appreciated.
@mtnrunner Oh good -- glad it was helpful! I love getting feedback from others and I've learned so much since I started on this site. I look forward to seeing the sunrise shot.
Thought there would be clouds for sunrise today, but got fooled. Not quite sure what the red/green flare in lower left of the near mountain is. Or, how to remove it. Any ideas would be appreciated. I use Apple Aperture at present time.
@panthora Thanks for participating, Osia! These are great examples of night photography! I love the way you were able to use the light painting to create a spiral into the image. And your reflections are fantastic for the city shot.
@taffy Hi Taffy, thanks for the comments. I have put just one of the photos here full size, not sure if you will be able to see the dots that I was talking about, I circled them. They are Red in the Raw File, but Whitish Pink when I convert to Jpeg. Thanks Jenny
@jennymallett the best way to tell is to shoot a blank white background. Then up the contrast and see if the spots are visible. It's hard to tell on black.
@lambda Oh gosh, this is incredible! I love the way you used long exposure to smooth out the water and to capture the movement of the clouds. And the golden tones -- well, wow!. Thanks for posting in the thread.
A second version of an earlier post this week. In the challenge series of Night Photography I, I submitted a capture with a wider f stop, and no foreground lights. After receiving good a critique I realized perhaps I had a better photo in this one. Comments welcome.
Here's another example of a night sky shot. Settings were ISO 3200, Aperture as wide as I could at f2.8, and focal length wide at 16mm. Exposure of 25 seconds.
@mtnrunner Yes, I do like this one better! Your tighter aperture gave you the light flares which I find more appealing than the more blown out lighting in the first post. I also think your tones here are sharper. Thanks for posting!
@taffy Appreciate the comment. After reading your 1st comment, and looking at tonights post, I do like it better as well, the lights in the foreground really helped. Lights help lead into the picture more.
Your partial eclipse of the sun is truly amazing.
Thanks again. Will work on a new photo for tomorrow.
Raining again tonight, but I noticed the power lines against the sky and decided to take this shot. Big thanks to my sweet wife who held the umbrella to keep the camera dry. Settings were: ISO 100, f/11, 15 sec exposure on tripod with remote shutter release.
OK... here is my attempt. Hopefully, more to come. I am still fumbling around with manual settings (ie., taking my best guess at them). I tried one with the camera choosing, but this shot was with my settings. I left my ISO on auto, just fussing with aperture and time of exposure. I tried a smaller aperture in another shot, but it was way too dark, even with more time for exposure. Thanks for all of the wisdom on this challenge.
Exposure: 15 sec (15/1)
Aperture: f/5.0
ISO Speed: 200
Really like the night photography so had to have a go this week. I was distracted by a security guy so I didn't get a chance to really nail the settings like I hoped. I was hoping for the lights to be sharper bursts, so I probably didn't have the aperture tight enough. If I try it again, probably need a tighter aperture and longer shutter speed?
@cdean1956
This has such a wonderful mood to it -- and the light flare draws our eye into the image. Wonderful long exposure evening shot (and nice wife to save your camera!).
@rosiekerr Hi Rosie -- this was a super shot. F11 gave you enough to get small flares out of the lens. You could probably up to 250 or even 400 to allow for a tighter aperture. For a shot like this, you might try keeping the ISO at 200, stopping down to f14 or so, and using 30 seconds exposure. Or, if not enough, use bulb (where you manually release and hold the shutter) to 45 seconds. The longer the exposure with the tighter aperture, the higher the clarity and the star bursts.
@ladygator I love the rich lighting! If you do get a chance for a re-shoot, you're right re lowering the ISO to 200 (or 100 if you can), and then using a longer exposure. I've done 30 to 45 seconds to have the tight aperture and low ISO, but I'm guessing at 200 and f/16 you should be good to go at 30 seconds (maybe 25).
@mtnrunner Better and better! In this one, the sign gives me a strong place for my eye to land, while the line of lights brings me into the scene. Lovely!
Low Light on the Brisbane River. The orange colouring is coming from a street light that gives the photo some life. Didn't get a chance to do the different camera setting as it was too wet.
@irene111 This is so cool! I think that spot was one some 365 friends took me to when I was visiting Brisbane, so I especially like the scene! Lovely warm tones in the shot as well. Thanks for posting!
@dianen Your framing and tones are clear and strong. My suggestion would be more about having a place for my eye to land. The musicians are rather far away. So that could be handled by cropping just to the left of the singer, as the dark space on the left doesn't add much. There is a lot of space above and below the musicians and you don't need quite so much for framing. Once the image is cropped, you may want to do a little adjustment to the lighting as some of the kids are more exposed than others. I would always use image stabilization when not using a tripod. With a tripod, because the kids are moving, you still would want a fairly fast shutter speed so that you stop the action.
Hand held 1/6, 6.3, ISO 3200. Found this quite hard. Wanted to try hand held and tried lots of different settings Thought the lights were too bright and exposed here although the shot itself was brighter.
Hand held 1/6, 4.5, 800.
I liked this shot the best out of all that I took. I found it hard to get the ISO down and keep the shutter speed up so that I didn't get blur. I felt this was the best of my shots. Any advice welcome.
This was taken using a 14mm lens on a full frame camera. Typically, to avoid star trails, the maximum exposure would be 35 secs (or 22 second on a crop sensor) based on the rule of 500, which I assume is explained further up?
In this case however, I found I was able to go to 65 seconds without any noticeable trail at the resolution I was after. If I was printing a billboard it would be noticeable, but I'm not!
So, in summary, settings were: 65 secs, ISO 3200, f2.8.
Ok. After a quick look above, I couldn't see the rule of 500, so here goes:
If you wish to avoid star trails in your astrophotography, you need to calculate the maximum shutter speed for your camera/lens combo.
To do this, divide 500 by the effective focal length of your lens - in my case, I was using a 14mm lens. So, my maximum shutter speed is 500 / 14 = 35.71 seconds.
Now, it gets a little confusing if you aren't using a full frame camera (which most people don't). For example, if I was using my 700D, which is a crop sensor camera, that has a sensor that magnifies everything 1.6 times. So, my 14mm lens is actuall 14 x 1.6 = 22.4mm.
Redoing the rule of 500 gives me 500 / 22 = 22.72 seconds before I get a blur.
If I haven't bored you too much and you are still reading, the reason for the blur is that the stars move across from one pixel on your sensor to another - the more pixels they cross, the longer the trail.
If you are not sure whether your camera is crop sensor for full frame, Google it - you should also be able to find out the factor you need to multiply your lens by (like the 1.6 for current Canon crop sensors)
@kiwisnapper Thanks so much for posting this fantastic shot! I'm amazed that you were able to go 65 seconds with such sharp focus. The colors in the Milky Way are so dramatic, with the lighting you were able to pull out. Really, one of my favorite examples!
Thank you for your comments, yes you are right it is a magic spot. I was there with a great bunch of people having a photography lesson with Andy Williams and would like thank Andy for the support for the last year. Irene.
Another go tonight. Tried to use bulb to extend the shutter some to brighten the shot a little...but apparently I haven't read that far in my manual and couldn't get it set. So we're stuck at 30s, f/18 and ISO 250. Thinking about it now, since the shutter speed was stuck I probably should've kicked the ISO back up some. Always forget about that one...
I don't get much of a chance to shoot at night, but did do early morning. Taffy suggested I post it here. Shot at f5 1/160 ISO1250. Now that I realized early morning might work like early evening, I may try another with my tripod if I can find a spot to hide it after the shot rather than carry it 5 miles:)
@ladygator You already are a step ahead -- exactly what to do re ISO bump up! With my Nikon, I just keep turning the dial past 30 and the next one is 'bulb.' I don't know how that would compare to your camera though. @frankhymus might know.
@milaniet Thanks Melanie -- this is a terrific morning shot that parallels the kind of thinking we have to do about settings when we do sunset shots. I appreciate your posting!
@kathyboyles Thanks for the attempt and for posting! Night photography can be frustrating. I'm guessing in the case of this scene, you would have had to use a very high ISO and/or bulb to open the shutter for well over a minute. There is a certain mysterious element to this that makes it interesting. What were you going for in the shot?
@jennywren Hi Jenny -- thanks for posting! I'm glad to read you were experimenting with different settings for handheld night photography. It's a useful skill to develop but it is, as you saw, hard to do! I find that the biggest problem with handheld at night is that the ISO has to be high which means a certain amount of graininess is unavoidable, and that the light -- rather than being tight lightbursts that add interest -- tens to be bright sort of blown out spots. Again, almost unavoidable. You could try bracketing so that one is very dark and the lights are not overblown and the other is light enough to capture the elements, though the lights will be overblown. Then, combining 2 or 3 of these can help. I agree with the one you chose as the best, btw.
@taffy Thanks for such helpful comments, good learning curve for another time. Will try to do some long exposure shots with tripod even if I don't have time to post them.
Kathy, I have watched you progress in your photography and what a joy it has been. You try these challenges and are learning from them! (Taffy please let us know if you agree or have another thought) but when I copied your settings for your shot below your shutter speed was fairly fast for a night shot. I am not certain what the lighting was like but I see you did have your ISO pretty high. Perhaps for a shot like this you could try 25 seconds, 30 seconds or as Taffy said even a minute but this shot wasn't even 1 second. Also, in photography there still needs to be some light. In night photography the light is limited but there is light coming from somewhere or there will be nothing to photograph since photography means "light writing". So my main recommendation for this shot (there appears to be some light) is to have a longer exposure. Your camera will display 1" for one second, 2" for 2 seconds. Try a shot like this again, focus on something with a little bit of light and go for 15" or 20" (seconds).
Canon EOS 70D
Exposure: 0.002 sec (1/500)
Aperture: f/3.5
ISO Speed: 12800
Focal Length: 16 mm @taffy
@myhrhelper@kathyboyles Thanks for the additional help! I totally agree...the ISO is already extremely high so noise will be a serious problem. I would both increase the shutter speed (as Kathy has laid out) AND I would decrease your ISO to 3200. Use 30 seconds or more if you can for that same scene which is really a dark one.
Good luck!! Please tag us when you try again. I think you'll see a huge difference with these two changes. Of course, you'll need a tripod or something to steady the camera on. If you don't have a tripod, I recommend the 'bag of rice' method -- you can simply put your camera on that and it makes a nice steady bed. You can also angle it here and there as needed.
Unnecessarily noisy I think, as others have said. I wonder why you might have chosen 1/500 shutter? That's fast even in full light.
Even if you don't want to break out the tripod, you could try something like
Shutter 1/30 (quite safe at 16mm hand held) - 4 Stops Up
Same Aperture
ISO 800 - 4 Stops Down
This "base" gives you the same EV (Exposure Value) as the shot you posted, with the ISO "under control." And if you want to adjust the Light up some more, even say 3 stops (EV) this would be a shutter of about 1/4, which you could (probably) even hand hold if the lens has image stabilization. Or just break out some camera support.
As side homework specific to your camera, beyond this challenge of course, I'd also check out the Auto ISO Speed Sensitivity Settings of your 70D, working in conjunction with, say, Av mode, and any exposure compensation you would dial in on top of that. Around about Page 123 and following in the manual. You can have the camera adjust the ISO within a range you specify, raising it as a last resort, determined by specifying the slowest shutter you will allow. The 70D (and later more advanced Canon DSLRs) even has an AUTO setting for the slowest speed you will allow that automatically sets this slowest limit for a suitable hand-held speed depending on the focal length of your lens. You need faster shutters for longer lenses to hand hold, of course. I use these all the time on my Nikon D7100 and it frees me up no end from the drudgery of trial and error and subsequent manual computation.
Yes, I know the object of the challenges so far is to have you do all this at least once manually in "M." And that's fine to understand what might be going on "under the hood." But in practice why would folks not want to automate much of this drudgery? You are still in command, you are not "surrendering control," but you can get to suitable exposures, with ISO kept in check as much as possible, much quicker than a trial and error hunt and peck approach.
After all, you've paid for the camera technology. It's one reason your camera cost twice as much as, say, a t5/t6 Rebel. Why not use it to handle the low level tasks, within limits you set of course, keeping executive decisions for yourself? Good luck, and good shooting with your excellent camera.
@frankhymus@myhrhelper thank you both for the help. You both have gone into great detail. First, what I was trying to do was take a much brighter picture. I definitely at least had the wrong shutter speed. Next time I think I will try using the auto features of the camera. I usually do. Incidently, I was using a tripod. I will try again tonight. Thank you both.
Kathy the purpose of this challenge is to learn the manual mode and shoot night photography while practicing. I would not recommend for these challenges to just try to do what you usually do but try new things, practice and then after you have given it your all you can decide what is the best avenue for you.
Since it was on a tripod you would be able to slow the shutter speed.
@kathyboyles@myhrhelper As Kathy B said, I think you need to understand the basics of doing things manually, and then branch out to use technology. I think I said that even above.
Went out for an evening cloud capture, but the clouds really didn't happen tonight. Walking across the creek after dark, and played with a bit of light painting.
@dianen Hi Diane, I see Taffy has addressed the compositional aspects of your image. Regarding the technical aspects, I'm not sure you needed such a narrow aperture (f11), especially since all of the performers (your subject) are a good distance away: even though there are probably a couple of meters between the front and back ones, their distance to your lens means they can all be in acceptable focus at a much wider aperture. I'm guessing you are using a zoom lens at 65mm, so your max aperture may only be f/5.6, but even so, that's two extra stops of light and you now have a little more wiggle room in either shutter or ISO or both. If your performers are moving more quickly, I'd advise using it to increase your shutter speed two stops to around 1/80s which will minimise the possibility of motion blur (did you find this in any of your other shots from the evening?). Or, if nobody is moving quickly and your IS is doing its job, you may want to use it to decrease your ISO those two stops to roughly the 640-800 mark, thereby increasing the quality of your image by reducing noise. If your max aperture is bigger than this (f/5.6), by all means open it up, and you will have even more options to play with. I hope this makes sense :)
@taffy Thanks. I know what you mean about the blank space to the left of the singer, unfortunately I was asked to get a group shot! So I was trying to get all the musicians in. I sometimes forget about aperture! I need to try to remember to open it up! Learning process!! I think I was using my 70-300 zoom lens and it only opens to f/3.5 (if I'm remembering correctly!). I do have another lens which I should have used as it opens up to 2.8...where was my head that night?? I have another opportunity this friday night...lets see if I can hold it all together and get better shots! Seriously, now that I look at this...what was I thinking! I knew a little more than I showed here!! :) @aliha Thanks to you both you for the tips!
Exposure: 10 sec (10/1)
Aperture: f/14.0
ISO Speed: 100
Focal Length: 12 mm
Tripod and the self timer ~ I used a high f# to get the star burst effect on the street lights. I stuck with 10 seconds as there was still some light on the sky and had I gone any longer I may of lost some details? the photo may of been too bright?
@dianen One thought occurred to me -- nothing to do with night photography but about the composition and the empty space. You could have taken two shots, and then created a diptych pretty easily using picmonkey collage setup. OR, you could create a second copy of this image, crop into two -- left square, right rectangle, and then combine in a diptych. Let me know if you'd like more info on how to do that. It's really not hard and makes for a more dramatic and interesting shot from the one you have and your focus is strong enough that I think it would work.
@mtnrunner Nice Bret! It makes for a good abstract! When you were light painting, do you know about the technique of using your hand as a reflector? That way, the light is not directly on any item and you get a smoother look. You point the light to your palm and have your palm go in the direction you want the light to go.
@kathyboyles Much lighter and easier to see. To create an interesting composition from this, you might try a few steps. First, crop the blurred foreground out totally. Then, to balance, crop in from the right. Then, use 'rotate' to even out the lines so they are parallel to the edge. I think a little lowering of the exposure post production might bring out the shapes more -- or you could increase the contrast. Final thought might be to convert to b&w since the color isn't critical to the shot and the focus is more on light and shape. Lots to work with here!
@taffy No, I had not yet come across that tip..... Interesting. As I took probably 5 different shots light painting, In each I did have some "hot spots" of light. Using the palm to reflect is a terrific idea. Will try that out.
In another matter, I am going with my photo club the end of the week to photograph about 6 or 7 different ghost towns in Nevada. That should be awesome. Weather is looking good. Camp out on Friday and Saturday nights. Should be fantastic opportunities for pictures!
@mtnrunner You will love that!! I did a photo course near Nevada, in Death Valley, and went to one at night that is part of the park, I think, or at least right next to it. I learned about settings there and also about the reflecting-off-the-hand idea. Once you figure out your settings for your camera, the rest is a snap as it's all about composition. Take your widest angle lens -- that's what I found to be most helpful, though there were some interesting possibilities for more focused zoom shots if the night sky isn't your main focus. Have fun!
Hand held. ISO 250, f3.6 1/6. Taffy suggested I post this shot from the other night. When Itook the shot, I didn't know about the night photo challenge.
It was done at about 8 pm so it wasn't completely dark and the sky was an incredible blue. If I had had a tripod and time to set up the shot, I think I could have improved on the result.
@redy4et A tripod for such shots will always work best. Also, I'd have tried to shoot it more directly straight on, or a very exaggerated left to right view. For me, the "little bit of angle" is more distraction than anything. MOO of course.
@kathyboyles The garage. Effective. But don't forget about "straight." Or wildly tilted. One or the other. "Just a little bit" of tilt doesn't seem to work well for me, it just tends to look careless. As Taffy did say, and I see you took another crop at it. And personally, I don't mind the ample foreground in the original at all.
@frankhymus Frank, I thought the cropped one was straight. Anyhow, thanks for the advice. Another thing. On Friday evening I'm going with my photo club to "shoot the full moon." Can you recommend settings for my camera? The downtown skyline of San Diego will be at the horizon. Thank you. Kathy
@kathyboyles The moon... You can work out "correct" settings by Spot Metering and aiming right at the moon on the center circle on your Canon. We haven't talked about that here yet, but we will. It will work out to about the same settings as shooting on a cloudy day, the moonlight is, after all, reflected sunlight. P166 in your 70D manual for Spot Metering. Careful Manual Focus is best on Canons since they do not allow you to separate out Spot Metering from the Focus Point. Just setting your lens at infinity can work, but you might find that focusing "past infinity" if you are not careful, and that won't be ideal for detail. After getting the right exposure through the viewfinder, you might switch to Live View for optimal focusing.
The exposure will come in at about +13 or +14 LV (light values), that is 13 or 14 stops higher than f/1 for 1 second at ISO 100. Something like f/5.6 (5 stops up from f/1) at ISO 200 (1 stop up from ISO 100) at 1/200 - 1/256 (8 stops up from 1 second). You can hand hold that, but it is better with a tripod since the area of the moon is so small and hand shake will be noticeable even with an image stabilized lens. At that exposure, you won't get much (anything actually) of a night shot of San Diego, which requires about 4-5 LV, maybe a little more depending on the artificial light available.
So if you want both, you might want to take two shots, one exposed for the moon and one exposed for the background and combine them, best in an editor via "stacking" since you can operate and manipulate at your leisure after shooting. You can do it in-camera as you are shooting but that can get a little complicated, having to take a stop off each shot, especially the moon one, since exposures are "additive" when you combine them on one camera frame. P175 and following in your manual for multiple exposures. In any case you'll have to make sure the background shot doesn't have a super over-bright moon in it. In an editor you can mask out all but the background in the background layer, or simply clone out the bright spots before loading. In camera is way more awkward; you will (probably) have to turn completely away from the bright moon. In a way, the editor route, the stack route, is more "real" and "true" if such things really bother you.
Of course, in an editor you can get really "active" and layer in the moon after selecting it, perhaps after cropping that might "magnify" the moon. Rather than just stacking shots with the same focal length and crop/magnification. Is that cheating? I'll leave that for you to decide. But don't make the moon too big if you do so. That will be a real give away that you have "operated."
If you are really into editing and stacking, taking a stack of 20 (or even more) and stacking those properly can give you great results, detail, noise, earth rotation cancellation. Here's a link for a video on how to do that "astral" stuff, even "moon" stuff. It's not complicated. http://starcircleacademy.com/2012/06/simpleastro/
Good luck! Sorry this took so long, and that it covered more than we've talked about yet here on CSC, but there is a lot to think about, more than just exposure settings, to get moon shots that are at all effective.
@kathyboyles@frankhymus I want to reinforce Frank's post -- the most important thing I learned in shooting a moon shot (I learned this in my first year on the site and have used it in tons of other circumstances) is how to set up spot metering. On the Nikon, it turned out to be an obvious button, but I'd not known what it was for. It's very easy once you find where on your camera to set it up!
@frankhymus Frank, if I use multiple exposures for the moon shot, what setting does the camera need to be on? Manual, P, Av, or Auto? Thank you Kathy. I will be using a tripod.
It doesn't matter. If you've worked out the settings then probably M is best because you can adjust the exposures down. Or Av, dialing in -1EV compensation as required.
I brought my 2.8 lens but found by paying attention to aperture I didn't need to open it up to 2.8 when I did it was too harsh where the lights shined right on the musicians. Thank you so much...learning a ton from these challenges!
@dianen i think it's a very strong image on all levels! I like the rise of the music stands as it goes into the background, the clear focus on the musicians, the rich colors, and the composition. It all works together well! I'm glad you found the CSC helpful and appreciated your participation.


@jyokota
Thanks for the use of your photo! I indicated which ones were yours above in the text.
Oh, for focusing, it's hard for the auto focus to work, so find something really far in the distance to focus on and once there, put it onto manual focus. Or just put it on infinity on manual. Have fun!!
Another one to try is star trails, but you might want to wait until it's warmer out, since you might be outside for an hour or more. Here's just one referene on "how to." Out in the country on a moonless night would be a perfect place to try this. http://digital-photography-school.com/how-to-photograph-star-trails/
I have image stabilisation in my lenses and it has been mentioned to me that I should turn it off for night photography. Is that correct, and if it is... Why?
Thank you
The trick is, when you turn it off, you have to remember to turn it on again!
Well done Charles! You've given us a terrific example of an evening shot during the blue hour, with the tripod insuring that your image components were tack sharp. Lovely DoF too. Thanks for posting!
The higher the ISO the brighter the shots got. There is definitely more grain in the higher ISO shots, but it is more noticeable in the foreground than in the stars. There are more stars the longer the shutter stayed open.
I live on acreage & went into the paddock to take these shots after I closed the curtains in the house. I was surprised by how much light was in the photos from the surrounding houses - these houses were quite far away & I couldn't see them. They gave off enough light that I can see my house in the middle & right bottom shots. Even in the top row you can see the glow of the lights around the trees.
I took some photos looking almost straight up so you can only see the tops of the trees & I took some aiming lower down to get some foreground in. I think I ended up with too much foreground. The interesting thing is that even though I know that the top row of photos actually have more sky in them, I keep feeling like the bottom row has more. I think this is because the bottom row has the ground & trees to provide a definition to the photos & to give a perspective and sense of scale.
I've drawn some circles on the bottom row of photos. I don't know if you'll be able to see but they are dots. They are on all the photos, but most noticeable on the photos that have foreground. They are not noise as they are quite sharp. They are not lights as there were no lights on this side of the tree line. I think they might be dust spots in my camera - would anyone have any other suggestions?
In general I like the 3200 ISO shots as a compromise between being too dark and too light/grainy. I think the 25sec shots are also the best compromise. In the 15 sec shots the light illuminating the house is not enough to understand what the house is, it is only enough to be distracting.
@pamknowler
Re the spots...unfortunately, I can't see them since they are small. You might want to post a full size image on a date from before you started your project just to get it onto the site. Then copy and paste the link to it in here or just send it to me in one of my shots and I'll look more closely. I suspect it is sensor dust if it is always showing up in the same place. Cameras almost always end up with this at some point. I have a few on mine at the moment and am just using Lightroom (or Aperture or picmonkey) to clone them out. There has to be enough, to me, to warrant paying the money for a professional cleaning.
Is this where I can make a comment for the challenge pictures?
Wonderful contribution! It is a bit scary to see the thatch and the heater so close to one another -- I hope that was just from your POV. On thought for your next attempt (maybe two)...First one is that at 30 seconds, you've let in sufficient light so that everything can easily be viewed. At night, though, one of the advantages is to create a little mystery about what we are seeing If you do this again, you might want to try stopping your aperture down as far as possible (I saw you were at f10, maybe to f16 or more if you can) so that the lights -- the white part of the lights -- turn into little starbursts, or at least are a little darker. The sparkles in the background would be fun to see against a somewhat darker background. The second thought is to step back a bit so that there is something that is a clear focal point -- what do you want our eye to land upon? Having the exposure and focus mostly on that and going ahead and letting the rest be darker would create a moodier image.
Your b&w of the pier is lovely with the symmetry you've highlighted. With all those lights, this would be a perfect candidate scene for a long exposure, tight aperture, low ISO capture to bring out the starbursts in the lights and have them a little less roundy-bright. The composition is very effective as is your choice of b&w.
Will post todays picture also. I think it qualifies as night photography, as it is sunrise, yet before the sun is up.
The suggestions from the community are what I need here in the project to help me progress. They are appreciated.
Thought there would be clouds for sunrise today, but got fooled. Not quite sure what the red/green flare in lower left of the near mountain is. Or, how to remove it. Any ideas would be appreciated. I use Apple Aperture at present time.
And, another one of the skyline across the water at nighttime:
Thanks,
Irene Marshall
@taffy Hi Taffy, thanks for the comments. I have put just one of the photos here full size, not sure if you will be able to see the dots that I was talking about, I circled them. They are Red in the Raw File, but Whitish Pink when I convert to Jpeg. Thanks Jenny
Here's another one from the same night... I like this one better.
A second version of an earlier post this week. In the challenge series of Night Photography I, I submitted a capture with a wider f stop, and no foreground lights. After receiving good a critique I realized perhaps I had a better photo in this one. Comments welcome.
Your partial eclipse of the sun is truly amazing.
Thanks again. Will work on a new photo for tomorrow.
Exposure: 15 sec (15/1)
Aperture: f/5.0
ISO Speed: 200
This was f//16, 15 sec, ISO 400
Night photo challenge. Found the lines of the lights leading to the sign perfect for composition. I think...
This has such a wonderful mood to it -- and the light flare draws our eye into the image. Wonderful long exposure evening shot (and nice wife to save your camera!).
Low Light on the Brisbane River. The orange colouring is coming from a street light that gives the photo some life. Didn't get a chance to do the different camera setting as it was too wet.
Thanks Kathy I'm in looking forwards to the journey.
Here's one from earlier this month. hand held ISO 2800 65mm f/11 1/20 thoughts on making it better? tripod? Image stabilization off?
Hand held 1/6, 6.3, ISO 3200. Found this quite hard. Wanted to try hand held and tried lots of different settings Thought the lights were too bright and exposed here although the shot itself was brighter.
Hand held 1/6, 4.5, 800.
I liked this shot the best out of all that I took. I found it hard to get the ISO down and keep the shutter speed up so that I didn't get blur. I felt this was the best of my shots. Any advice welcome.
This was taken using a 14mm lens on a full frame camera. Typically, to avoid star trails, the maximum exposure would be 35 secs (or 22 second on a crop sensor) based on the rule of 500, which I assume is explained further up?
In this case however, I found I was able to go to 65 seconds without any noticeable trail at the resolution I was after. If I was printing a billboard it would be noticeable, but I'm not!
So, in summary, settings were: 65 secs, ISO 3200, f2.8.
If you wish to avoid star trails in your astrophotography, you need to calculate the maximum shutter speed for your camera/lens combo.
To do this, divide 500 by the effective focal length of your lens - in my case, I was using a 14mm lens. So, my maximum shutter speed is 500 / 14 = 35.71 seconds.
Now, it gets a little confusing if you aren't using a full frame camera (which most people don't). For example, if I was using my 700D, which is a crop sensor camera, that has a sensor that magnifies everything 1.6 times. So, my 14mm lens is actuall 14 x 1.6 = 22.4mm.
Redoing the rule of 500 gives me 500 / 22 = 22.72 seconds before I get a blur.
If I haven't bored you too much and you are still reading, the reason for the blur is that the stars move across from one pixel on your sensor to another - the more pixels they cross, the longer the trail.
If you are not sure whether your camera is crop sensor for full frame, Google it - you should also be able to find out the factor you need to multiply your lens by (like the 1.6 for current Canon crop sensors)
Happy snapping!
Thank you for your comments, yes you are right it is a magic spot. I was there with a great bunch of people having a photography lesson with Andy Williams and would like thank Andy for the support for the last year. Irene.
I don't get much of a chance to shoot at night, but did do early morning. Taffy suggested I post it here. Shot at f5 1/160 ISO1250. Now that I realized early morning might work like early evening, I may try another with my tripod if I can find a spot to hide it after the shot rather than carry it 5 miles:)
Kathy, I have watched you progress in your photography and what a joy it has been. You try these challenges and are learning from them! (Taffy please let us know if you agree or have another thought) but when I copied your settings for your shot below your shutter speed was fairly fast for a night shot. I am not certain what the lighting was like but I see you did have your ISO pretty high. Perhaps for a shot like this you could try 25 seconds, 30 seconds or as Taffy said even a minute but this shot wasn't even 1 second. Also, in photography there still needs to be some light. In night photography the light is limited but there is light coming from somewhere or there will be nothing to photograph since photography means "light writing". So my main recommendation for this shot (there appears to be some light) is to have a longer exposure. Your camera will display 1" for one second, 2" for 2 seconds. Try a shot like this again, focus on something with a little bit of light and go for 15" or 20" (seconds).
Canon EOS 70D
Exposure: 0.002 sec (1/500)
Aperture: f/3.5
ISO Speed: 12800
Focal Length: 16 mm
@taffy
Good luck!! Please tag us when you try again. I think you'll see a huge difference with these two changes. Of course, you'll need a tripod or something to steady the camera on. If you don't have a tripod, I recommend the 'bag of rice' method -- you can simply put your camera on that and it makes a nice steady bed. You can also angle it here and there as needed.
Unnecessarily noisy I think, as others have said. I wonder why you might have chosen 1/500 shutter? That's fast even in full light.
Even if you don't want to break out the tripod, you could try something like
Shutter 1/30 (quite safe at 16mm hand held) - 4 Stops Up
Same Aperture
ISO 800 - 4 Stops Down
This "base" gives you the same EV (Exposure Value) as the shot you posted, with the ISO "under control." And if you want to adjust the Light up some more, even say 3 stops (EV) this would be a shutter of about 1/4, which you could (probably) even hand hold if the lens has image stabilization. Or just break out some camera support.
As side homework specific to your camera, beyond this challenge of course, I'd also check out the Auto ISO Speed Sensitivity Settings of your 70D, working in conjunction with, say, Av mode, and any exposure compensation you would dial in on top of that. Around about Page 123 and following in the manual. You can have the camera adjust the ISO within a range you specify, raising it as a last resort, determined by specifying the slowest shutter you will allow. The 70D (and later more advanced Canon DSLRs) even has an AUTO setting for the slowest speed you will allow that automatically sets this slowest limit for a suitable hand-held speed depending on the focal length of your lens. You need faster shutters for longer lenses to hand hold, of course. I use these all the time on my Nikon D7100 and it frees me up no end from the drudgery of trial and error and subsequent manual computation.
Yes, I know the object of the challenges so far is to have you do all this at least once manually in "M." And that's fine to understand what might be going on "under the hood." But in practice why would folks not want to automate much of this drudgery? You are still in command, you are not "surrendering control," but you can get to suitable exposures, with ISO kept in check as much as possible, much quicker than a trial and error hunt and peck approach.
After all, you've paid for the camera technology. It's one reason your camera cost twice as much as, say, a t5/t6 Rebel. Why not use it to handle the low level tasks, within limits you set of course, keeping executive decisions for yourself? Good luck, and good shooting with your excellent camera.
Kathy the purpose of this challenge is to learn the manual mode and shoot night photography while practicing. I would not recommend for these challenges to just try to do what you usually do but try new things, practice and then after you have given it your all you can decide what is the best avenue for you.
Since it was on a tripod you would be able to slow the shutter speed.
Thanks @taffy for asking me to contribute.
Manual settings, auto focus.
Exposure: 10 sec (10/1)
Aperture: f/14.0
ISO Speed: 100
Focal Length: 12 mm
Tripod and the self timer ~ I used a high f# to get the star burst effect on the street lights. I stuck with 10 seconds as there was still some light on the sky and had I gone any longer I may of lost some details? the photo may of been too bright?
In another matter, I am going with my photo club the end of the week to photograph about 6 or 7 different ghost towns in Nevada. That should be awesome. Weather is looking good. Camp out on Friday and Saturday nights. Should be fantastic opportunities for pictures!
It was done at about 8 pm so it wasn't completely dark and the sky was an incredible blue. If I had had a tripod and time to set up the shot, I think I could have improved on the result.
The exposure will come in at about +13 or +14 LV (light values), that is 13 or 14 stops higher than f/1 for 1 second at ISO 100. Something like f/5.6 (5 stops up from f/1) at ISO 200 (1 stop up from ISO 100) at 1/200 - 1/256 (8 stops up from 1 second). You can hand hold that, but it is better with a tripod since the area of the moon is so small and hand shake will be noticeable even with an image stabilized lens. At that exposure, you won't get much (anything actually) of a night shot of San Diego, which requires about 4-5 LV, maybe a little more depending on the artificial light available.
So if you want both, you might want to take two shots, one exposed for the moon and one exposed for the background and combine them, best in an editor via "stacking" since you can operate and manipulate at your leisure after shooting. You can do it in-camera as you are shooting but that can get a little complicated, having to take a stop off each shot, especially the moon one, since exposures are "additive" when you combine them on one camera frame. P175 and following in your manual for multiple exposures. In any case you'll have to make sure the background shot doesn't have a super over-bright moon in it. In an editor you can mask out all but the background in the background layer, or simply clone out the bright spots before loading. In camera is way more awkward; you will (probably) have to turn completely away from the bright moon. In a way, the editor route, the stack route, is more "real" and "true" if such things really bother you.
Of course, in an editor you can get really "active" and layer in the moon after selecting it, perhaps after cropping that might "magnify" the moon. Rather than just stacking shots with the same focal length and crop/magnification. Is that cheating? I'll leave that for you to decide. But don't make the moon too big if you do so. That will be a real give away that you have "operated."
If you are really into editing and stacking, taking a stack of 20 (or even more) and stacking those properly can give you great results, detail, noise, earth rotation cancellation. Here's a link for a video on how to do that "astral" stuff, even "moon" stuff. It's not complicated. http://starcircleacademy.com/2012/06/simpleastro/
Good luck! Sorry this took so long, and that it covered more than we've talked about yet here on CSC, but there is a lot to think about, more than just exposure settings, to get moon shots that are at all effective.
I brought my 2.8 lens but found by paying attention to aperture I didn't need to open it up to 2.8 when I did it was too harsh where the lights shined right on the musicians. Thank you so much...learning a ton from these challenges!