Congratulations to Wendy Bowden (@wenbow) for winning the CSC26 challenge with her photo 'The Plum Tree':
Wendy has asked me to host the next challenge.
Do some of the camera settings intimidate you? Do you want to learn how to develop your photography skills and learn how to use your camera effectively without always going back to the “auto” function? These challenges are for you!
=== INTRODUCTION ===
For this challenge, I'm going to stretch you by giving you not only a chance to practice your camera settings, but also combining it with a very useful but little-known trick called 'the black card technique', which can do wonders for your landscape photography!
This explanation is quite long, but stick with it -- I've tried to make it as simple as possible.
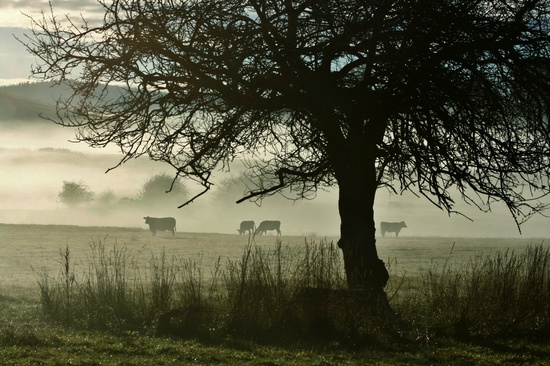
Most people have at least tried to take landscape shots at sunset or (if you're one of *those* people) sunrise. Do either of these shots resemble the results you get?
or
It's the typical landscape photographer's nemesis. You see a beautiful sunset, but when you take a shot with your camera, you either end up with the sky totally washed out, or the ground in almost complete darkness.
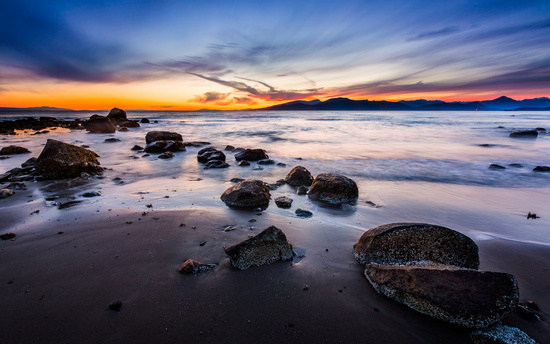
For this challenge, you are going to learn how to get your camera to take this shot instead:
For those thinking this is HDR or clever processing, this is a single photograph using the same camera and lens as in the first two photos, and I have applied absolutely no post-processing to any of these shots.
=== REQUIREMENTS ===
For this challenge, you will need three things:
1. A camera! A DSLR is best, but you can do this with a bridge camera. Compact cameras or smartphones will struggle with this technique -- you really need to be able to put the camera into a fully manual mode.
2. A tripod. Yes, I know, I know, but you should be using it for this kind of photo anyway. Really! Consider this a good opportunity to dust it off!
3. A small piece of black cardboard. Read on to find out why!
=== THE PROBLEM ===
So, why do we typically end up with a photograph that either has a washed out sky or a very dark foreground? The problem is because there is too much of something called 'dynamic range'.
Our eyes are truly remarkable in a number of ways, but in this case, one thing they are very capable of doing is allowing us to comfortably see scenes with a lot of dynamic range. Dynamic range is the difference between the brightest thing we can see and the darkest thing we can see. When we see a sunset, we are able to see the colours in the sky, and the detail in the ground, despite the fact that the sky can be 15-20 times brighter than the ground.
The camera, however, can't do this anywhere near as well. Even high end cameras can capture far less 'dynamic range' than our eye, so when we take a photo of this scene with the camera, we can either get the detail in the sky, or the detail in the ground, but not both at the same time.
We need to find a way to lower the dynamic range in our scene to allow the camera to capture it.
=== THE SOLUTIONS ===
Now, some of you are no doubt reading this and thinking, 'well, this is exactly what HDR does'. This is absolutely correct. HDR is a technique where we take photos with different exposures and combine them in software afterwards -- we have a photo with the detail in the ground, and a photo with the detail in the sky, and the software figures out which bit of each photograph to use.
This is all well and good, but HDR is a faff. You need to set the camera up to take these exposures, you get back home with 3 times as many photos as before, and you have to use a complex, time-consuming and (if you want the best results) commercial piece of software to process the photo. And if you have things in your photo that moved, such as waves, people, cars, etc., then you're really going to struggle, as they won't be in the same place in each photo.
Where possible, I will always try and avoid using HDR for these reasons. It's easier, quicker and more satisfying to get the result right 'straight from the camera'.
That brings us on to the other common solution to this problem, which does fix the problem without resorting to HDR, and that is to use what are known as graduated neutral density filters (often called ND grads).
Graduated neutral density filters look like this:
These rectangular filters are dark at the top and clear at the bottom, and they slide into a filter holder that fits to the front of your lens. They can be slid down so that the transition between dark and clear is where the horizon is, and that reduces the light from the sky while allowing the light from the ground to be unfiltered.
This is what I personally use for most of my landscape photos (but I didn't use them for the example above). They're great, but they have so many downsides -- they're expensive (that kit pictured costs over $380!!), they're fiddly, they scratch easily, they're easy to drop, and so on. If you're getting seriously into landscape photography, then you may want to consider buying a set, but for a casual photographer, wouldn't it be nice if there was a better way?
The good news is that there is -- the black card technique.
=== WHAT YOU NEED ===
The black card technique, as the name suggests, requires the use of a piece of black card. Here's one I made earlier:
The more observant of you may notice that it's banded. This isn't some clever trick -- I simply didn't have any black card, so I took some grey card and covered one side of it with strips of black electrical tape!
The piece of card should be about as tall as the diameter of the front of your biggest lens, and about twice as wide. At least one of the long edges needs to be approximately straight. Don't worry about getting it precise -- anything even slightly close to that will be fine. And if you don't have black card, improvise like I did -- there really is almost no way you can mess this up! And pretty much anything black will do -- plastic would be fine too. I'd avoid metal as you will be holding this close to the lens, so you don't want anything really sharp, but otherwise, anything will do.
=== HOW IT WORKS ===
What, you may be wondering, does this piece of black card do? (You may also be wondering if you'll ever get to the bottom of this post -- hey, me too!)
When we take our photograph, we are either getting too much light in from the sky, or not enough light in from the ground. We need to fix that. It's hard to increase the light from the ground without bringing in floodlights, so we're going to concentrate on reducing the light from the sky.
We can do this by simply holding our piece of black card over the lens for part of the exposure, and removing it near the end. This allows light from the ground to enter the camera for the entire length of the exposure, but only allows light from the sky to enter the camera for a fraction of the exposure -- so it ends up being a lot less bright!
=== HOW TO DO IT ===
To start with, put your camera on the tripod and find a location and composition you are happy with. It helps if you have a relatively flat horizon -- hilly scenes may not work as well, but don't be afraid to experiment! We also need a shutter speed of at least a second, which is why you should aim to do this at sunset.
Once you have the camera set up, switch it into 'aperture priority' mode (often shortened to Av). This mode allows you to control the aperture, and have the camera work out the corresponding shutter speed. You should also set the camera ISO to the lowest value (usually 100) -- this will both give you a shot with very little noise, and help get a longer shutter time.
Set the aperture value quite high (try f/16) and take a test photo. Depending on exactly where the camera is pointing, and how your camera's metering system works (the bit of the camera that works out what exposure to use), you will probably end up with a shot that either has a very bright sky and a well-exposed ground, or a very dark ground and a well-exposed sky.
The aim is to get a well-exposed ground and a very bright sky. To do this, we will adjust the exposure that the camera has chosen using the 'exposure compensation' control -- usually controlled either with a special dial, or by holding down a button while turning the main camera dial.
You probably have a dark ground and a well-exposed sky, so you need to increase the exposure compensation. Start off by increasing it by 1 stop (usually three clicks), and take another test shot. Continue to make adjustments until the ground looks well-exposed. Don't worry about the sky -- it will almost certainly be totally washed out in these photos, but that's OK! Even if you had a well-exposed ground to start with, make small adjustments with the exposure compensation dial to see if you can make it even better.
You should now have the camera set up so that, when you press the shutter, you get a nicely exposed ground. Hopefully the camera has had to choose a shutter speed of at least one second to achieve this. If not, you can either use a smaller aperture (try f/22 or even higher), or wait a few minutes until it gets a bit darker.
We now need to 'lock' the camera to these settings. Make a note of the shutter speed, aperture and ISO that the camera used for your last test photo, and then switch the camera to manual mode (M). Set the camera up to use the exact same settings. Now take another test shot -- it should have exactly the same brightness as before. If it doesn't, go back to Aperture Priority mode and double-check your settings. Also, switch the lens to manual focus mode, so that the focusing isn't confused by the piece of card.
Finally, we are ready to take a real photo (and use the piece of black card -- you didn't leave it at home, did you?)
Look through the viewfinder while bringing the black card down in front of the lens, with the long, straight edge of the card facing down. The black card should be touching, or almost touching, the front of the lens. You want the black card positioned so that this is what you see through the viewfinder (or on the screen, if you're using a bridge camera):
Now, press the shutter while holding the black card in place. Just before the end of the exposure, smoothly and quickly lift the black card from being in front of the lens.
If all went right, you now have a photo that has the ground looking just as it did in your test shots, but also with the colour and detail in the sky. However, this was your first try, so chances are you either removed the card too soon (in which case the sky will still be far too bright), or you removed it too late (in which case you don't have any sky at all!).
At this point, just keep trying. The aim is to remove the card just before the shutter is closed. If the sky is too bright, try keeping it in place for just a little bit longer. If the sky is too dark, try removing it just a little bit sooner.
After a few practice shots, you should start to get the idea, and then it's just a case of keep trying till you get the perfect result!
=== HOW TO DO IT -- SUMMARY ===
That was a lot to read, so here is the short version:
1. Put the camera on a tripod, at sunset, somewhere with a flattish horizon.
2. Switch the camera to aperture priority mode, set the aperture to f/16, set the ISO to 100, take a test shot.
3. Use the exposure compensation setting to adjust the brightness of the shot so that the ground is perfectly exposed, ignoring the sky.
4. Make sure that the shutter speed is at least 1 second in length. If it isn't, use a smaller aperture (f/22 or higher), or wait a few minutes.
5. Transfer the settings used for your test shot in aperture priority mode to the camera's manual mode. Switch the camera/lens to manual focus mode. Take another test shot to make sure it looks the same.
6. Hold the black card in front of the lens so it covers the bright parts of the photo, press the shutter, and just before the end of the exposure, lift the card out of the way.
=== THE FINAL RESULT ===
The result will be a photo that comes out of the camera looking something like this:
And of course, if you want to do a bit of post-processing, then you can turn it into something like this:
=== FREQUENTLY ASKED QUESTIONS ===
Q. This looks crazily complicated. There's no way I'll do it!
A. I've tried to give plenty of detail about both what to do and why it works. Take a look at the summary and hopefully you'll see it's not so bad. Admission time -- I'm pretty familiar with my camera, but I never used this technique before today. It took me about 2 minutes to get my first 'good' photo. I'm not expecting you to do it that quickly, but give it a go, and if you get stuck, ask questions!
Q. Why do I need a shutter speed of over a second?
A. You need to be able to remove the card almost at the end of the exposure. This is fairly easy to do when the shutter speed gets over a second in length. Once you get used to it, try it with shorter exposures. I had no real difficulty doing it using a 1/4 second exposure, although it was a bit harder. You probably don't have the reflexes to do this with a 1/200th of a second exposure!
Q. This is neat, but I want to be able to use it at times other than sunset!
A. To do this, you'll need to slow your shutter some other way, such as by using a neutral density filter (note, not a graduated filter as I mentioned earlier). Many people have these and use them to slow exposures when taking, for example, waterfalls, but if you have one you can use it for this technique too!
Q. Why do I need to use manual mode? I just set the camera up in aperture priority mode, what's wrong with that?
A. Good question! Aperture priority mode bases the exposure on the brightness of the scene, adjusted by any 'exposure compensation' you've dialed in. When you put the card in front of the camera, you are darkening the overall brightness (even though it's not covering the ground), so the camera will alter the exposure, overexposing the ground!
Q. The 'edge' where the card was held is too obvious, it looks fake.
A. Try moving the card up and down very slightly (a couple of millimeters) instead of holding it perfectly still. This will 'soften' the edge and provide a smoother transition.
=== CHALLENGE DETAILS ===
Experienced photographers who are knowledgeable in this particular setting are encouraged to offer “kind and constructive” suggestions on the posted entries. Those entering this challenge want to learn and improve.
This challenge starts today, June 6th, and ends on Sunday 16th June at 12:00pm Central Standard Time (17:00 Zulu time http://www.zulutime.net). All photos must be taken during these dates to be considered. Enter as many as you would like- the idea is to practice & learn. TAG YOUR PHOTO CSC-27 AND post your picture in this thread to receive feedback from other experienced photographers specific to this challenge.
Voting will take place on June 17th (and remain open 24 hours) and the winner will be announced on June 18th. The winner of the challenge will select an experienced photographer to host a new challenge. It is the winner’s option on who they want to host the next challenge; it may be someone they follow whose work they admire, or someone who is active offering suggestions on previous CSC challenges. The winner may also select an experienced photographer for the list of photographers who have agreed to host future challenges as another option. Here is the link to that list: http://365project.org/myhrhelper/365/2011-12-12
Expect to receive constructive suggests on how to improve your skills.
How to post your photo on this link:
1) Go to your page that has the photo you wish to post.
2) Copy the “share” code in the bottom right section of that page.
3) Return to this thread and paste the code under comments
Alexis, it is never a chore to read your posts. Thank you for explaining in such a way that all should be able to understand! This is an amazing and interesting challenge - thank you!
I am not one for reading instructions but never cease to some away from reading yours with a feel good factor and a sense of yes I can do that ~ because you make it sound so easy by explaining it so well ~ now to get out there and try it ~ thank you for the challenge
This is absolute GENIUS!!! So simple, yet so elegant! And fantastic explanation. :) I may not get time to try it within the timeframe of this challenge, but I will most certainly give it a go when I am near a beautiful sunrise/sunset :)
Brilliantly explained. I GET completely how to do it, but whether I can actually do it or not remains to be seen... Think I will have a go though. Thanks Alexis
Quick thing about this Alexis... at point 5, I would also recommend that after they've done test shots and are happy with the focus, they switch it to manual focus... I know that with something in the range of F18, a lot will be in focus, but it'll get over the instances of the centre point being up in the sky and the auto focus going beserk
alexis, reading instructions like this (comp and long) used to cure my insomia. but yours are always so engaging i would even have the energy to re-read it. this challenge is a must-try just because you explained it in such simple terms. thank you.
as i always tell people, everything i learned in photography, i learned from 365, and you.
I love how you explain things. Just one question...I've never heard the term, "faff." Is that an abbreviation?
Looking forward to trying this one. The blown out sky often bothers me.
Such a fantastic challenge! You are an amazing writer and wonderful at making instructions clear and easy to understand. Thank you so much for this Alexis.
Well this certainly is something I would love to try out although finding the straight horizon might pose a problem but persevere I shall! Your explanation makes it sound quite simple
Woo Hoo! I love this challenge. I will try it. Maybe not with such a cool subject as your example photo but I'm excited to learn how to do this. Thank you so much for hosting this challenge Alexis!
@Cheesebiscuit if you have mountains, you can tryusing the black card for one shot at the bottom of the mountains, one half way through (unlikely to work) and one near the top. Alternatively lets say that if the shutter is open for 1 second, you could try at the bottom of the mountains and slowly raise the card... that may work?
@abirkill I saw this a while back in a video... it's a super, SUPER idea! You can also use your camera strap if you have nothing else. Would you like me to see if I can find the video where they demonstrate it? I think it was Improve Photography.
Cool! Always one to experiment, I found something I wrote on a pic in 2010:
"oh.. and I don't have graduated filters for my camera... so I probably looked silly.. but my solution so there would be some landscape showing, was to expose more for the landscape which would of course overexpose the moon.. and then fanning a piece of construction paper over just the top part of image so the moon was only visible to camera for part of the exposure. And then I upped the shadows quite a bit in picasa and applied a graduated tint. Not perfect.. but not bad for a facebook showing of how AWEsome the moonrise was tonight!!!"
Thanks to everyone for their comments -- I'm glad that it seemed to make sense to most of you! It was quite late when I wrote it!
@toast Good point, I've added that to the instructions, thanks.
@btorrey Ah, that would be my Yorkshire upbringing! From Wikipedia:
faff: to dither, futz, waste time, be ineffectual, “I spent the day faffing about in my room”. Also related noun ("That's too much faff"). Mainly found in Scotland and the north of England, but also popular in South Wales.
In this case, the graduated filter has been used to darken the sky and increase the detail in the clouds, although it would of course work on a clear day as well.
To replicate this by using the black card technique, you may need to slightly alter the way the card is removed. Holding the card in place for most of the exposure, and quickly removing it, creates quite a hard edge which works well on straight horizons but isn't so good for hills. Instead, try holding the card in place for about half of the exposure, and then slowly lifting it out of the path of the lens for the second half of the exposure. This will produce a soft-edged graduation.
Of course, if you really want to stretch yourself, take along some black card and some scissors and cut out a custom-shaped card that matches the hills/mountains you are photographing!
@ozziehoffy Thanks! I'm sure people would be interested in seeing the video. For anyone who does want more info, there is, of course, a huge amount on the 'net -- just search for 'black card technique'!
@abirkill lol! I think cutting out a custom card for the hills is a bit beyond me! And littering is frowned upon in Switzerland :D I will definitely try your other suggestion though, thank you :)
@abirkill this sounds exciting to learn. I am going to try it. I had better practice the steps so i am not out there so long trying each step that it gets totally dark. I blink step 3 and the step where you pull the card up. I hope I can do it successfully!
Mary @m9f9l ,yes I can think of a place or two with flat horizon. I think! It has to be very flat to work. I'm glad I am on summer break so I have time to attempt it. One of my projects for summer is to learn some new techniques. Thanks for tagging me! Oh and I friend requested you on FB. :o)
Excellent Instruction's!! I have no problem finding a flat horizon in Texas!! lol...And i always have this problem! So now i can experiment! Thank you! ;)
Thanks for sharing, Alexis. Very magnanimous. Interested in your views that that you'd rather use Grads (or Black Card!) then HDR - I think I'm coming to the same conclusion. It may be my bad technique, but I find I get better results shooting a single RAW shot and tweaking in LR then using HDR - it just never really seems to look natural to me. Think I'll have to invest.
Here is my entry for the challenge. Absolutely fascinating technique and very useful! Thanks Alexis!
I found it interesting how the colours were much warmer in the area of the photograph that was covered by the card. Any ideas why?
@myhrhelper I tried a bunch of different horizons and ended up with it at an angle covering most of the water. In some of my pics you can see a a very light line across the water, just above the grass. I'm guessing in those, I held the black card in place too long.
I wish the rain would stop...I can't wait to try it again!
This is a pitiful example but I HAD to try this with what I had available. I can see when I do this properly it is going to be much better. I hope to have a better shot before the challenge is over- either way I will try it. I tried to cover the upper left side and not cover the tree on the right. I did shake the camera a bit too. The photo was shot within the correct time frame I just added it to an earlier date since I didn't have anywhere else to put it (not like this one has a chance for a vote)
@sassik Wow, that's stunning, well done! I'm not seeing a warmer colour balance in the top half of that photo, to my eye, unless you've corrected it? If you use auto white balance, a photo without the card may be different to a photo with the card because the white balance selection will be affected by the card.
@btorrey Really nice! Well done for using the card at an angle, you do have to experiment to find the best positioning, just as with a graduated filter. There is still a bit of overexposure in the sky, so maybe holding the card there a fraction longer would have been an option, but it's an excellent shot! Well done!
@myhrhelper Well done! Even if you aren't totally happy with the shot, I hope it's given you an idea of how it can be used in the future! Using a rectangular composition like this is a great idea and it has controlled the exposure very nicely.
This was as close as I could get, but I will continue trying to perfect this technique. Thank you for this challenge, I love learning new and useful things.
Gotta be honest, I did tweak the exposure, where the card covered the first rocks in the water, to match the foreground. The thing is, that the water would look too bright, if I didn't cover it with the card. Also added some clarity, vibrance etc.
Alex, thanks for sharing this. I definitely want to try it out, but won't have time to make competition. It's wonderful to get information like this and to experiment further. Thanks again.


Tagging myself so I can find this later. As always amazing Alexis, huge thanks!
as i always tell people, everything i learned in photography, i learned from 365, and you.
now, if only the rain would go away.
Looking forward to trying this one. The blown out sky often bothers me.
Umm... the landscape I can see is the Alps...
Maybe I can get something flat down by the lake, but the sun is still going down behind some hills down there.
"oh.. and I don't have graduated filters for my camera... so I probably looked silly.. but my solution so there would be some landscape showing, was to expose more for the landscape which would of course overexpose the moon.. and then fanning a piece of construction paper over just the top part of image so the moon was only visible to camera for part of the exposure. And then I upped the shadows quite a bit in picasa and applied a graduated tint. Not perfect.. but not bad for a facebook showing of how AWEsome the moonrise was tonight!!!"
Pics are first two here: https://www.facebook.com/media/set/?set=a.1579862690788.82327.1062296810&type=1&l=b061fc4cc4
If I'd had a straight horizon that night, I probably would have reinvented this wheel!LOL Nice to read it's an actual technique.
@toast Good point, I've added that to the instructions, thanks.
@btorrey Ah, that would be my Yorkshire upbringing! From Wikipedia:
faff: to dither, futz, waste time, be ineffectual, “I spent the day faffing about in my room”. Also related noun ("That's too much faff"). Mainly found in Scotland and the north of England, but also popular in South Wales.
@salza @Cheesebiscuit You can still give it a go, although it will be a little harder to master. ND grads are still useful when photographing hilly horizons, and can again control the brightness in the sky. Here's an example:
http://www.flickr.com/photos/johngravett/8949631097/
In this case, the graduated filter has been used to darken the sky and increase the detail in the clouds, although it would of course work on a clear day as well.
To replicate this by using the black card technique, you may need to slightly alter the way the card is removed. Holding the card in place for most of the exposure, and quickly removing it, creates quite a hard edge which works well on straight horizons but isn't so good for hills. Instead, try holding the card in place for about half of the exposure, and then slowly lifting it out of the path of the lens for the second half of the exposure. This will produce a soft-edged graduation.
Of course, if you really want to stretch yourself, take along some black card and some scissors and cut out a custom-shaped card that matches the hills/mountains you are photographing!
@ozziehoffy Thanks! I'm sure people would be interested in seeing the video. For anyone who does want more info, there is, of course, a huge amount on the 'net -- just search for 'black card technique'!
I may also have a problem with the hills around here but will still give it a try.
Mary @m9f9l ,yes I can think of a place or two with flat horizon. I think! It has to be very flat to work. I'm glad I am on summer break so I have time to attempt it. One of my projects for summer is to learn some new techniques. Thanks for tagging me! Oh and I friend requested you on FB. :o)
I found it interesting how the colours were much warmer in the area of the photograph that was covered by the card. Any ideas why?
I wish the rain would stop...I can't wait to try it again!
@btorrey Really nice! Well done for using the card at an angle, you do have to experiment to find the best positioning, just as with a graduated filter. There is still a bit of overexposure in the sky, so maybe holding the card there a fraction longer would have been an option, but it's an excellent shot! Well done!
@myhrhelper Well done! Even if you aren't totally happy with the shot, I hope it's given you an idea of how it can be used in the future! Using a rectangular composition like this is a great idea and it has controlled the exposure very nicely.
Gotta be honest, I did tweak the exposure, where the card covered the first rocks in the water, to match the foreground. The thing is, that the water would look too bright, if I didn't cover it with the card. Also added some clarity, vibrance etc.