Welcome to the Brand New & Revised Camera Settings Challenge 2015. This is Camera Settings Challenge #10. @myhrhelper will be coordinating so if you would like a quicker response, feel free to tag in your first comment box. @camerasavvy will be automatically notified as well.
Do some of the camera settings intimidate you? Do you want to learn how to develop your photography skills and learn how to use your camera effectively without always going back to the “auto” function? These challenges are for you!
We are going to walk you through various camera settings starting with the basics and build upon them as we move forward. This will no longer be a competition, but rather a type of Project 365 classroom community. You can join in and follow whenever a challenge interests you.
These are designed for experienced photographers to share knowledge with those who want to learn and improve their skills.
The current challenge is: focus basics, March 30th - April 5th
Please use the tag: camerasavvy-focus
THE LINKS DO NOT WORK - SEE THE COMMENT WITH THE LINK.
-------------------------------------
This week’s Camera Settings Challenge is all about focus and the focus modes. Just like shooting in Manual mode you gain more control over your camera and the type of images you want – the same is true with focus. We are not talking about shooting in FULL Manual Focus – (that is a topic for another week) but rather being able to adjust the focus points to the exact part of the image you would like.
This is an excellent article on this very topic. (Katie was part of 365 in the past). Please read.
http://www.boostyourphotography.com/2014/05/focus.html
FOR THIS WEEK’S CHALLENGE - We want to concentrate on two things: Choosing the focal point in your image, and tracking a moving object. These are quite different to each other, and one may be more relevant to you than the other. You may choose to concentrate on one topic or attempt both.
Most cameras default is AF- Auto and the camera will decide what should be in focus and would should not be in focus. If you see birds in a tree, you may want to have the birds in focus but the camera may focus on a branch in the tree. Likewise, the bird may move or take flight, and you may lose focus. So to have better focus control we are going to select either single or continuous focus modes.
SINGLE FOCUS MODE (ONE SHOT on Canon) is generally used for shooting still or fairly still objects, for example portraits, still life and landscapes.
In single focus you push your shutter button halfway, and the camera will lock in focus – signaled by your AF point lighting up and/or a beep. You are then able to recompose your image should you wish, by moving the camera to the left or right for example, your subject remaining in focus while you do this, before you press the shutter fully. You can further control this mode by manually selecting which AF point you want your camera to use, rather than having it choose one (or more) automatically. (You may have to check how to manually select your AF point for your camera.) In the example above, the camera may choose the AF point with the closest object to the camera – which may be a branch. By manually choosing the AF point, you can ensure there is a bird underneath it when you focus, and if you choose to recompose, you know that bird will remain in focus. Many photographers prefer to use the center point.
CONTINUOUS FOCUS MODE (AI SERVO on Canon)
is used for focusing on moving objects such as sports, a moving animal, children etc. When using the continuous focus mode you again lock in your focus on the moving object by pushing the shutter ½ way and keep it there until you want to shoot the picture. The camera will track the motion of the object and it should still be in focus when you press your shutter fully. How your camera does this is quite complex, and could vary depending on manufacturer etc. There can also be different modes of tracking available, and you may find one works better for you than another. Here is an explanation of how it works for Nikon by Jared Polin: http://froknowsphoto.com/super-secret-project-focusing-mode-explained/
CHALLENGES:
1. Single Focus
For this challenge try to select a little wider aperture, I recommend F5.6 as a good place to start. You may shoot in manual mode or aperture priority – which ever you prefer. Select AF-Single/ONE SHOT.
– Select a scene you want to photograph and take a photo. Did the camera focus where you wanted it to?
Without changing your scene, manually select an AF point (eg. centre) and take a photo. How did that change the image?
Focus and recompose: Without changing your scene, and with your selected AF point, move your camera to choose the part of the image you want in sharpest focus. Hold down your shutter halfway, recompose (back to your original framing), and take the shot.
Compare all of your images on your computer screen, zooming in to thoroughly check the focus in each. Is there much variance? Which do you prefer? Which settings do you feel most in control, and which do you feel most comfortable? Keep practicing while in Single focus mode.
2. Continuous Focus
For this challenge you can use either Shutter Speed priority or Manual mode. I recommend that you use a faster shutter speed such as 1/250 of a second or faster depending on your lighting conditions. Select AF-CONTINUOUS/AI SERVO.
Try shooting a moving subject using the continuous focus mode. Take multiple shots. Do you have at least one image with where the moving target is in focus? If not try again, to get this right it takes practice and often takes several attempts before capturing the image you are happy with.
B) Try shooting another subject moving in a different direction (eg. if your first attempt was something moving across your frame, try something moving toward you). Did you find this more or less challenging?
C) OPTIONAL EXTENSION: Try experimenting with your camera’s available tracking modes (as explained in the Jared Polin link above) – which seems to work best for you?
Here are other helpful links on the subject:
https://photographylife.com/dslr-autofocus-modes-explained
Since this week’s subject is on focus try to get images in crisp clear focus as possible.
Post your examples on this thread for feedback.
The main question to ask yourself is – is my focus point tack sharp?
Hello all! I'm posting the collage below to show the difference between single focus and AI Servo (continuous focus). This is perhaps my greatest achievement with the CSC over a year ago. The sock monkeys on the top row were done using AI Servo (on Canon) and the sock monkeys below show single focus. Single focus will not track the subject as it moves. I also find that AI Servo is wonderful with subjects going forward and back, but it's really good with kids moving, birds, etc. I found that my Rebel camera at the time will also move more slowly per frame and drain the battery, so once done using it, turn it back to single shot to save battery drainage. For me, since I love action shots, the AI Servo has been great. There is AI Focus too, which lately I have been playing with. Hopefully below will show the differences! Happy snapping!
@darylo I saw that photo and was going to ask if you about using it. This is perfect! @darylo Also, since you use this mode in Canon (I am a Nikon user) It may be helpful if there are any questions specific to Canon cameras that you could help in responding to those questions? I was going to ask you but time slipped away and I never did
@myhrhelper no problem! I use a 7D Mark II and a Rebel T2i, so I should be able to guide Canon users! Will try to keep an eye on the thread. If I have time to do a few shots, I'll post them here!
@darylo Thanks Daryl, these examples are great! I have done the same experiment on occasion with my kids on swings but I probably deleted all the out-of-focus ones! Certainly don't have an awesome collage like this :)
@camerasavvy Hi, I couldn't see @irene111 in the list & I know Irene wanted to join in with the Camera Savvy Challenge. Could you please add her into the distribution list. Thanks Jenny
I have a Rebel T2i and I hate to admit but I totally do not remember how to change the mode. I'm spelunking through the manual now. I'm annoyed with myself because I think I've done this same challenge once before.
Ok, so yesterday and today I went out to work on this challenge. After all, I'm a big speed junkie and love moving targets. My new camera is a beast to figure out for focus and speed, so this challenge was made for me. Here are two collages I made (if you click on them, it has explanations). A note to those who are using AI Servo, it's not always great, and don't forget you can use sport mode as well--which I believe provides the assistance--you just aren't controlling everything in manual (but it's great when you see a hawk and don't have time to fiddle with knobs!).
A question ~ I have my camera set permanently on AF -C, continuous with one single focal point that I move to where I want my camera to focus on~ no matter what I am shooting. I am shooting in manual and choose Shutter, Aperture and ISO based on light conditions and what I am shooting.
Should I be changing back to AF-S [single] when not taking a shot of something moving? And should I be using more focal points?
@alisonp Hi Alison! I would use AF-S. It depends on your camera, you shoot with a D7000 I think, but almost every camera's center focus point is the most sensitive, fastest and most accurate. I feel that's the one you should always try to use for "single" focus shots. Put the spot over the subject, half press shutter to acquire focus and reframe. Just as explained in the introduction. Personally, I feel moving the focus point away from the center one is counterproductive, the only exception being if the camera is locked stationary on a tripod and the subject is off center.
Unless you have set the AF Area Mode (Nikon terminology) to something other than "S" (single point), AF-C, and AF-A for that matter, is almost pointless, since nothing will track outside that single focal point.
Interestingly, if you set AF-C (or AF-A) AND the Nikon 3D Tracking for the AF Area Mode (not any of the Dynamic Area modes) you can put the center point over the subject, half press the shutter and then move THE CAMERA to reframe. The focus point will shift automatically back to the one now over the original subject, just as if the camera was held steady and the subject had moved. At least it will try too. Your D7000 is not always totally accurate, especially in low light, and also might be a little slow to react. That is, IF there is a focus point now over the subject. Remember, the focus points don't cover the whole frame. There is a setting that makes the camera try to refocus quicker when tracking focus. Look on the Custom Menu, AF section, Focus Tracking with Lock On, setting a3 on my D7100. But if there is no real motion, the simpler AF-S will be more accurate and precise almost always.
Good shooting. But you seem to be doing remarkably well with your current operations, but I think it just overly complicates things for you. Also, I think you will get significantly longer battery life with the simpler AF-S setup.
@alisonp@frankhymus
I agree with most of what Frank said but I do have a couple additional things for you to think about.
1) yes to what Frank said there really isn't a point to use a single point when using continuous. I think center is probably ideal or using a large range of focal points since the D7000 offers up to 39pts. (That is the camera I have).
2) For single focus I will use center or single point frequently. The reason is I do a lot of portrait photography. I want that crisp clear focus on the eye. If you are using a wide aperture the center focus may not be good enough (at least for my taste).
3) As Frank mentioned the D7000 has been known to have some focus issues but for me I have not experienced too many issues with it but as he mentioned better lighting will help. But I find that to be true with focusing in general
@frankhymus@myhrhelper thank you both for your comments ~ it is late here noew, but I will try and digest all the info tomorrow and try and put it into practice
I reset my AF to S and re-instated all 39 focal points.... I struggled ~ the camera was just hunting for something to focus on and it wasn't where I wanted it to be. So I reverted back to my one single focal point but did stick with the AF-S
To be fair I didn't follow the challenge fully so had nothing to compare on screen ~ I will do this tomorrow.
I focused on the white writing as the AF was having a fit and wouldn't focus on anything else
@myhrhelper This shot was taken on shutter priority and continuous focus. Its not as sharp as I wanted. What AF point section would be best to use for birds in flight? Is that where I went wrong
My camera is Canon 7d Mark ii fairly new to this camera only had it 10 days now so may be there are other setting that I need to make as well?
@alisonp So AFTER you select AF-S (by holding the button on the left side of the camera marked AF or M) and turning the front dial of the camera near the red stripe) the camera gives you two options you can select AF -Auto or AF-S with one adjustable one single point. AF-Auto is going to pick and choose your point. If you have AF-S you can move the red focal point within that grid. Once you found a focal point you like by holding shutter 1/2 (and keeping it down 1/2 way) you can also do a slight recomposing of the shot as well.
You select your focus modes Auto, AF-S (single) or AF-C (continuous by turning the dial located on back of the camera top right)
Then you can dial in your available AF-S options which is AF-Auto or AF-S (this one allows you to adjust that point by tapping to the right, up, down, left of the button labeled ok.
@bizziebeeme You did well. Shooting birds is tricky. I found this video to be helpful. https://www.youtube.com/watch?v=EpFR_UYhOKY
Your first image was awesome - great focus - the second was not but that is typical when shooting birds - it really takes practice.
@myhrhelper Not confusing at all. yes they are the buttons I use to change AF setting.
Currently I have set ot to AF-S and a single focal point that I chose to position within the frame by using the right/left/up and down dial. This is what I have always done but tried the auto where the camera chose what it thought I wanted and the focusing was hunting through any one/few points of the 39, so I went back to single focus point that I choose.
What I have changed to my usual settings is AF-S over AF-C [that I always had set on my camera ~ for no reason other than I had it on it] and also used just the single focus point that I chose.
Because I use the single focus point I also find it beneficial to choose 11 focal points instead of 39 as this allows me to 'toggle' between points quicker.
@alisonp Did you think to try the center point, place it over the focus subject, half press the shutter and then reframe with the shutter held half down? Then when reframed, press the shutter the rest of the way down. This way you get to use the center point, most accurate and sensitive, and one of the nine "cross" points in the center. A "cross" point is important to prevent hunting if all your lines are vertical or horizontal. The nine cross points are in the center of the frame. And you don't have to mess with manipulating the up-down-left-right control. And you can have *any" position in the final frame in focus, not just those that fall under a focus point in that final frame.
All I did was switch from AF-A to AF-S. In AF-A it was definitely less sharp. I'm a little confused. For this challenge am I changing focus mode and focus point or just mode??
@frankhymus@alisonp For the D7000 when in AF-S you have two main options - Auto or single point when using the view finder and that is what we are focusing on for this challenge. There isn't a center focus option when using the AF-S. There are many more options when you are using the AF-Continuous https://www.youtube.com/watch?v=zeOvJmOYw_o
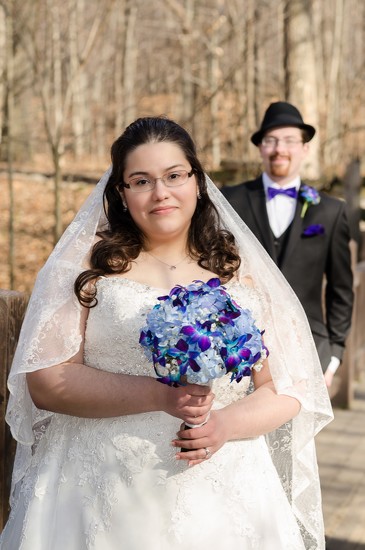
@dianen This is a beautiful shot. For this challenge we are trying two things 1) practice with the AF-S mode (for Nikon users) and AF-C (continuous).
I get better results when I have control rather than the camera picking what should be in focus. So for this challenge - put your camera in AF-S (single - or one shot for Canon) then decide what do you want in focus and adjust the focus point to that point and take the photo. Then, move the focal point and take another shot. Some scenes you will notice a bigger difference. For example with the shot above with the bride & groom, the bride is in focus and the groom is not when using AF-S. For another shot I could have the groom in focus and the bride blurred.
Also keep in mind there are other factors that will effect how crisp your focus is. What is the lighting like? If it is too dark you may not have as clear of a focus. Also, what shutter speed are you using? If your shutter speed is too slow it may be less in focus hand held.
@bizziebeeme One other thing I want to point out with the AF-C or Al-servo (Canon) when a subject is moving your camera is continuously calibrating the focal point(s) so for that reason alone some of your images may not be in as good of focus. Once your subject focal point leaves scene of your camera it stops tracking and you will need to re-focus on the moving image once again.
@myhrhelper@alisonp AF-S, "S" (single point area mode, not auto), select the center point if not already selected with the multi-selector, and (optionally) lock it by moving the lever around the multi-selector to the L position. Thought I said that, but if I didn't, that's "always use the center focus point."
Left shot - F2.8 1/250 ISO 100
Right shot - F2.8 1/200 ISO100
I was just playing around with the focus modes when I took these shots. I am now going back to the manual to gain an understanding of the different modes.
I prefer the shot on the right as I like the focus on the foreground rocks.
@adayinmallacoota I also prefer the one on the right but doing both gives you ideas of the different effects you can get with your focus and really does work well with the aperture setting used as well, especially if using a wide aperture (low Fstop number).
Today I discovered what the AFF button on my camera does. It means Auto Focus Flexible and is designed to be used if there is going to be a change in direction of your subject ie animals or children. So when I spotted this heron I thought I would give it a try. In addition I also used burst mode to fire off a few rapid shots in succession. As this fellow was hopping around a bit, I am reasonably happy with how this turned out.
@bizziebeeme I am by no means an expert on this (far from it) but after my reading in the last few days in contribution to formulating this challenge ... perhaps my thinking out loud may help?!
Firstly, did your camera have time (in the second shot) to focus with the shutter half down? I know that in the speed of getting "that" frame with moving objects it's easy to forget the simplest things. Of course you may have had your shutter half down for ages waiting for this moment ...
Secondly I think I saw a comment (for someone else), about whether the subject could have moved out from under the focus points, and I'm thinking that unless you have heavily cropped this image, that's unlikely to be the problem. I've never held a 7Dii but I know the coverage of focus points on the 7D is quite extensive (covers much more of the frame than my 6D) so I can't imagine the bird just isn't being covered by them! But being SO out-of-focus it also seems unlikely that the continuous focus just wasn't keeping up with the movement, which I guess is why I asked the question in my first point.
Thirdly re the top shot - is this the one you're referring to saying it's not as sharp as you wanted? I'm also trying to get a handle on how Canon's tracking system works (after watching Fro's video on the options Nikon use and a couple of exchanges with Frank) ... but to my eye it seems the water splash is pretty crisp, and the bird only slightly less so. I'm wondering if the tracking system is the one where the closest thing to the camera is what ends up being in focus? I also wonder whether the 7Dii (being so new, and the 7Ds being more geared toward wildlife/sport etc in general) that you may have some options that my 6D doesn't? @frankhymus Do you have any insights into this? Just thinking it might be worth trying a different tracking option if you have them?
@adayinmallacoota I'm assuming this is an attempt at the "focus and recompose" method? Given I'm seeing the same subjects framed identically but the focus placed on a different point each time ... in which case, well done, it's an excellent illustration of the point :) I too prefer the one on the right, and it's nice to have the comparison one on the left and know that you can control it :)
Just contributing a couple of examples for the "focus and recompose" idea. Shooting S's labour (last May) I was working in very low light, and had my lens wide open at f/1.4 most of the time. There were many instances when it was impossible for me to have both S and her husband C in focus, so I would frequently take a number of similar frames, some with the focus on S, some on C. I suspect allowing my camera to choose the focus in this instance would have resulted in only S in focus as she was closer to me. Catching the right one at the right time of course was a challenge, because candidly photographing people interacting ... you never know who is going to have the better expression at any given second!
@aliha Thank you for your reply, I have only had my 7d mark ii for 11 days now and birds in flight is something that I generally struggle with although I was happy with the top shot it was the bird that I would have liked a bit more crisp. And as for the second shot yes perhaps the camera did not have enough time to focus. I am hoping to try agin over the Easter weekend to get a perfect shot :-).
@myhrhelper Thank you so much for you reply and the link to youtube video I will hopefully be able to try again over Easter to get the perfect shot :-)
@aliha@bizziebeeme If you have time, you should read 5 or 6 pages in your 7Dii manual on Auto Focus, starting at about page 124 and reading through about page 128 where it talks about enabling iTR. The earlier area options, "Expand AF Area Surround" and "Expand AF Area Adjacent" look analogous to the various Nikon Dynamic Area modes. The Manual Select Zone and Large Zone seem interesting as well.
But what is most interesting is on page 128, the iTR that is new (or adapted from the 1Dx it seems). Somewhat akin to the function of Nikon 3D Tracking, from reading the manual and other literature.
I'd try the "Expand AF Area Surround" and iTR and see what that gets for you.
I'll stay with my Nikon 3D Tracking though. It is reported, I have no first hand comparison experience, that currently Nikon just do it better. And offer the functions across the entire current DSLR product line down to the D3xxx. Here's one, reasonably unbiased, assessment. Also, it discusses much better than the manual the area and tracking options for the 7Dii, with nice big diagrams, and some practical explanations of ways to control the "sensitivity" of the tracking and refocus. Very nice fucntionality, more comprehensive than Nikon. Towards the bottom of the main text, above the "comments" of the bloggers. http://www.dpreview.com/reviews/canon-eos-7d-mark-ii/6
@darylo also has recently upgraded to the 7Dii, and might be able to provide more information and advice.
The one on the left followed the settings for AF single-ONE SHOT and the right used the center AF point - both are supposed to be focused on the dandelion. They most definitely not sharp! I am totally lost on this one and would sure appreciate some thoughts.
@milaniet Hi Milanie. The scene you photographed is not the best choice for seeing how a single focus point works. The shot in your album of the Brown Thrasher would be a great choice for using a single focus point. This is where you would want to have the focus point on his eye.
In this shot below I focused on the squirrels head, right between his eyes. I used a shutter speed of 1/60 and f/8 for aperture. You will notice that his body is progressively more blurred. If I had used a smaller aperture (larger aperture number) I would have had more of his body in focus but I would have needed a slower shutter speed.
In the flower photo below I wanted just the rippled edge of the lily in focus so I used a single focus point, f/3.5 aperture and 1/40 shutter speed.
Focus Challenge - Single Focus. All shots were f5.4 1/20 @ 100 ISO.
I chose to photograph some stuffed toys in a cot, because I thought the camera would automatically focus on the slats of the cot when left to its own devices so I would see obvious difference in my shots.
The shot on top is full Auto Focus. The slats are in focus, the three toys at the front right are also in focus. The unicorn in the middle is going out of focus and the purple dog at the end is way out.
For the middle shot I set the Focal Point to be the far left hand point, which lined up over the purple dog at the end. This reversed the focus of everything so that the front toys are out of focus & the purple dog is in focus. The unicorn, while still out of focus is clearer than in the first shot.
For my bottom shot I used the centre focal point over the unicorns eye and reframed. I had remembered from the Aperture Lessons that you should focus 1/3rd into the photo. So when I positioned the toys I deliberately put the eye of the Unicorn 1/3rd into the frame (I actually measured with a tape measure!). This ended up being the best shot of all. The slats of the cot, the front toys & the unicorn are all in focus. While the purple dog is still out of focus it isn't as bad as the first shot so I feel it is acceptable as it isn't as distracting and is part of the background.
@frankhymus Thank you Frank for your detailed information all so helpful, really enjoying the camrasavvy and certainly is helping me understand the camera and settings, so much to take in but I'm getting there I think :-)
All at F 5.6, ISO 100, Foc L 5mm. Aperture priority.
a, was 1/125, all focus points covering.
b, was 1/100, single point focused on centre top stone.
c, was 1/160, single point focused on the side moss, half focused and then whole shot recomposed.
c, was I think the best shot as the moss was sharper and the whole image better, the collage unfortunately doesn't quite show the whole shot.. I didn't quite understand why the single focus and then recomposing made the whole shot better than just the single focused point as only one single point was used in both shots. Why was that @myhrhelper. I hope to get a moving focus shot tomorrow, time and weather permitting.
@jennymallett Great work Jenny :) I think the main point of this challenge is to learn how to control focus when you need to be able to, and make decisions that will be most appropriate for what you're shooting, and I think you've illustrated this very successfully :)
@milaniet I would probably tend to agree with Charles' assessment on your page - that in the left shot, the camera has chosen to focus on the foreground. I like that - the flowers closest are in focus, and fade to a nice blur in the distance. I don't necessarily think this is a shot that "should" have been taken with a smaller aperture - it's really a matter of taste.
Unfortunately my screen is small so when you say "dandelion" I can see a whitish dot in the middle distance??? (Sorry!) And it looks to be in focus, so I think you've ticked the box. But I suspect the reason this doesn't "work" so well is that your focal point also needs to be easily recognisable as such - ie. in Laura's @lstasel example above, there is no question that this is an image of a squirrel, and that his eyes are in focus is exactly what you would want and expect. So in your right shot, being of a gorgeous field of flowers, it's hard for the viewer to understand that that tiny whitish dot is meant to be your focal point, if that makes sense? I think it would "work" better as an image if you either zoomed in or got closer, and filled the frame with more of the dandelion, keeping your wide aperture and creating a lovely purple blur around it. In keeping with the idea of the challenge, you could focus on the dandelion, and then move it to the left or right of your frame but still being your focal point. I hope this makes sense/is helpful?
@jennymallett This was a wonderful practice and it is especially great to see that you were able to not only apply this lesson on focus but previous camera setting challenges.
Also if you can perhaps post the images individually rather than as a collage (you can use an old date that you don't have an image on such as dates before you ever joint 365 and show each one individually.
@jennywren Fantastic practice here. My opinion is the third image is better because the point of focus you selected is just a more interesting looking photo. It is difficult to tell with colleges - I try to make my screen bigger to view better. If you like you can always show multiple images here instead of a collage - especially since you have an ace account. You can always use an old date that you don't have an image of your project on.
@adayinmallacoota Love this image you are doing fantastic! I love the the texture of the ground you were able to get in focus as well and the water a beautiful blur. Wonderful to see you are even stepping past what we are covering in this challenge and learning additional settings on your camera
@alisonp@frankhymus@myhrhelper I'm just getting to the thread this weekend and want to thank you for raising this question. I set my camera up just as you have, Alison. When I shift to the 39 points and the other options, I find that I can't get the focus right quickly enough. I'm so glad you've raised this as this is my weakest point when it comes to images. I depend on AF because of my horrible vision without glasses and really need to sort this out! Frank has helped me set it up for the focal points, but now I need to connect it to AF-C and AF-S. It's tough!
@taffy Hi Taffy. Tell me about blind without glasses!
With AF-S (single servo), just select "S" area mode and not AUTO. The area mode is set by holding the AF button and twirling the front dial between options. Half press the shutter to activate the metering/focus system and you'll see the active focus point. You can move it around with the multi-selector if the Lock (around the multi selector) is not engaged. Select the center one if not already and (optionally) lock it so you don't accidentally move it. And you are good to go with single point focus and re-framing.
In AF-A (or AF-C), you can select a number of dynamic area modes (d9, d21, d39), AUTO (I wouldn't use this) and the important 3D tracking. With the dynamic area modes, the camera will try to focus and keep focused on the chosen focus point and will only ever show one. Again I always use the center one, but if the subject moves, or your camera moves, the camera will use information from the surrounding points (9, 21, 39) if it can't keep locked on the original subject. Remember, you will NOT see the points around the center and which one is currently "best." It takes time to sort this out, so depending how fast your subject might be moving, choose the minimum number of points necessary to track for this shot.
With 3D tracking, again use the (one) chosen point to lock on to the subject, but this time if the subject moves (or the camera moves) the active focus point actually changes to "track" the original subject. You can see it move, unlike the dynamic modes. It uses more technology to track than do the dynamic area modes, color, contrast, distance. It can be occasionally fooled if a similar color object moves on top of the original subject and will re-lock to that. Same colored jersey on the same sports team is the classic case. Some old-time Nikon users don't like this mode for that very reason and use dynamic area instead. This tendency has become less and less possible with every new camera Nikon come out with, and is excellent with the D610. And by the way *superb* with the D750, best in class by a long way.
3D Tracking requires that your lens provides the camera distance information. All modern Nikkor lenses do. I found this out on Saturday when I attached a x2 teleconverter to my 70-200, and puzzled forever wondering why I now didn't have a 3D tracking area option. The teleconverter must not transmit distance information; I must check for sure with Nikon this week.
You can experiment with AF-A/AF-C and 3D tracking with a stationary subject. Lock on to a subject and then move the *camera* as though to reframe. The focus point will move, tracking the original subject. Indeed, some might use this in place of the AF-S Single Point lock and re-fame basic method. And people who shoot all the time in AF-A might elect to do so.
For non-Nikonites, your camera will have different options with different names and (possibly) different behavior.
If you are still unsure, please email and we can talk more about it more if you care to. All the best.
F7.1 Iso 100, 1/500 sec. FL 135 Aperture priority and Al servo.
Only had time to quickly shoot these two shots in the garden. The birds were way up high so cropped right in. It was hard to focus and track them but I thought the camera did quite well. Hope to try a vehicle for a better subject.
Same setting as previous shot except for S/S now 1/640. The photos are not really sharp but not bad for the distance. I like the stick in the beak of this crow. Any comments or suggestions appreciated if time.
@jennywren Hi Jen. These shots can be awkward to shoot, and the initial focus lock can be difficult, especially even to find the subject with a long telephoto. So good job. Here's one of mine from Saturday that turned out quite well; I don't shoot a lot of this sort so I was quite pleased.
AF-A/3D Tracking (Nikon camera), 200mm on an APS-C body, f/5.6 and ISO AUTO, giving ISO 100 and 1/640 shutter in the excellent light conditions, probably very similar to yours.
@frankhymus Great, I just printed this out as it does make sense to me. I'm going to go somewhere this afternoon as it's beautiful outside -- sunny at least, though I don't know how cold. I'm taking your directions with me. Thank you for your patience! I don't know why I have such a block about this!
@frankhymus Thanks for your positive comment, I meant to say that I was set on auto ISO too. Great shot of the seagull, the longer lens is certainly a plus. I wondered if I should have used the 5.6 aperture as recommended instead of the 7.1, I am not sure quite why I had that setting. Previously I did use the action setting with the 5.6 aperture, I also used the centre focus point, it was quite difficult to focus on the bird.
@jennywren Thanks for liking Jonathan! 7.1 versus 5.6? It would matter little. I just have my aperture set f/5.6 in A (Av) as a usual starting point for most shots. Have you heard of the "sweet spot" concept? It would say that most lenses, even the best, have an aperture at which they seem to provide the sharpest images and least distortion. It is usually about 2 or 3 stops up from wide open, somewhere between 5.6 and 8 usually. "Not too hot and not too cold. Just right." :)
Panning Car- Was taking this shot at 3 pm had problems with too much light the f/stop was at 6.3 and ISO was at 100. Took this phot at 5pm with a better result.
This was a focus and recompose shot:
ISO 100, f/2.8, 1/400s
I did try focusing without selecting a single point, but it didn't quite focus where I wanted. My entry-level Canon has the most sensitive focus point in the middle, so I selected that and shifted the scene to put the crocus on the bottom left. (I also cropped in the end because my lens couldn't focus quite as close-up as I wanted. Need a macro lens someday.)
I also tried out the AI-Servo mode a couple of times this week, but it did not stand up to my fast moving toddler. I'm going to continue trying to figure it out, though, because the boy never stops moving and it would be nice if I could get a few more shots in crisp focus!
f2.8, 1/640s, ISO 100 Aperture Mode, AFS
I focussed on the new growth so the surrounding leaves are out of focus which is what I was aiming for.
Now off to try the continuous focus mode!
@irene111 Irene this looks great. Panning shots are not at all easy to do but the vehicle is nicely in focus. It typically does take a lot of tries to get it right and imo you did
@sarahsthreads Love the gorgeous focus on the crocus! Nicely done. Good luck with the keeping up with a toddler lol. Actually, make sure you have your shutter speed on a fast setting or it is going to be blurring or just not a good crisp focus shot. Some challenges ago we talked about freezing action. Getting the perfect shutter speed you may want to try setting you shutter speed to 250 and adjust up/down from there. Can't wait to see what you come up with
@myhrhelper Yes, definitely. I had my shutter speed around 1/400 or faster and my aperture at around f/4.0 to give me a better shot at crisp focus but he's just fast. Or maybe I'm not understanding how to use that setting and should go get my manual out and re-read. Will definitely try again this week!
This is so relevant today; I wondered why I pressed the shutter half way and the focis kept changing. The camera wa in A1 servo in error. I usually like it in single shot mode or A1 focus but...what is the difference between those two? I understand the servo one as every time I moved the camera it annoyingly readjusted the focus.
This is a picture which I took once the focus was set on the daffodils. The DOF looks quite a lot too as I was using my 100mm macro lens for experimentation too.
@callymazoo Yes, you show the power of the technique. Your subject is far from the center of the frame. Some folks might be surprised to see the background blur, and a little in the foreground too, but when the background is 3-4 times the distance behind the subject as the subject is from the camera, you'll get nice blur at almost any aperture. You can look back on previous challenges, the DoF one especially, and check up on the "hyperfocal distance" concept. 2/3 behind and 1/3 in front of the subject for the focus field, and if you are close to the subject as you can be with a macro lens, even twice that behind is not much at all.
@sarahsthreads Hi Sarah. I think you have the idea of focus and then recompose down nicely. It's a simple technique but very powerful and easy to use.
When you try AF-Servo, make sure you set Automatic AF Point Selection. The camera (the SL1) will try the center one first and then look around for more. See about P104/105 in your manual.
Remember that things will work as you want provided there is a focus point over the moving subject. You only have 10 of these in the center of the frame, and they are not very densely packed, so do your best, and don't get frustrated if the subject moves too rapidly. Put a longer lens on the camera and step back a little might help. And then be prepared to crop the result.
@myhrhelper Followed your advice of posting to an old date to avoid having to make a collage. Up till now I had never quite understood focus & recompose - I have used the toggle arrow buttons to get the focus where I want it but this can be rather fiddly, and I persevered with focus & recompose as per your instructions today. And managed to focus first on the front tulip and then on the back :) My OMD offers S-AF and S-AF MF - I've always had it on the latter but used S-AF today. Not sure if it makes much of a difference? As for a moving target, I have C-AF and C-AF TR - any idea which I would try? Seems like Olympus is a bit different from Nikon & Canon. Many thanks to all you folk who help out here - it's a great service and much appreciated :)
Went back and re did the challenge in it's entirety. I knew a lot of the info but going thru and doing the challenge all at once really reinforced my knowledge. In particular, I really understand the difference between 3-D and dynamic AF-area modes. Settings: AF-C, 3-D tracking, f/4.5, 1/60. Thank you for giving us 2 weeks!!
Thanks for giving us two weeks! I needed the time. I finally had a chance to "focus" on this lesson (ouch). I had never explored this "moving target" focus setting on my camera, so thank you!
Here is the shot using my "auto focus on a moving target" option:
I also used the single focus option to select a near point focus and a further point focus:
@pistache Hi, Clare! We both use Olympus cameras, so I just learned more about mine (and yours) today.
When you open up the AF menu, the following choices are available (reading from left to right, titles appear above as you scroll through):
S-AF = Single Autofocus
C-AF = Continuous Autofocus
MF = Manual Focus
Single AF + M = Single Autofocus and Manual focus (how this works, who knows???)
C-AF [TR] = Continuous Autofocus - Tracking.
I used the C-AF [TR] for my swimming wood duck shot today. It was great... tracked that chugging little fellow all around the pond, keeping him in focus as he moved along. :) I had never tried that setting before. I would recommend it highly for moving subjects, based on my experience this afternoon. Hope this helps!
@callymazoo I believe this is actually a setting on Cannon. I have never used it since I'm a Nikon user but from what I can tell it is sort of an auto type feature that you can use for single shots or continuous shooting with a moving subject. The camera will decide which mode you would need to use. My understanding is there may be a lag time with that feature. Again, I've never used it but doing a quick look up that is what I noticed.
For this challenge, and to learn better focus control I am suggesting to use either One shot (Single Nikon) or AL Servo. Since you typically use the single my personal challenge for you would be to experiment with the AL Servo which is going to track your moving subject once you lock it in (clicking shutter 1/2 way).
The daffodil photo is beautiful. I love the blurr bokeh you have in this shot.
@pistache Beautiful flowers and nice shot. I'm glad you showed these individually rather than in a collage so I was able to enlarge the photo and look at it. I like how you have the focus point on the nearest flower in the front and the flower in the back on the second shot. For this type of setting I think the focus on the closest flower ends up having the nicer effect since it also blurs the background out a little more as well.
As far as your camera settings:
The S-AF single would be the one we are talking about for this challenge.
Your camera offers the option to once you focus on your target you can fine tune it manually. I think this will really depend on how good your eye sight is. For me personally what I see as a sharp image when viewed as a small picture ends up being a bit blurry when it is full size on a computer screen. So I would trust the camera to get it in focus a bit more most of the time. I do use manual focus but then I use the viewer and enlarge it which we will be talking about soon in another challenge.
For this challenge you would use C-AF. The C-AF TR is your option of continuous tracking. I would recommend using the C-AF first and then after you have played with it switch it to the tracking and see if you like that option better. This ends up being a personal taste feature - some prefer the tracking others don't ever use. it. You can watch the Jarid Pollin video I posted earlier in the thread.
@dianen I looked at this beautiful dog photo full size and I love the focus you have here. As with people the focus should always be on the eye and the closest eye to the camera. I am excited to learn that you gaining a better understanding of the focus features since after all it is one of the most critical things to get right in photography. You can have great composition, a nice aperture, or freeze water in a crown but if the focus is not right it ends up being a bad image - even if one tries to cover it up in processing.
@frankhymus Oh my goodness, that's exactly where I went wrong. I've gotten hooked on manually selecting that center point, I didn't realized that AF-SERVO needed to be set on automatic focus selection.
(smacks head on desk and resolves to read the entire manual)
I will try again when if we can get outdoors and run around later this week! I'll also try with my kit lens, the longest prime I have is 40mm. Not that 18-55 gives me that much more length, but it's better than nothing!
@sarahsthreads :) Different Canon DSLRs have different feature content for "follow focus" it seems. This does appear to be the most effective way to do it with your SL1.
@rosiekerr Really very nice - you are right the duck shot looks fantastic. Now for you single focus dove shots this is where it really shows the difference of you being able to select where the camera focuses rather than the camera making that choice for you. Each shot does have a different feel to it and you could use either one as an interesting image. - well done on this challenge
I almost exclusively use single point focus with the focus point being in the center and recomposing. Rarely I will change the focus point, if the subject is stationary. I also use back button focusing as I tend to release the button otherwise. For this shot of the squirrel, if I had let the camera focus, it would have tried to focus on the window I was shooting through, or the tree branches in the foreground.
@cdean1956 great example of why having control over where you focus is better than what the camera chooses. Very well done!
I also lobe using back button focus and we are going to cover that in the future. I personally would not have selected that wide of an aperture for this specific shot. That is just for my own preference, but I would have preferred the squirrel to be in a little more focus but at f1.8 that is difficult.
@myhrhelper Thanks for the feedback. To be perfectly honest, I had been shooting something else and had set my aperture at f/1.8 for the look I was going for. When I saw the squirrel, I barely had time to focus and adjust the exposure, so I totally forgot to readjust the aperture. I do totally agree that it would have been better with a wider DOF.
I think this challenge is great and I have been trying out the different settings using my Olympus EM-5. I took some yesterday of my son riding his bike, he was going fast towards me. I was pleased with the focus of the first frames but after several frames the camera seemed to not be able to track. Maybe he was going too quickly.
Forgive me asking but I am new to this site and haven't worked out how to post a shot on this thread if I haven't already uploaded to my journal. Can someone give me instructions please?
@helenhelen First welcome to 365! So happy you are learning! You are not able to post photos unless it is on your site. And to post a photo on this thread from your journal go to the page with your photo. Under the photo you will see the date and to the right of that you will see a set of dots. Copy the code and paste.It really does take practice. It could be that you were not able to lock in the image,
@helenhelen This is wonderful - love the blur & bokeh on this shot. Are you able to then select a different part of the same scene to focus on?
@brianarmoured Brian the focus is very clear and I love the dof in this shot. I also love the color & lighting. Well done
@myhrhelper Thank you very much, I'd worked out how to post from my journal I just didn't realise that I could only post from there. I'm still hung up with the date thing from my alternative photo project. I understand you can add a shot to a backdated date if you want to post more so I've sorted that now I think.
Thanks for the comments on my photo, I would have taken another to match with a different focus but I didn't as I hadn't worked out how to post 2 photos. Thank you I do intend to follow the challenges in the future it's a very good way to learn.
Arggggg.... Just venting, is anyone familiar with a Lumix GH4.
I'm just looking at my user guide and there are so many settings for auto focus that I'm a little confused.
I understand the AFC and manual but there is one setting that has both AFS/AFF and I can't figure out how to choose one over the other.
There's also a AF/AE lock.... What is this???
Any guidance would be appreciated, in the meantime it's back to the user guide.
@helenhelen When I want to post two photos I will type my comments on a Word Document and the code for each. Then I copy and paste what I wrote in the thread
@deborah63
Rather than write a long description - I think these video clips will be very helpful to you. let me know if they were.The first video really goes into a lot of detail about the different modes, how to set them and lock the shots etc.
For this shot, I am using manual setting, speed 1/1250, F4.0, ISO auto, spot metering, al servo and continuous shooting. The small birds move very fast and and I cannot even use 1/1000 because the images would be very burry.
@rosiekerr Rosie thanks so much for that info. Nice to find a fellow Olympus user - and especially one who's so helpful! I will definitely try the tracking option. Your duck was amazing. Have had very little success with panning so far but I gather it can take some practice. Thanks for the encouragement :)
@myhrhelper Thanks so much for your input. Yes I prefer the focus on the front flower too - just tried the back one as part of the exercise. I thought the manual element offered the possibility of a manual tweak, as you explain - will await more info on that when we get there. Meanwhile continuous tracking is the order of the day :)
@alinz An easy place to find/change the setting on the D3200 is to look on the monitor screen and press the i button (at the bottom left hand side on the back of the camera) twice. Scroll down to the setting AF-A/AF-S/AF-C/MF (5th setting down), select and scroll through settings to get the one you want. I think that's all the steps.
Canon 700D
Aim: To focus on the yellow anthers of the hibiscus
Both Pics are F/5.
1st Pic used the Auto mode and therefore it focus on the petals.
2nd Pic used the Manual mode using the centre AF point. The yellow anthers & style was clear & sharp and the rest blurry. Happy with the result.
I will try to use the Continuous Focus, but it has been raining off & on all week.
@myhrhelper Thanks Kathy....I am the type of person that uses the Auto features eg Auto mode, lanscape & macro modes. Since I started 365 last year and reading & attending your 'lessons' I am starting to get out of comfort zone. Lately Im starting to get control of my camera...thanks :-)
Canon 700D
Aim: To shoot using various modes on my camera of moving car.
Top Left:
Used Auto mode
F/5.6 1/250 ISO-100
Bottom Left:
Used Sports Mode
F/5.6 1/1600 ISO-400
Top & Bottom Right side:
Used Manual mode & Al Servo with the centre AF only.
F/5.6 1/1250 (top) 1/1600 (bottom) ISO- 200
Verdict:
The Auto mode makes the car go blurry.
The manual mode with Al Servo made the cars more sharp compared to the Sports mode.
But I would like the background become more blurry like the bike photo above even if I increased the shutter speed it does not work. Thanks for your help.
@leestevo Hi Lee-Ann. If you want background motion-blur as you pan and track, you'll have to bring the shutter speed way down to 1/60 or less, so I think this is an ideal one for "S" (or Canon Tv) if that is what you want. To keep the moving car sharp, you'll have to pan smoothly and accurately, and would be best to go with single point AF and keep the focus point squarely on the cars as you pan. Good to see you are trying out a number of alternatives.
Did we talk about good panning technique? Basically, keep you arms in to your sides and swivel your upper body, keeping your hands and arms, and consequently the camera, locked so they don't move relative to your upper body.
@leestevo Hi Kathy I proud of this shot....a honeyeater through the shrubs using manual mode: AF centre point.
Used to always using the Auto focus, not any more....this AF centre point is so good. In my opinion the bird look so clear & sharp.
No editing at all
@leestevo @frankhymus
Panning - yes as Frank said the shutter speed would be slower:
Here is a little more information specifically about panning.
use a tripod
What settings should you use?
3] Your camera probably can shoot about 5 photos per second. Select the setting for that: burst or continuous high speed mode.
4] Select AI mode (Canon) or continuous focus (Nikon). Your camera will keep focussing for each shot, though you just keep the shutter button down. In other settings he just focusses once when you press the button.
5] Exposure? That all depends, though the exposure time should be longer than in normal situations. You want to register movement and so you don't want to freeze the situation. But for an express train passing by, you need other settings than a kid on a bike. The train will even get a blurred background with 1/60 second, the kid maybe needs 1/30. Anyhow, select shutter speed priority, start with 1/50 and try if you should change it into slower or faster. The aperture is not that important here and will be automatically selected when you select the exposure time.
5] The closer the subject, the more difficult you make it. Why? Because the focal distance changes extremely fast when shooting a train passing by on 4 meters distance. On the other side: when photographing a speedboat at 200 meters, you will have difficulty to get even some blur.
ADVANCED TIP:
1] Tripod users never should use the camera/lens stabilizer. A stabilizer tries to compensate vibrations by vibrate too, just in a different way. When you use a tripod, you have no vibrations and so the camera vibrations blur you photo! I admit I also forget more than once to switch it off.
All brands have stabilizers, they just all give it an other name. I checked for 4 brands. Canon has IS lensen, Nikon VR lenses, Sony steady shot lenses and Olympus has in-camera stabilizer. Just check your documentation if you don't know if you have a stabilizer and/or how to turn it off.
2] For panning you should turn off your stabilizer too. The vibrations the camera detects, is on purpose panning, which he'll try to compensate. Just try with and without and share your experiences!
There are even lenses with panning options. I know Canon tele has a stabilizer mode 1 and 2. Mode 1 is two axis, so the standard mode. Mode 2 only correct vertical vibrations, so perfect for panning. Just check your camera/lens!
@myhrhelper Image Stabilization... Nikon (Nikkor) lenses *will* automatically detect panning and only correct on the other axis with VR on, so definitely leave it ON while panning. For Nikon again, only engage VR Active (if your lens has it) if you are shooting from a moving or jolting platform; it corrects for big motion, and not for typically "small" camera hand shake. Again for Nikon, if you forget to disengage VR on a tripod, it doesn't matter much, the technology can detect "shutter shock" rather than "hand shake" and will almost always correctly compensate.
Other lens manufacturers can be different. Sigma I know, and perhaps should be turned off while panning. Or only engaged to detect motion 90 degrees to the horizontal panning action. (Type II rather than Type I). And definitely turn it off on a tripod, it's not "shutter shock detection" smart. Tamron basically behaves like Sigma.
Canon and others, I don't specifically know. Sony, especially, has Image Stabilization built into the camera not the lens, and the sensor itself moves to compensate, but I don't know what the caveats of when to turn on or off at all.
@myhrhelper@frankhymus thanks Kathy & Frank for your help & techniques. I have a Canon 700D and my Image Stabilization on/ off switch is on both of my lens (18-55mm & 55-250mm). I will try this panning this weekend.
@leestevo Cool! Best of luck. Most of what I said just above is Nikon specific, not Canon, so following Kathy's general guidelines would be best to start I believe.
I had a go using my camera on continuous focus and continuous shooting mode and here is the result. I didn't pan because of the angle but maybe I'd have got more movement if I had.
@helenhelen@kwiksilver I think you photos turned out well. The ideal with this focus mode is to be able to focus on a subject that is moving and both of you did that. The challenge really isn't panning but is only one technique that can be done with this mode. The key is to keep practicing and you will become more confident at it. These children are adorable by the way.
F5.6 S\s 1/4000, Auto Iso 8000, FL 135mm. Al Servo mode.
Cant remember if on single point focus or multiple.
Not the best photo but an opportune moment one while out around traffic. He wasn't going very fast but used the continuous focus mode and got him fairly sharp. Didn't manage to capture any descent shot using cars. I see in a comment that we should be on all points focus for this rather than the single one which I hadn't realised. Is that correct, or does it depend on the subject and place?
All the links you had for this challenge were very interesting and helpful.
My focus was on the chook on the right. Single focus mode. Reasonably happy with it. I also did practice a bit with the focus setting on continuous but still need a bit more work on that one! Haven't posted anything from that exercise. But have learnt a lot from this series. Thank you.
@jennywren Yu did very well - I agree he is very sharp which works best when using continuous focus for a moving subject.
For this type of shot it would be better to have a larger area to work with than one single point. I typically don't use single point when using continuous/Al Servo mode.
@adayinmallacoota This is done beautifully. Eye and chook are in focus. Feel free to post any other shots in this thread later but please use @myhrhelper so I know you posted.
Not sure if this is continuing but I finally got around to trying out the continuous tracking setting as encouraged by @rosiekerr. A mixed bag of results but I enjoyed having a go. Thanks to Kathy @myhrhelper and everyone else who pitched in with their advice and help - what a thread :)


http://froknowsphoto.com/super-secret-project-focusing-mode-explained/
https://photographylife.com/dslr-autofocus-modes-explained
https://www.youtube.com/watch?v=N-HICPTe5Ug
https://www.youtube.com/watch?v=EpFR_UYhOKY
http://www.exposureguide.com/focusing-modes.htm
http://www.digitalcameraworld.com/2012/09/04/how-to-use-autofocus-with-moving-subjects/
CameraSavvy
@acsstudios @adayinmallacoota @aecasey @aliha @alinz @alisonp @andrina @aponi @aquaina @autumneden2015 @barb_b @barbtatum @barneyone @berta @billy52 @bizziebeeme @blinkny @brigette @brittwd @bsheppard @callymazoo @candysiegmueller @cathieg @catsmeowb @ccb @cdean1956 @christophercox @clake @craazyal @cruiser @cynthiak @darylo @deb60 @deborah63 @deverest @dianen @dmcoile @dsp2 @elliotwb @emblegemble @fivefingerofdeath @francoise @frankhymus @froggie0628 @gabigabs @gai @grammyn @gratefulness @harts @homeschoolmom @houser934 @iqscotland @jannkc @jantan @jbd1962 @jennymallett @jennywren @jewelofdenial @jocasta @jocee @joeyl @julieco @juliedduncan @justaspark @kalm @karlow75 @kauaikris @kerrynz @kimmy15 @ksyvarth @kwiksilver @ladygator @lauramalone82 @leestevo @lensenvy @lfreeman1230 @libertylady @lifepause @linah @lizfawn @lsquared @lstasel @ludgate @luka365 @lynnb @lynnilou @maaayke @madamelucy @maishanny @melinareyes @miata2u @milaniet @motherjane @mpratt @mrslaloggie @musecreative @mzbull @mzzhope @nanderson @newbank @nickspicsnz @northy @nosarian @olivetreeann @omglooksquirrel @oreos808 @overalvandaan @pamknowler @panthora @paulam @paulaw @pistache @polarvrtx @psychegrrrl @quietpurplehaze @quintus @randystreat @rangerxenos @ribbet9 @rosie1610 @rosiekerr @salza @sarahsthreads @shazzym @slash @soseema @sparkle71 @squamloon @stepheesue @summerfield @susie1205 @taffy @tahoemb @thejazzyj @theresefriis @thistle @transatlantic99 @trinda @tstb @ukandie1 @voiceprintz @weebindi2 @wingwatcher @yaorenliu @zosimasy @jyokota
@camerasavvy
nothing gets past me nothing ;-)
Should I be changing back to AF-S [single] when not taking a shot of something moving? And should I be using more focal points?
Unless you have set the AF Area Mode (Nikon terminology) to something other than "S" (single point), AF-C, and AF-A for that matter, is almost pointless, since nothing will track outside that single focal point.
Interestingly, if you set AF-C (or AF-A) AND the Nikon 3D Tracking for the AF Area Mode (not any of the Dynamic Area modes) you can put the center point over the subject, half press the shutter and then move THE CAMERA to reframe. The focus point will shift automatically back to the one now over the original subject, just as if the camera was held steady and the subject had moved. At least it will try too. Your D7000 is not always totally accurate, especially in low light, and also might be a little slow to react. That is, IF there is a focus point now over the subject. Remember, the focus points don't cover the whole frame. There is a setting that makes the camera try to refocus quicker when tracking focus. Look on the Custom Menu, AF section, Focus Tracking with Lock On, setting a3 on my D7100. But if there is no real motion, the simpler AF-S will be more accurate and precise almost always.
Good shooting. But you seem to be doing remarkably well with your current operations, but I think it just overly complicates things for you. Also, I think you will get significantly longer battery life with the simpler AF-S setup.
I agree with most of what Frank said but I do have a couple additional things for you to think about.
1) yes to what Frank said there really isn't a point to use a single point when using continuous. I think center is probably ideal or using a large range of focal points since the D7000 offers up to 39pts. (That is the camera I have).
2) For single focus I will use center or single point frequently. The reason is I do a lot of portrait photography. I want that crisp clear focus on the eye. If you are using a wide aperture the center focus may not be good enough (at least for my taste).
3) As Frank mentioned the D7000 has been known to have some focus issues but for me I have not experienced too many issues with it but as he mentioned better lighting will help. But I find that to be true with focusing in general
I reset my AF to S and re-instated all 39 focal points.... I struggled ~ the camera was just hunting for something to focus on and it wasn't where I wanted it to be. So I reverted back to my one single focal point but did stick with the AF-S
To be fair I didn't follow the challenge fully so had nothing to compare on screen ~ I will do this tomorrow.
I focused on the white writing as the AF was having a fit and wouldn't focus on anything else
I hope to upload some shots soon...
@myhrhelper This shot was taken on shutter priority and continuous focus. Its not as sharp as I wanted. What AF point section would be best to use for birds in flight? Is that where I went wrong
My camera is Canon 7d Mark ii fairly new to this camera only had it 10 days now so may be there are other setting that I need to make as well?
You select your focus modes Auto, AF-S (single) or AF-C (continuous by turning the dial located on back of the camera top right)
Then you can dial in your available AF-S options which is AF-Auto or AF-S (this one allows you to adjust that point by tapping to the right, up, down, left of the button labeled ok.
Once you select AF-S
Your first image was awesome - great focus - the second was not but that is typical when shooting birds - it really takes practice.
Currently I have set ot to AF-S and a single focal point that I chose to position within the frame by using the right/left/up and down dial. This is what I have always done but tried the auto where the camera chose what it thought I wanted and the focusing was hunting through any one/few points of the 39, so I went back to single focus point that I choose.
What I have changed to my usual settings is AF-S over AF-C [that I always had set on my camera ~ for no reason other than I had it on it] and also used just the single focus point that I chose.
Because I use the single focus point I also find it beneficial to choose 11 focal points instead of 39 as this allows me to 'toggle' between points quicker.
All I did was switch from AF-A to AF-S. In AF-A it was definitely less sharp. I'm a little confused. For this challenge am I changing focus mode and focus point or just mode??
I get better results when I have control rather than the camera picking what should be in focus. So for this challenge - put your camera in AF-S (single - or one shot for Canon) then decide what do you want in focus and adjust the focus point to that point and take the photo. Then, move the focal point and take another shot. Some scenes you will notice a bigger difference. For example with the shot above with the bride & groom, the bride is in focus and the groom is not when using AF-S. For another shot I could have the groom in focus and the bride blurred.
Also keep in mind there are other factors that will effect how crisp your focus is. What is the lighting like? If it is too dark you may not have as clear of a focus. Also, what shutter speed are you using? If your shutter speed is too slow it may be less in focus hand held.
Left shot - F2.8 1/250 ISO 100
Right shot - F2.8 1/200 ISO100
I was just playing around with the focus modes when I took these shots. I am now going back to the manual to gain an understanding of the different modes.
I prefer the shot on the right as I like the focus on the foreground rocks.
Today I discovered what the AFF button on my camera does. It means Auto Focus Flexible and is designed to be used if there is going to be a change in direction of your subject ie animals or children. So when I spotted this heron I thought I would give it a try. In addition I also used burst mode to fire off a few rapid shots in succession. As this fellow was hopping around a bit, I am reasonably happy with how this turned out.
Firstly, did your camera have time (in the second shot) to focus with the shutter half down? I know that in the speed of getting "that" frame with moving objects it's easy to forget the simplest things. Of course you may have had your shutter half down for ages waiting for this moment ...
Secondly I think I saw a comment (for someone else), about whether the subject could have moved out from under the focus points, and I'm thinking that unless you have heavily cropped this image, that's unlikely to be the problem. I've never held a 7Dii but I know the coverage of focus points on the 7D is quite extensive (covers much more of the frame than my 6D) so I can't imagine the bird just isn't being covered by them! But being SO out-of-focus it also seems unlikely that the continuous focus just wasn't keeping up with the movement, which I guess is why I asked the question in my first point.
Thirdly re the top shot - is this the one you're referring to saying it's not as sharp as you wanted? I'm also trying to get a handle on how Canon's tracking system works (after watching Fro's video on the options Nikon use and a couple of exchanges with Frank) ... but to my eye it seems the water splash is pretty crisp, and the bird only slightly less so. I'm wondering if the tracking system is the one where the closest thing to the camera is what ends up being in focus? I also wonder whether the 7Dii (being so new, and the 7Ds being more geared toward wildlife/sport etc in general) that you may have some options that my 6D doesn't? @frankhymus Do you have any insights into this? Just thinking it might be worth trying a different tracking option if you have them?
But what is most interesting is on page 128, the iTR that is new (or adapted from the 1Dx it seems). Somewhat akin to the function of Nikon 3D Tracking, from reading the manual and other literature.
I'd try the "Expand AF Area Surround" and iTR and see what that gets for you.
I'll stay with my Nikon 3D Tracking though. It is reported, I have no first hand comparison experience, that currently Nikon just do it better. And offer the functions across the entire current DSLR product line down to the D3xxx. Here's one, reasonably unbiased, assessment. Also, it discusses much better than the manual the area and tracking options for the 7Dii, with nice big diagrams, and some practical explanations of ways to control the "sensitivity" of the tracking and refocus. Very nice fucntionality, more comprehensive than Nikon. Towards the bottom of the main text, above the "comments" of the bloggers.
http://www.dpreview.com/reviews/canon-eos-7d-mark-ii/6
@darylo also has recently upgraded to the 7Dii, and might be able to provide more information and advice.
The one on the left followed the settings for AF single-ONE SHOT and the right used the center AF point - both are supposed to be focused on the dandelion. They most definitely not sharp! I am totally lost on this one and would sure appreciate some thoughts.
In this shot below I focused on the squirrels head, right between his eyes. I used a shutter speed of 1/60 and f/8 for aperture. You will notice that his body is progressively more blurred. If I had used a smaller aperture (larger aperture number) I would have had more of his body in focus but I would have needed a slower shutter speed.
In the flower photo below I wanted just the rippled edge of the lily in focus so I used a single focus point, f/3.5 aperture and 1/40 shutter speed.
I hope this helps some.
I chose to photograph some stuffed toys in a cot, because I thought the camera would automatically focus on the slats of the cot when left to its own devices so I would see obvious difference in my shots.
The shot on top is full Auto Focus. The slats are in focus, the three toys at the front right are also in focus. The unicorn in the middle is going out of focus and the purple dog at the end is way out.
For the middle shot I set the Focal Point to be the far left hand point, which lined up over the purple dog at the end. This reversed the focus of everything so that the front toys are out of focus & the purple dog is in focus. The unicorn, while still out of focus is clearer than in the first shot.
For my bottom shot I used the centre focal point over the unicorns eye and reframed. I had remembered from the Aperture Lessons that you should focus 1/3rd into the photo. So when I positioned the toys I deliberately put the eye of the Unicorn 1/3rd into the frame (I actually measured with a tape measure!). This ended up being the best shot of all. The slats of the cot, the front toys & the unicorn are all in focus. While the purple dog is still out of focus it isn't as bad as the first shot so I feel it is acceptable as it isn't as distracting and is part of the background.
All at F 5.6, ISO 100, Foc L 5mm. Aperture priority.
a, was 1/125, all focus points covering.
b, was 1/100, single point focused on centre top stone.
c, was 1/160, single point focused on the side moss, half focused and then whole shot recomposed.
c, was I think the best shot as the moss was sharper and the whole image better, the collage unfortunately doesn't quite show the whole shot.. I didn't quite understand why the single focus and then recomposing made the whole shot better than just the single focused point as only one single point was used in both shots. Why was that @myhrhelper. I hope to get a moving focus shot tomorrow, time and weather permitting.
Unfortunately my screen is small so when you say "dandelion" I can see a whitish dot in the middle distance??? (Sorry!) And it looks to be in focus, so I think you've ticked the box. But I suspect the reason this doesn't "work" so well is that your focal point also needs to be easily recognisable as such - ie. in Laura's @lstasel example above, there is no question that this is an image of a squirrel, and that his eyes are in focus is exactly what you would want and expect. So in your right shot, being of a gorgeous field of flowers, it's hard for the viewer to understand that that tiny whitish dot is meant to be your focal point, if that makes sense? I think it would "work" better as an image if you either zoomed in or got closer, and filled the frame with more of the dandelion, keeping your wide aperture and creating a lovely purple blur around it. In keeping with the idea of the challenge, you could focus on the dandelion, and then move it to the left or right of your frame but still being your focal point. I hope this makes sense/is helpful?
Also if you can perhaps post the images individually rather than as a collage (you can use an old date that you don't have an image on such as dates before you ever joint 365 and show each one individually.
@jennywren Fantastic practice here. My opinion is the third image is better because the point of focus you selected is just a more interesting looking photo. It is difficult to tell with colleges - I try to make my screen bigger to view better. If you like you can always show multiple images here instead of a collage - especially since you have an ace account. You can always use an old date that you don't have an image of your project on.
With AF-S (single servo), just select "S" area mode and not AUTO. The area mode is set by holding the AF button and twirling the front dial between options. Half press the shutter to activate the metering/focus system and you'll see the active focus point. You can move it around with the multi-selector if the Lock (around the multi selector) is not engaged. Select the center one if not already and (optionally) lock it so you don't accidentally move it. And you are good to go with single point focus and re-framing.
In AF-A (or AF-C), you can select a number of dynamic area modes (d9, d21, d39), AUTO (I wouldn't use this) and the important 3D tracking. With the dynamic area modes, the camera will try to focus and keep focused on the chosen focus point and will only ever show one. Again I always use the center one, but if the subject moves, or your camera moves, the camera will use information from the surrounding points (9, 21, 39) if it can't keep locked on the original subject. Remember, you will NOT see the points around the center and which one is currently "best." It takes time to sort this out, so depending how fast your subject might be moving, choose the minimum number of points necessary to track for this shot.
With 3D tracking, again use the (one) chosen point to lock on to the subject, but this time if the subject moves (or the camera moves) the active focus point actually changes to "track" the original subject. You can see it move, unlike the dynamic modes. It uses more technology to track than do the dynamic area modes, color, contrast, distance. It can be occasionally fooled if a similar color object moves on top of the original subject and will re-lock to that. Same colored jersey on the same sports team is the classic case. Some old-time Nikon users don't like this mode for that very reason and use dynamic area instead. This tendency has become less and less possible with every new camera Nikon come out with, and is excellent with the D610. And by the way *superb* with the D750, best in class by a long way.
3D Tracking requires that your lens provides the camera distance information. All modern Nikkor lenses do. I found this out on Saturday when I attached a x2 teleconverter to my 70-200, and puzzled forever wondering why I now didn't have a 3D tracking area option. The teleconverter must not transmit distance information; I must check for sure with Nikon this week.
You can experiment with AF-A/AF-C and 3D tracking with a stationary subject. Lock on to a subject and then move the *camera* as though to reframe. The focus point will move, tracking the original subject. Indeed, some might use this in place of the AF-S Single Point lock and re-fame basic method. And people who shoot all the time in AF-A might elect to do so.
For non-Nikonites, your camera will have different options with different names and (possibly) different behavior.
If you are still unsure, please email and we can talk more about it more if you care to. All the best.
F7.1 Iso 100, 1/500 sec. FL 135 Aperture priority and Al servo.
Only had time to quickly shoot these two shots in the garden. The birds were way up high so cropped right in. It was hard to focus and track them but I thought the camera did quite well. Hope to try a vehicle for a better subject.
Same setting as previous shot except for S/S now 1/640. The photos are not really sharp but not bad for the distance. I like the stick in the beak of this crow. Any comments or suggestions appreciated if time.
AF-A/3D Tracking (Nikon camera), 200mm on an APS-C body, f/5.6 and ISO AUTO, giving ISO 100 and 1/640 shutter in the excellent light conditions, probably very similar to yours.
Panning Car- Was taking this shot at 3 pm had problems with too much light the f/stop was at 6.3 and ISO was at 100. Took this phot at 5pm with a better result.
ISO 100, f/2.8, 1/400s
I did try focusing without selecting a single point, but it didn't quite focus where I wanted. My entry-level Canon has the most sensitive focus point in the middle, so I selected that and shifted the scene to put the crocus on the bottom left. (I also cropped in the end because my lens couldn't focus quite as close-up as I wanted. Need a macro lens someday.)
I also tried out the AI-Servo mode a couple of times this week, but it did not stand up to my fast moving toddler. I'm going to continue trying to figure it out, though, because the boy never stops moving and it would be nice if I could get a few more shots in crisp focus!
f2.8, 1/640s, ISO 100 Aperture Mode, AFS
I focussed on the new growth so the surrounding leaves are out of focus which is what I was aiming for.
Now off to try the continuous focus mode!
Thanks Kathy I did delete heaps but I had fun...Thanks to 365 Project.!!!
This is a picture which I took once the focus was set on the daffodils. The DOF looks quite a lot too as I was using my 100mm macro lens for experimentation too.
Great white, gold and yellow of early spring.
When you try AF-Servo, make sure you set Automatic AF Point Selection. The camera (the SL1) will try the center one first and then look around for more. See about P104/105 in your manual.
Remember that things will work as you want provided there is a focus point over the moving subject. You only have 10 of these in the center of the frame, and they are not very densely packed, so do your best, and don't get frustrated if the subject moves too rapidly. Put a longer lens on the camera and step back a little might help. And then be prepared to crop the result.
Good shooting!
@myhrhelper Followed your advice of posting to an old date to avoid having to make a collage. Up till now I had never quite understood focus & recompose - I have used the toggle arrow buttons to get the focus where I want it but this can be rather fiddly, and I persevered with focus & recompose as per your instructions today. And managed to focus first on the front tulip and then on the back :) My OMD offers S-AF and S-AF MF - I've always had it on the latter but used S-AF today. Not sure if it makes much of a difference? As for a moving target, I have C-AF and C-AF TR - any idea which I would try? Seems like Olympus is a bit different from Nikon & Canon. Many thanks to all you folk who help out here - it's a great service and much appreciated :)
Went back and re did the challenge in it's entirety. I knew a lot of the info but going thru and doing the challenge all at once really reinforced my knowledge. In particular, I really understand the difference between 3-D and dynamic AF-area modes. Settings: AF-C, 3-D tracking, f/4.5, 1/60. Thank you for giving us 2 weeks!!
Here is the shot using my "auto focus on a moving target" option:
I also used the single focus option to select a near point focus and a further point focus:
When you open up the AF menu, the following choices are available (reading from left to right, titles appear above as you scroll through):
S-AF = Single Autofocus
C-AF = Continuous Autofocus
MF = Manual Focus
Single AF + M = Single Autofocus and Manual focus (how this works, who knows???)
C-AF [TR] = Continuous Autofocus - Tracking.
I used the C-AF [TR] for my swimming wood duck shot today. It was great... tracked that chugging little fellow all around the pond, keeping him in focus as he moved along. :) I had never tried that setting before. I would recommend it highly for moving subjects, based on my experience this afternoon. Hope this helps!
For this challenge, and to learn better focus control I am suggesting to use either One shot (Single Nikon) or AL Servo. Since you typically use the single my personal challenge for you would be to experiment with the AL Servo which is going to track your moving subject once you lock it in (clicking shutter 1/2 way).
The daffodil photo is beautiful. I love the blurr bokeh you have in this shot.
As far as your camera settings:
The S-AF single would be the one we are talking about for this challenge.
Your camera offers the option to once you focus on your target you can fine tune it manually. I think this will really depend on how good your eye sight is. For me personally what I see as a sharp image when viewed as a small picture ends up being a bit blurry when it is full size on a computer screen. So I would trust the camera to get it in focus a bit more most of the time. I do use manual focus but then I use the viewer and enlarge it which we will be talking about soon in another challenge.
For this challenge you would use C-AF. The C-AF TR is your option of continuous tracking. I would recommend using the C-AF first and then after you have played with it switch it to the tracking and see if you like that option better. This ends up being a personal taste feature - some prefer the tracking others don't ever use. it. You can watch the Jarid Pollin video I posted earlier in the thread.
(smacks head on desk and resolves to read the entire manual)
I will try again when if we can get outdoors and run around later this week! I'll also try with my kit lens, the longest prime I have is 40mm. Not that 18-55 gives me that much more length, but it's better than nothing!
I also lobe using back button focus and we are going to cover that in the future. I personally would not have selected that wide of an aperture for this specific shot. That is just for my own preference, but I would have preferred the squirrel to be in a little more focus but at f1.8 that is difficult.
Forgive me asking but I am new to this site and haven't worked out how to post a shot on this thread if I haven't already uploaded to my journal. Can someone give me instructions please?
@helenhelen This is wonderful - love the blur & bokeh on this shot. Are you able to then select a different part of the same scene to focus on?
@brianarmoured Brian the focus is very clear and I love the dof in this shot. I also love the color & lighting. Well done
Thanks for the comments on my photo, I would have taken another to match with a different focus but I didn't as I hadn't worked out how to post 2 photos. Thank you I do intend to follow the challenges in the future it's a very good way to learn.
I'm just looking at my user guide and there are so many settings for auto focus that I'm a little confused.
I understand the AFC and manual but there is one setting that has both AFS/AFF and I can't figure out how to choose one over the other.
There's also a AF/AE lock.... What is this???
Any guidance would be appreciated, in the meantime it's back to the user guide.
Rather than write a long description - I think these video clips will be very helpful to you. let me know if they were.The first video really goes into a lot of detail about the different modes, how to set them and lock the shots etc.
https://www.youtube.com/watch?v=XYfXmlQsW1c
https://www.youtube.com/watch?v=jNMV4HH2xmM
https://www.youtube.com/watch?v=6mz83ZVE4Yw
For this shot, I am using manual setting, speed 1/1250, F4.0, ISO auto, spot metering, al servo and continuous shooting. The small birds move very fast and and I cannot even use 1/1000 because the images would be very burry.
Canon 700D
Aim: To focus on the yellow anthers of the hibiscus
Both Pics are F/5.
1st Pic used the Auto mode and therefore it focus on the petals.
2nd Pic used the Manual mode using the centre AF point. The yellow anthers & style was clear & sharp and the rest blurry. Happy with the result.
I will try to use the Continuous Focus, but it has been raining off & on all week.
Your a life saver.... Thank you so much.
Canon 700D
Aim: To shoot using various modes on my camera of moving car.
Top Left:
Used Auto mode
F/5.6 1/250 ISO-100
Bottom Left:
Used Sports Mode
F/5.6 1/1600 ISO-400
Top & Bottom Right side:
Used Manual mode & Al Servo with the centre AF only.
F/5.6 1/1250 (top) 1/1600 (bottom) ISO- 200
Verdict:
The Auto mode makes the car go blurry.
The manual mode with Al Servo made the cars more sharp compared to the Sports mode.
But I would like the background become more blurry like the bike photo above even if I increased the shutter speed it does not work. Thanks for your help.
Did we talk about good panning technique? Basically, keep you arms in to your sides and swivel your upper body, keeping your hands and arms, and consequently the camera, locked so they don't move relative to your upper body.
Used to always using the Auto focus, not any more....this AF centre point is so good. In my opinion the bird look so clear & sharp.
No editing at all
@frankhymus
Panning - yes as Frank said the shutter speed would be slower:
Here is a little more information specifically about panning.
use a tripod
What settings should you use?
3] Your camera probably can shoot about 5 photos per second. Select the setting for that: burst or continuous high speed mode.
4] Select AI mode (Canon) or continuous focus (Nikon). Your camera will keep focussing for each shot, though you just keep the shutter button down. In other settings he just focusses once when you press the button.
5] Exposure? That all depends, though the exposure time should be longer than in normal situations. You want to register movement and so you don't want to freeze the situation. But for an express train passing by, you need other settings than a kid on a bike. The train will even get a blurred background with 1/60 second, the kid maybe needs 1/30. Anyhow, select shutter speed priority, start with 1/50 and try if you should change it into slower or faster. The aperture is not that important here and will be automatically selected when you select the exposure time.
5] The closer the subject, the more difficult you make it. Why? Because the focal distance changes extremely fast when shooting a train passing by on 4 meters distance. On the other side: when photographing a speedboat at 200 meters, you will have difficulty to get even some blur.
ADVANCED TIP:
1] Tripod users never should use the camera/lens stabilizer. A stabilizer tries to compensate vibrations by vibrate too, just in a different way. When you use a tripod, you have no vibrations and so the camera vibrations blur you photo! I admit I also forget more than once to switch it off.
All brands have stabilizers, they just all give it an other name. I checked for 4 brands. Canon has IS lensen, Nikon VR lenses, Sony steady shot lenses and Olympus has in-camera stabilizer. Just check your documentation if you don't know if you have a stabilizer and/or how to turn it off.
2] For panning you should turn off your stabilizer too. The vibrations the camera detects, is on purpose panning, which he'll try to compensate. Just try with and without and share your experiences!
There are even lenses with panning options. I know Canon tele has a stabilizer mode 1 and 2. Mode 1 is two axis, so the standard mode. Mode 2 only correct vertical vibrations, so perfect for panning. Just check your camera/lens!
Other lens manufacturers can be different. Sigma I know, and perhaps should be turned off while panning. Or only engaged to detect motion 90 degrees to the horizontal panning action. (Type II rather than Type I). And definitely turn it off on a tripod, it's not "shutter shock detection" smart. Tamron basically behaves like Sigma.
Canon and others, I don't specifically know. Sony, especially, has Image Stabilization built into the camera not the lens, and the sensor itself moves to compensate, but I don't know what the caveats of when to turn on or off at all.
Canon 600D, Tv, 1/500s, f7.1, ISO 100, continuous with AI Servo.
F5.6 S\s 1/4000, Auto Iso 8000, FL 135mm. Al Servo mode.
Cant remember if on single point focus or multiple.
Not the best photo but an opportune moment one while out around traffic. He wasn't going very fast but used the continuous focus mode and got him fairly sharp. Didn't manage to capture any descent shot using cars. I see in a comment that we should be on all points focus for this rather than the single one which I hadn't realised. Is that correct, or does it depend on the subject and place?
All the links you had for this challenge were very interesting and helpful.
My focus was on the chook on the right. Single focus mode. Reasonably happy with it. I also did practice a bit with the focus setting on continuous but still need a bit more work on that one! Haven't posted anything from that exercise. But have learnt a lot from this series. Thank you.
For this type of shot it would be better to have a larger area to work with than one single point. I typically don't use single point when using continuous/Al Servo mode.
@adayinmallacoota This is done beautifully. Eye and chook are in focus. Feel free to post any other shots in this thread later but please use @myhrhelper so I know you posted.
I think we are all trying to help others learn - I know you are passionate about it yourself.
Flying ducks on continuous focus (A-Servo in Canon.) Rather cropped to see that there is definition somewhere!
@callymazoo I think that is a good example of needing the tracking feature of the continuous focus - They look in focus to me.